Business Value
When you need to create purchase documents from a file, you can use Excellent Importer to speed up the process. Excellent Importer allows you to use item references to handle scenarios where your item codes differ from your vendor's.
Possible Scenarios
Here are some possible scenarios where you might use this feature to import purchase documents:
- Purchase orders from a replenishment system with no integration to Business Central.
- Purchase invoices from your vendors. For example, you could import time sheets from your contractors. Look at our example below with our fictional vendor - Transportation Plus.
- When you do not have an expense management solution to handle company credit cards, you can set up for Credit Card as a vendor and import expenses from the credit card statement.
- Initial loading of open purchase orders for a new Business Central company.
Feature Details
The Import action can be found in the lists:
| List |
|---|
| Purchase Quotes |
| Purchase Orders |
| Purchase Invoices |
| Purchase Credit Memos |
| Purchase Return Orders |
Settings

Document No. as Posting No.
This setting allows you to use the imported Document No. (if present) as the Posted Document No.
| Value | Description |
|---|---|
| No | Business Central will assign a number while posting the document. This is the default option. |
| Yes | Use the imported document as the posted document number. You use this setting if you want to keep the document number on the posted entries that will get created when you post the imported documents. |
Replace with Document No. from Series
| Value | Description |
|---|---|
| Yes | The imported document number gets replaced using the number series specified in the setup. |
| No (Default) | The imported document number gets used for the imported documents. |
Release Documents
This setting allows you to specify that the imported documents should be released or sent for approval after they have been imported.
| Value | Description |
|---|---|
| Yes | Release the documents or send them for approval after importing. |
| No (Default) | Do not release or send for approval. |
Update Header Dimensions
| Value | Description |
|---|---|
| Use First Line | The app will update the purchase header using the dimension set specified on the first purchase line. |
| Use values from all lines | The app will update the purchase header using the dimensions from the first line, and then, for each successive line, it will add a dimension value if not already specified on the header. For example, if the first line specifies only the department and then the second line specifies the department and the project, the header will be updated with the department of the first line and the project of the second line. |
| Use Default and values from all lines | Similar to the previous setting except that the dimension set on the header does not get replaced by the first line - the first line adds to the values. This gives priority to the dimensions that are defaulted onto the purchase header. |
| No | Use only the default dimensions for the header. |
Aggregate Lines
| Value | Description |
|---|---|
| No (Default) | Create a new line for each entry imported from the file—no aggregation is performed. |
| Yes - (Ignore Dimensions) | Automatically combine lines with matching key fields (item, variant, unit of measure, location, bin, unit price, posting groups, etc.), ignoring dimensions. |
| Yes - (Per Dimension) | Aggregate lines only if the key fields and the dimension set match. Lines with different dimensions will not be combined, ensuring dimension-specific reporting and control. |
You can read more about the aggregation feature here.
Negative Document Totals
This setting allows you to specify how to handle documents when the total value is negative and will enable you to Ignore, Skip, Cancel and Change Document Type. You can use this setting when importing purchase documents from another system when the file includes orders and returns. It allows you to import the file with a single process - rather than split the file and process two separate imports.
| Value | Description |
|---|---|
| Do not Validate | This is the default setting where the app imports the file without checking the totals. Use this setting when you are sure that the file only contains records for the same document type. |
| Skip during Import | Use this setting if you want the app to check the total and skip documents that have a negative total. |
| Cancel Import | Use this setting if you want the app to check the total and raise an error if the document total is negative. |
| Order/Invoice to Credit | Use this setting if you want the app to change the document type of negative documents. For example, if you import a file containing orders and returns into either purchase orders or invoices, the app will create credit memos for the documents with negative totals. |
| Order/Invoice to Return/Credit | Use this setting if you want the app to change the document type of negative documents. For example, if you import a file containing orders and returns into purchase orders, the app will create return orders for documents with negative totals. The app will create credit memos for negative documents when importing into purchase invoices. |
Common Settings
Custom Values
You can use Custom Values to:
- Create multiple purchase lines from one imported line. For example, the file may contain a charge for freight that you want to show as a separate line. You can read more about this here.
- Create comment lines above or below the imported line using a column from the file. You can read more about this here.
- Add comment lines to the beginning or end of the entire purchase document. You can read more about this here.
- Handle other custom logic, which you can add by extending Excellent Importer.
Document Grouping
When you import a file, the app groups lines into documents differently depending on the following scenarios.
- If one field you mapped is the document number, the app will group lines by Document No., Currency Code, Buy-from Vendor No. and Pay-to Vendor No..
- If no document number is mapped, the app groups lines by Vendor Invoice No., Vendor Cr. Memo No., Currency Code, Buy-from Vendor No. and Pay-to Vendor No..
Line Amount/Direct Unit Cost/Quantity
Some files contain only a quantity and a Line Amount. The app checks for this while importing a line, and if it finds that a line has a non-zero Line Amount and a zero Direct Unit Cost, it will calculate the Direct Unit Cost for you. The following applies when there is a non-zero Line Amount and a zero Direct Unit Cost:
- If Quantity = zero, then the app assumes 1; otherwise, it uses the Quantity on the line.
- The app then calculates the Direct Unit Cost as:
- Direct Unit Cost = Line Amount / Quantity (if no Multiplier specified)
- Direct Unit Cost = (Line Amount * Multiplier) / Quantity (if you specified a Multiplier)
- The app then rounds the calculated Direct Unit Cost using the Rounding Precision specified for the Line Amount. Therefore, in this instance, we recommend specifying the Unit Amount Rounding Precision for the Line Amount on your mapping template (usually 0.00001).
Item Tracking (Lot, Serial and Package Number)
This import supports lot, serial and package number tracking for items that require item tracking functionality.
Lot No. Information
If you have a Premium subscription plan for Excellent Importer you can also import lot number information. The app creates lot number information only when your imported file contains values mapped to the lot information fields.
Longer Descriptions
Purchase lines in Business Central have a 100-character limit for the Description field. However, Excellent Importer allows you to import descriptions up to 150 characters by automatically splitting longer text between the Description and Description 2 fields.
How It Works
To use both the Description and Description 2 fields, you need to map these fields in your template. When the value comes from the same column in your file, you can map the first 100 characters to Description and the next 50 characters to Description 2.
Excellent Importer automatically:
- Splits the text intelligently at word boundaries to avoid cutting words in half
- Places the first 100 characters (or less, to preserve whole words) in the Description field
- Places the remaining text in the Description 2 field
Setting Up Your Template
To use this feature:
- In your Excel Mapping Template, map your description column to the Description field
- Set the Starting Position to 1
- Set the Length to 100
- Map the same column to the Description 2 field
- Set the Starting Position to 101
- Set the Length to 50
Excellent Importer will automatically handle the intelligent splitting at word boundaries when your description text exceeds 100 characters.
Examples
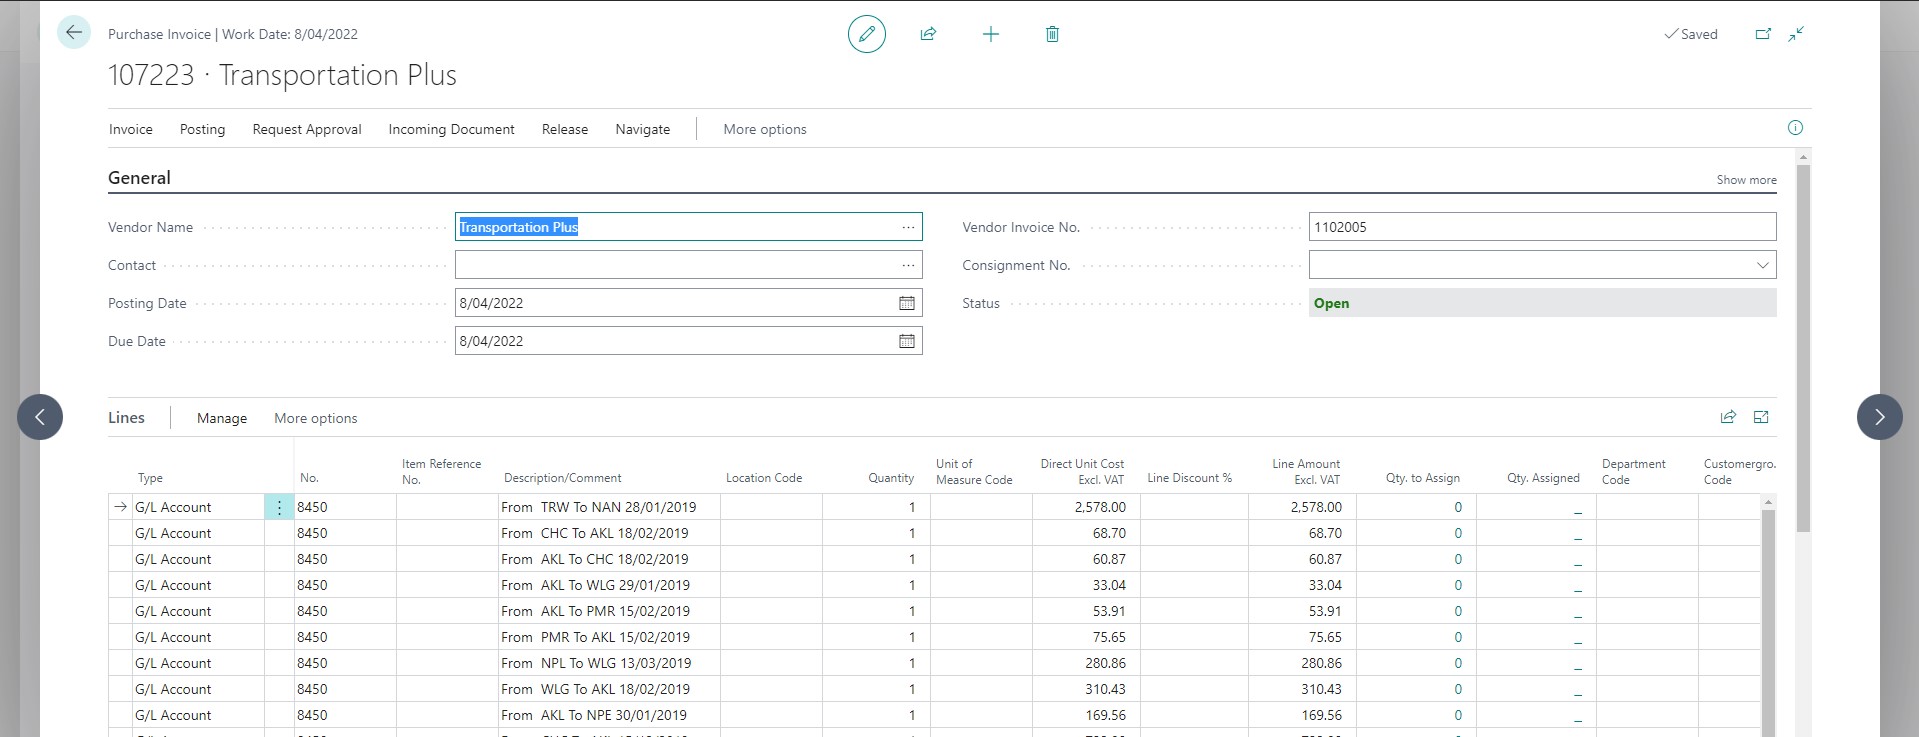
Import multiple purchase invoices from a vendor
In this example, we import a file that we received from our fictional vendor - Transportation Plus. This example includes using Account/Dimension Mapping to handle the mapping of the G/L Account, the GST/VAT and the Dimensions.
Excel file
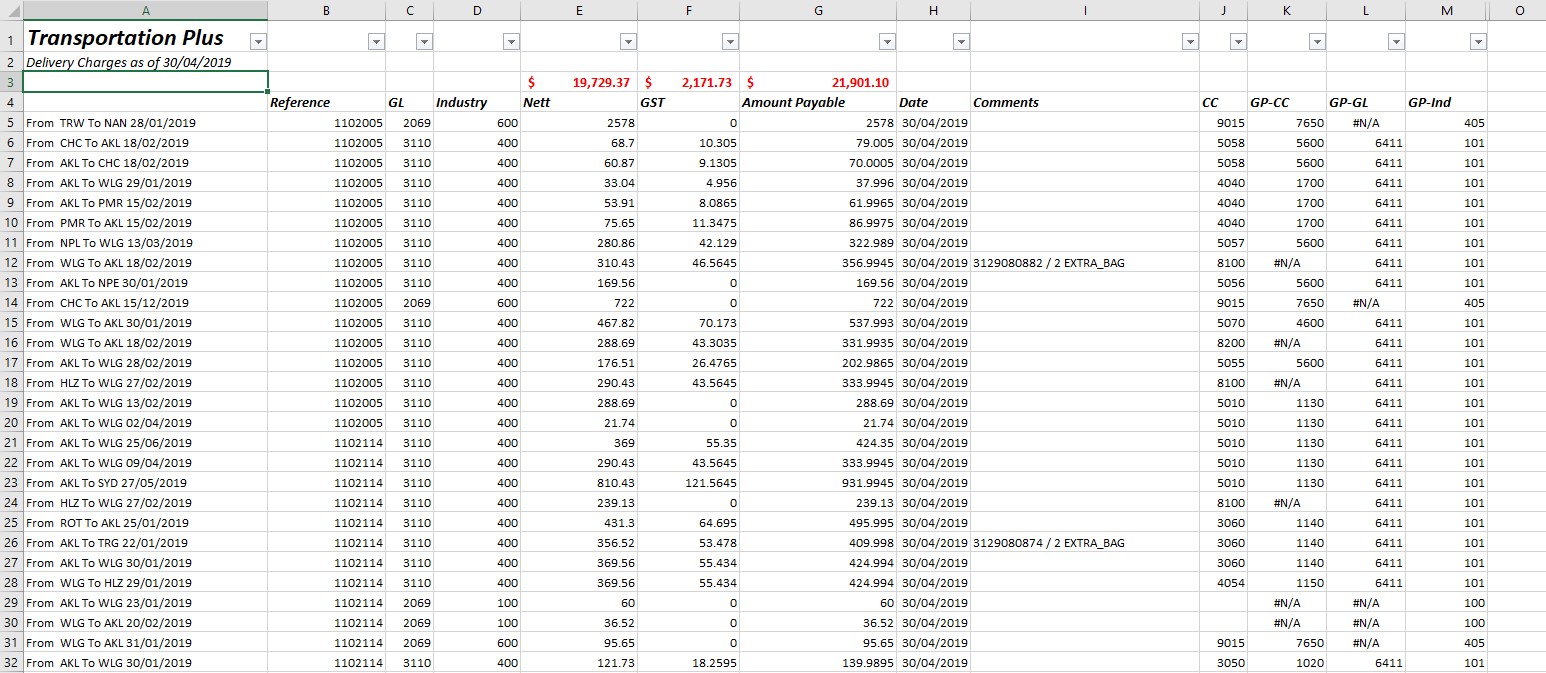
We will specified 5 for the First Data Row in the Excel Mapping Template because the first row of data we want to import is on row 5 of the Excel worksheet.
Excel Mapping Template
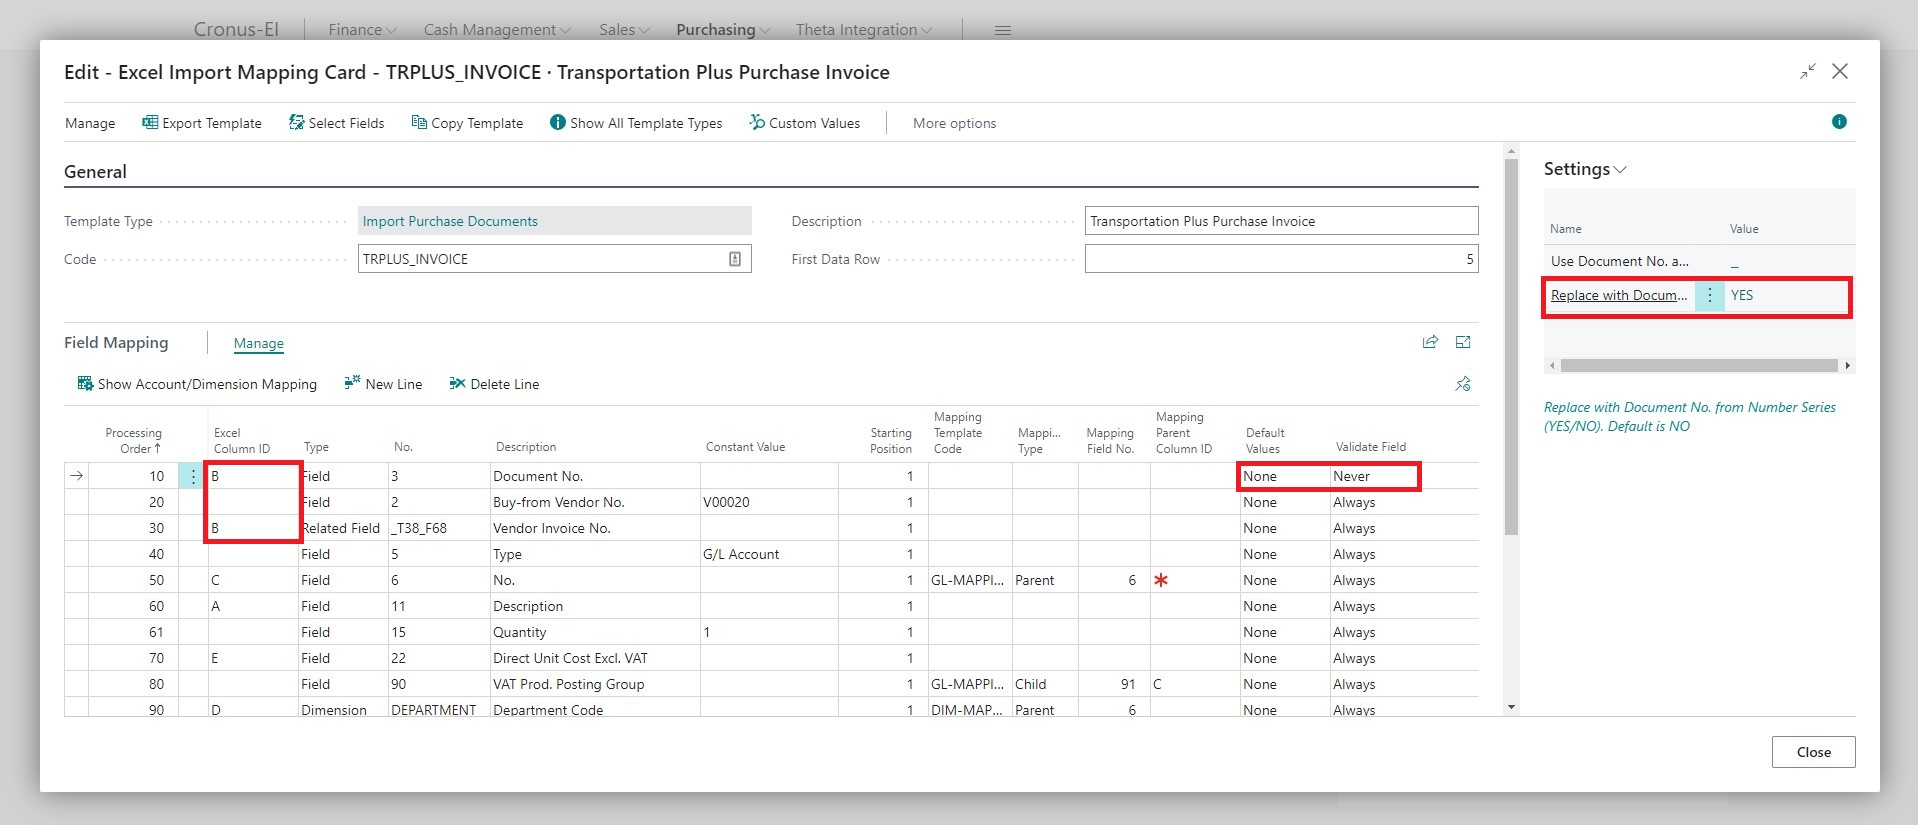
We use the Vendor Invoice number from column B in the Excel file for both the Document No. and the Vendor Invoice No.. We have done this because we want to create one Purchase Invoice in Business Central for every Invoice we receive from our supplier. However, we also want to use the Business Central document number series. We specified Yes for the Replace with Document No. from Series to achieve this result. To avoid receiving an error, we needed to select Never for the Validate Field on the document number mapping line.
The file that we will import comes from our vendor's system, and values such as the accounts and dimensions need to get mapped to our Business Central equivalents. We have used the Account/Dimension Mapping to handle this.
Imported Invoices - List
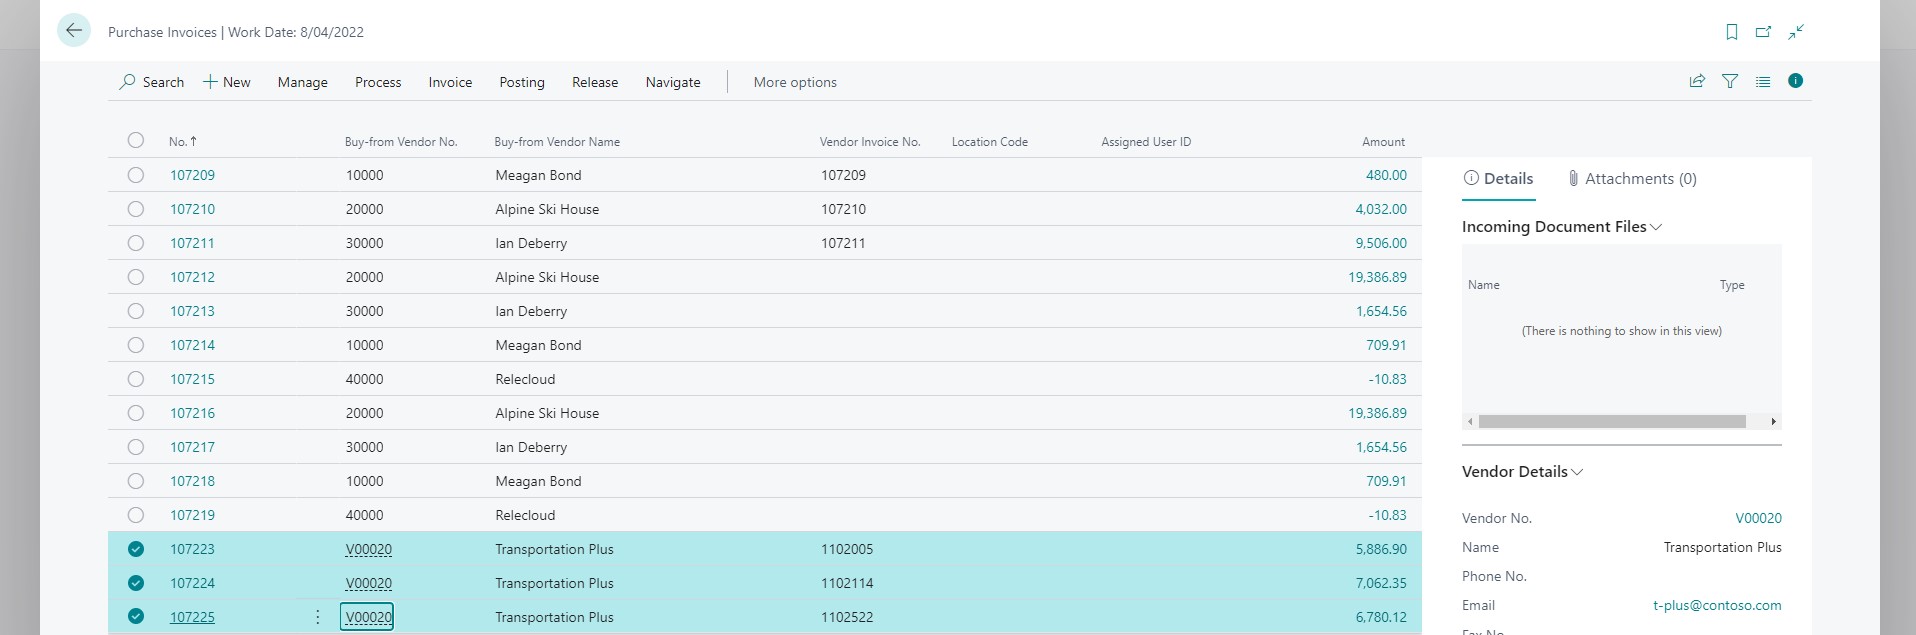
Excellent Importer created three invoices because the file we imported had lines spanning three vendor invoices.
Imported Invoice