General Journals
Business Value
Allows you to import General Journals from an Excel file in the format you receive the file. Use Excellent Importer to import expenses, payroll entries, adjustments, internal cost reallocations or any other entries that get posted to the general ledger. The general journal supports entries that post to your bank ledger, customer ledger, vendor ledger, fixed asset ledger, employee ledger and inter-company entries. You can also use Excellent Importer to import opening entries for new companies.
Possible Scenarios
Here are some possible scenarios where you might use this feature to import journals:
- Expenses from a different system, like Fraedom or Gorilla Expense.
- Petty cash expenses that you have recorded in Excel.
- Payroll entries that you have exported from your payroll system.
- Auditor's adjustments or IFRS adjustments.
- Internal cost reallocations - Look at our example below, where we reallocate expenses from our Admin department to Sales and Production using formulae that we added to our Excel spreadsheet.
- Consolidation entries for subsidiaries not using Business Central.
- Create opening balances for new companies in Business Central. This feature can import general ledger, customer, vendor, bank, and fixed asset journals. Our example below shows how to import opening customer entries.
- Import statistical entries using external data
Feature Details
The general journal import can be accessed from inside the journal using the Import action.
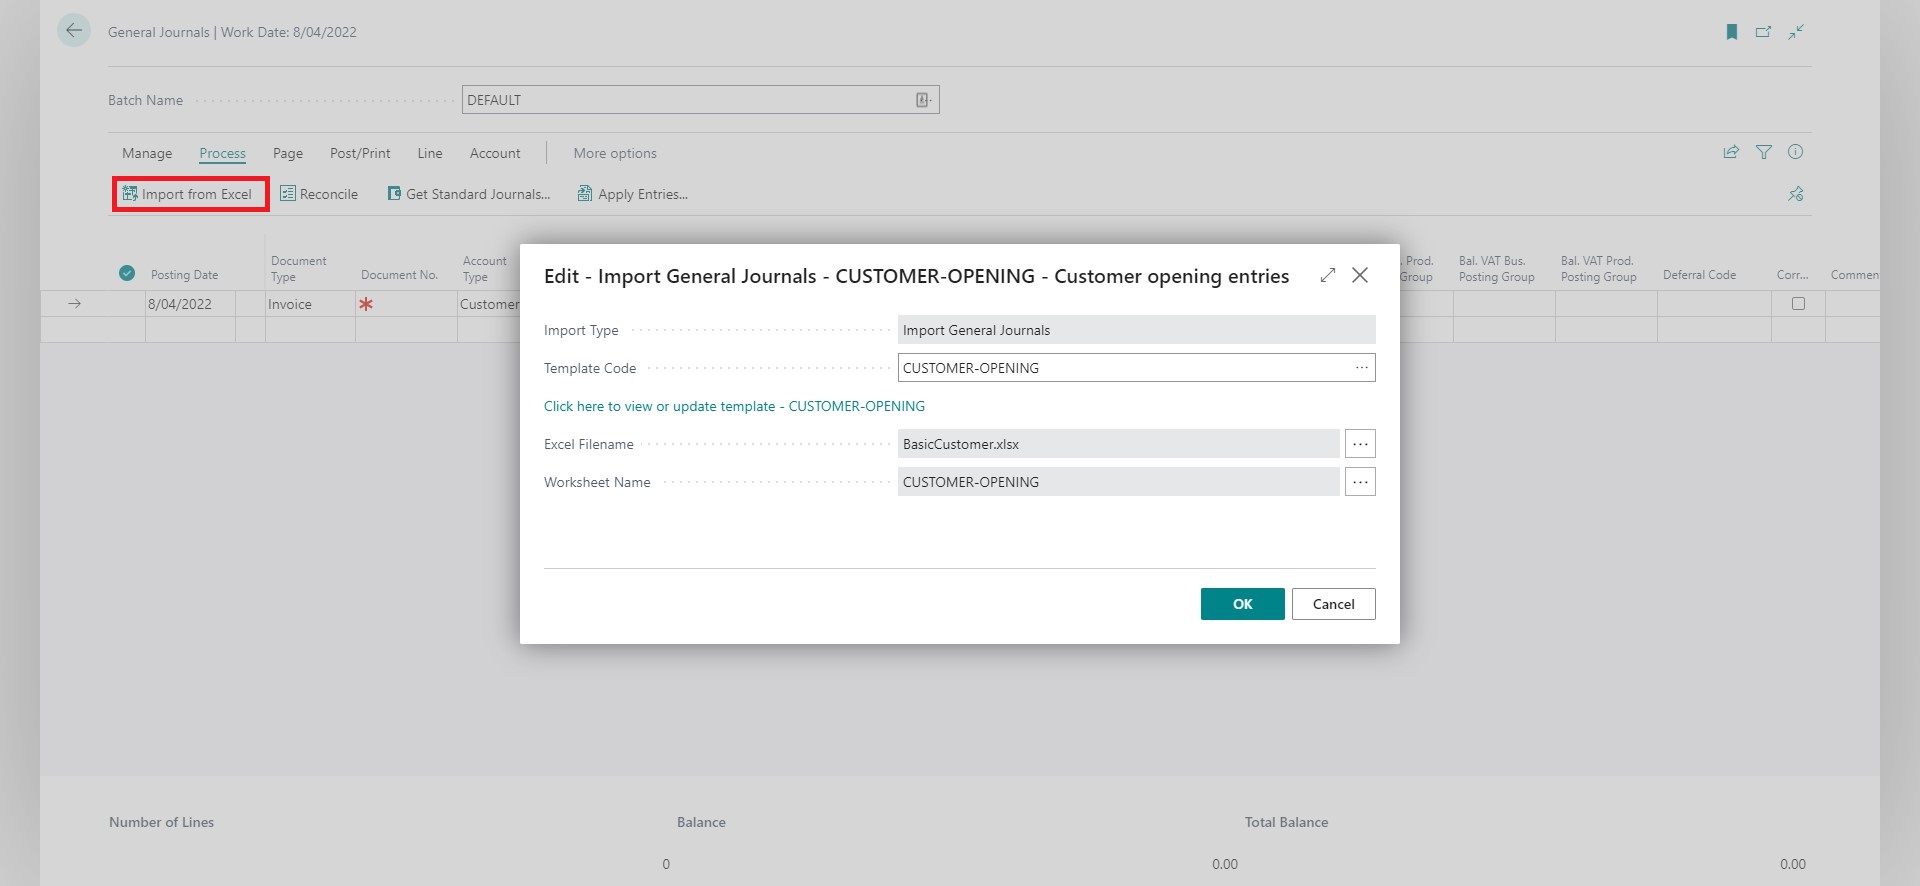
Supported Journals
You can find the Import action in the following journals:
| Journal | Description |
|---|---|
| General Journal | Used for month-end adjustments, payroll expenses, bank journals, etc. |
| Sales Journal | Process journals related to customers. |
| Purchase Journal | Process journals related to vendors. |
| Cash Receipt Journal | Process receipts from customers. |
| Payment Journal | Process payments to vendors. |
| Fixed Asset G/L Journal | Process journals related to fixed assets. You use this for FA Posting Types that are integrated to the general ledger. |
| Fixed Asset Journal | Process journals related to fixed assets. You use this for FA Posting Types that are **not **integrated to the general ledger. |
| Intercompany General Journal | Process entries that relate to intercompany parties. |
| Recurring General Journal | Process journals that recur regularly or accruals that need to be raised and automatically reversed in the next period. |
| Project G/L Journal | Process general ledger journals related to projects |
| Statistical Account Journal |
In Business Central, recurring journals do not get deleted after posting, so you don't always need to import them - it depends more on the setup of the recurring journal lines. If you have lines where the amounts are cleared out and need to get recaptured in the following period, consider importing the entries using Excellent Importer.
Settings
One Document No. per Batch
This setting allows you to specify that you want Business Central to use the same document number for each batch. This setting overrides the standard Business Central behaviour, where the number is incremented for each balanced transaction.
| Value | Description |
|---|---|
| No | The standard Business Central behaviour will apply when the document number is incremented for each balanced transaction. |
| Yes | The app will use the first document number assigned from the specified number series on the batch for all imported lines. |
The app will ignore this setting if you import a document number from the file.
Exclude lines with zero amounts
The purpose of this setting is to allow you to exclude lines with zero amounts.
| Value | Description |
|---|---|
| No | Imports all lines from the file, including lines that have a zero amount |
| Yes | Does not import lines that have a zero amount |
Dimension Code linked to Amount columns
Use this setting when a block of columns each contains amounts for a single dimension (for example, several department columns). It's handy for reallocations calculated in Excel where each amount column represents the same dimension but different values.

Set the setting to the dimension code (for example, DEPARTMENT). In the example below we allocate expenses from department "ADM" to departments "SALES" and "PROD". See Example 2 for configuration details.
When this feature is enabled, the app disables concatenation for the Amount field on that template.
You can achieve a similar result using the General Journal Add Additional Line Custom Value. Use the dimension-linked columns feature when the extra columns all represent the same single dimension. Use the Custom Value approach when columns map to different accounts or to multiple dimensions (for example, Department and Project).
Check for Empty Batch
This setting specifies that the batch you're importing into must be empty before the file can be imported. It is beneficial when using the API to import and post a journal, as it helps prevent accidentally posting lines that were not part of the import.
The app does not raise an error if the journal contains empty lines—it deletes them instead. It uses Business Central's standard logic to determine whether a line is empty.
Post after Import
This setting lets you specify whether the journal should be posted automatically after importing.
| Value | Description |
|---|---|
| No | The journal will not be posted automatically. This default option allows you to review and manually post the journal. |
| Yes – Save Lines on Error | The journal will be posted automatically after import. If an error occurs during posting, the entire posting is rolled back, but the imported lines remain in the journal. You can then correct the errors and post the content manually. |
| Yes – Remove Lines on Error | The journal will be posted automatically after import. If an error occurs during posting, the entire import is cancelled, and no lines are saved in the journal. |
- Importing large journals (e.g., thousands of lines) may cause record locking for other users. Selecting Yes – Save Lines on Error helps reduce this risk. Smaller imports are less likely to cause issues.
- If you post the journal automatically, the app will delete any empty lines before importing. This helps prevent posting errors. The app uses Business Central's standard logic to determine whether a line is empty.
- Use the Check for Empty Batch setting to ensure that only data from the import file is posted.
- Select Yes – Remove Lines on Error when integrating via the API to ensure a clean import and avoid manually opening and posting the journal.
Approval Workflows
If there is an active workflow, the app will create the Restricted Records when you import journal lines by running the standard Business Central logic. Therefore, you will be able to post the journal once it has been approved, when applicable.
Some of the examples below demonstrate how to import opening transactions. These examples might also include mapping to set the System-Created Entry to Yes. Please note that this is intended only for an initial take-on, so you don't need to change the direct posting setting for accounts. If you specify that the journal is system-created, Business Central will not create restricted records as expected.
Custom Values
Custom values can be used to add custom features to imports. The app includes custom actions for General Journals:
Automatic Journal Balancing
Many source systems export journal data without balancing entries — they simply list the transactions without providing the offsetting credit or debit. These two custom value actions allow you to automatically generate balancing lines during import, posting the net amount to a separate account that you configure.
Both actions work the same way at a high level: the app accumulates the imported lines and then inserts one or more balancing lines to bring the journal to zero. The difference lies in how the amounts are aggregated.
To use either action:
- Open the import template and navigate to the Custom Values tab.
- Add a custom value and select the appropriate balancing action.
- Link an Account/Dimension Mapping to the custom value to specify the G/L account and any dimensions to apply to the balancing line.
- Navigate to the Settings tab on the import template, set Automatic Journal Balancing to the custom value you created.
Balancing per Document Number
The General Journal Add Balancing Line per Document Number action inserts one balancing line for each unique document number in the imported batch. The net amount of all lines sharing the same document number is calculated, and a single offsetting line is written to the account specified in the Account/Dimension Mapping.
Use this action when:
- Each document in your file should balance independently (for example, individual invoices or payments).
- The source file groups transactions under unique document numbers and you want the general ledger to reflect a zero balance per document.
Balancing per Batch
The General Journal Add Balancing Line per Batch action inserts a single balancing line for the entire batch. The net amount across all imported lines is calculated and posted as one line to the account specified in the Account/Dimension Mapping.
Use this action when:
- The entire import represents a single transaction that should balance as a whole (for example, a payroll run or a bank statement).
- You do not need individual document-level balancing — one summary entry is sufficient.
By default, Business Central requires that each combination of document number and document type balances to zero before posting. When using Balancing per Batch, the balancing line shares the same document number as the rest of the batch, so this requirement is usually met automatically. However, if your file contains inconsistent or varying document numbers across lines, you may run into issues. In that case you have two options:
- Use automatic document numbering: If your file does not include document numbers, the app will assign the same document number (from the batch number series) to every line, ensuring the batch balances as a single document.
- Force one document number per batch: Enable the One Document No. per Batch setting, which overrides any document numbers from the file and applies a single document number to all imported lines.
You generally do not need to change this behaviour — it only becomes relevant when the source file contains a mix of document numbers across lines that you want to aggregate into one balancing entry.
Configure the Account/Dimension Mapping on the custom value to control which account receives the balancing entry and to apply any fixed dimension values to that line. The Account/Dimension Mapping supports G/L accounts, customers, vendors, bank accounts, and other account types supported by the general journal.
Set Balancing Account to Control Account
You can use this action on a General Journal import. You usually only want to do this when migrating opening balances from a legacy system. For example, you don't want the control account's balance to change if you import open items for your customers and separately import the opening balances for your general ledger.
This action aims to assist with migrating opening balances, where we want Business Central to post entries to this sub-ledger without changing the balance of the control accounts. If you are already live, using this action will create an imbalance between the General Ledger and the Subledger.
Multiple Amount Columns Support
The General Journal Add Additional Line custom action allows you to import files with multiple amount columns that map to different G/L accounts. This feature effectively transposes your data from columns to rows, creating a separate journal line for each amount column. This is handy when you receive files where each column represents amounts for different accounts, eliminating the need to manually transform the file into a format with one line per column.
How it works
- Map each amount column as a Custom Value instead of mapping to the Amount field
- Configure each custom value with the General Journal Add Additional Line action
- Specify the target G/L Account and, optionally, dimensions for each custom value
- The app transposes the data: each non-zero amount column creates a separate journal line with the specified account
Use Cases
- Multi-Account Transactions: Process files where amounts need to be posted to different G/L accounts
- Expense Categories: Process expense files with columns for different expense types
- Cost Centre Allocations: Import files with separate columns for different cost centres or departments
Example Configuration
If you have a file with columns for "Rent", "Utilities", and "Office Supplies", you would:
- Map each amount column as a Custom Value
- Set the action to General Journal Add Additional Line
- Configure the Account number for each (e.g., Rent: 6100, Utilities: 6200, Office Supplies: 6300)
- Optionally set dimensions for each account
This creates multiple journal lines from a single row of data, with each amount posting to its designated account.
Refer to the example below to see how to use this feature.
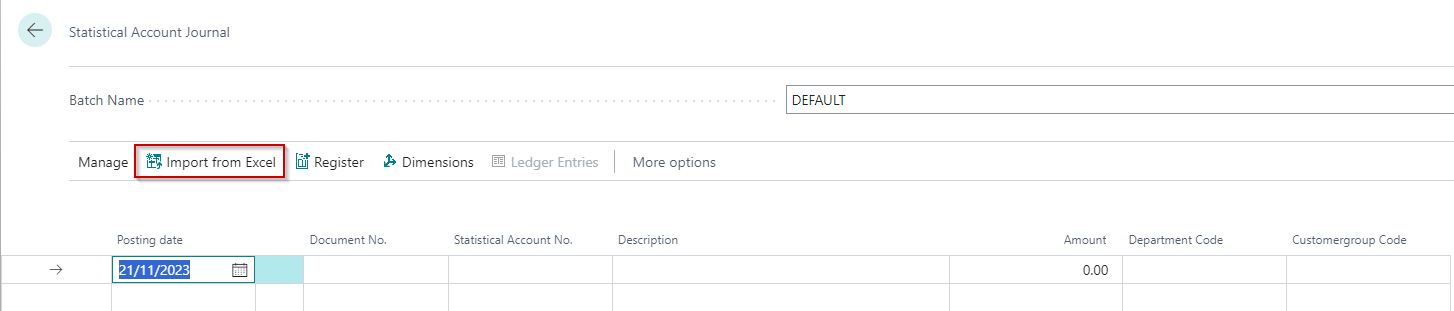
Statistical Account Journals
You can import Statistical Account Journals from the Statistical Account Journal page.
The template includes a Custom Value that allows you to import multiple statistical values from a single row. Like the General Journal custom action, this feature transposes your data from columns to rows, creating a separate journal line for each statistical value column you map.
Examples
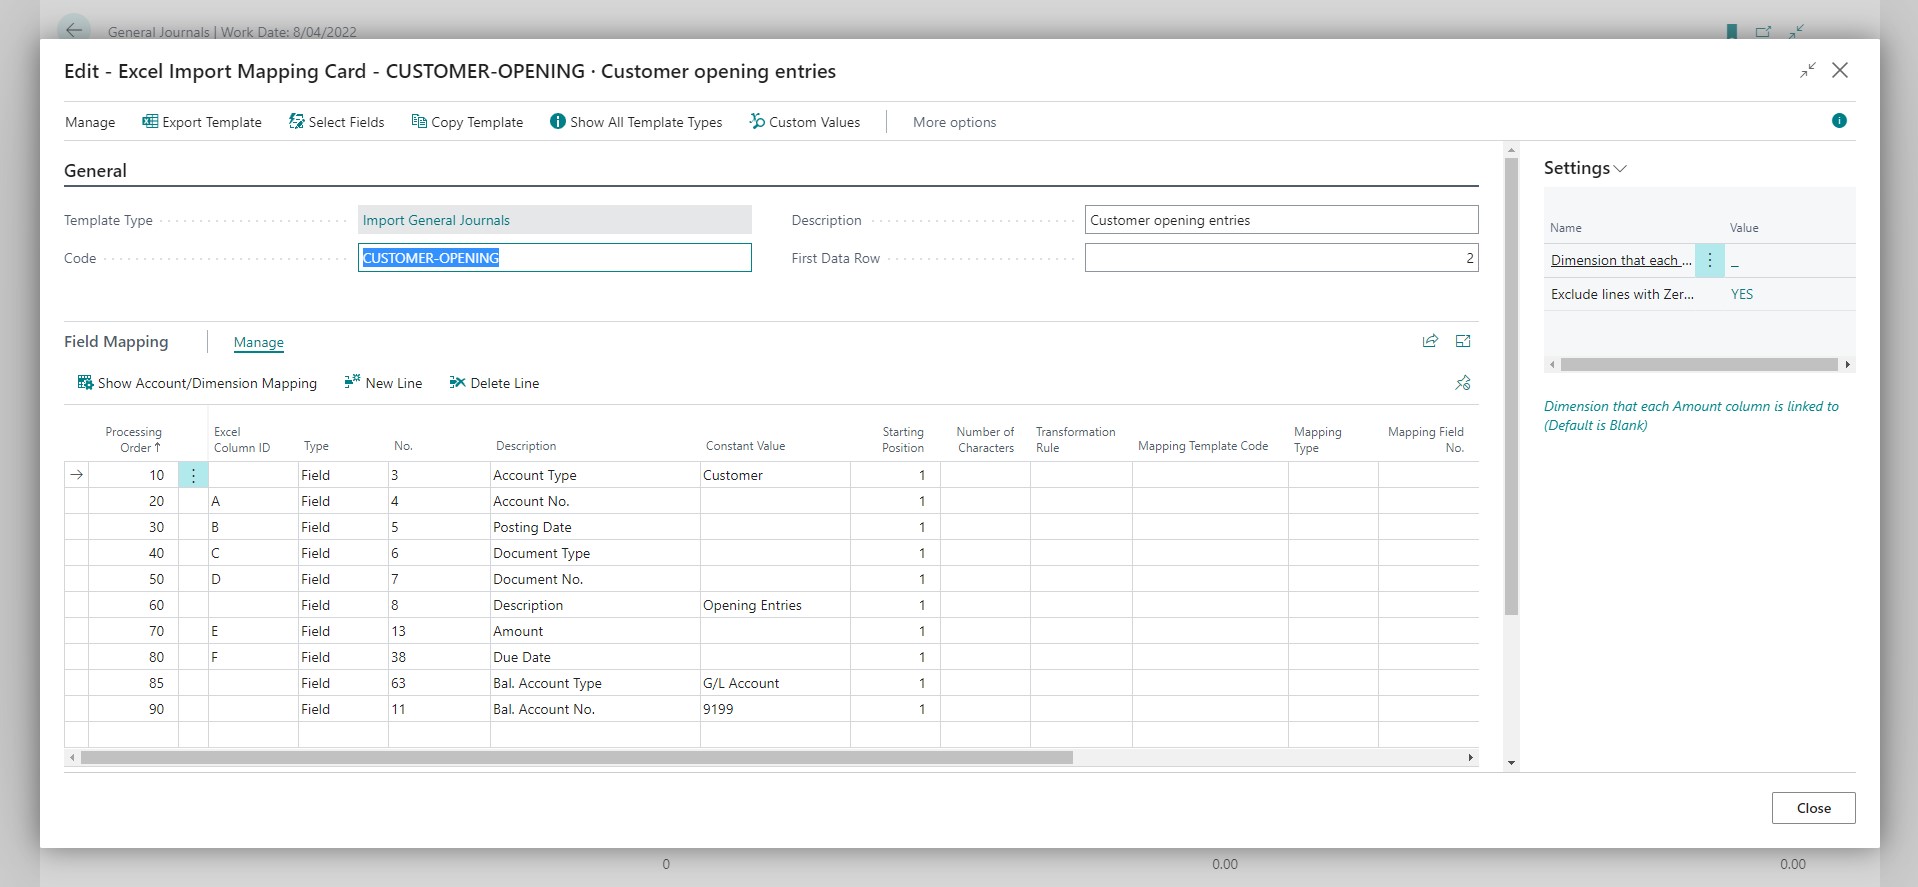
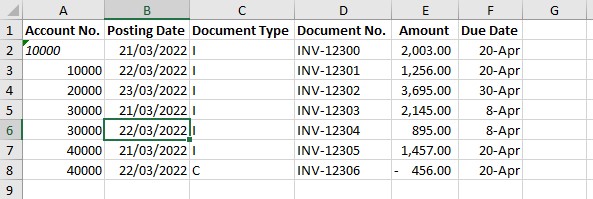
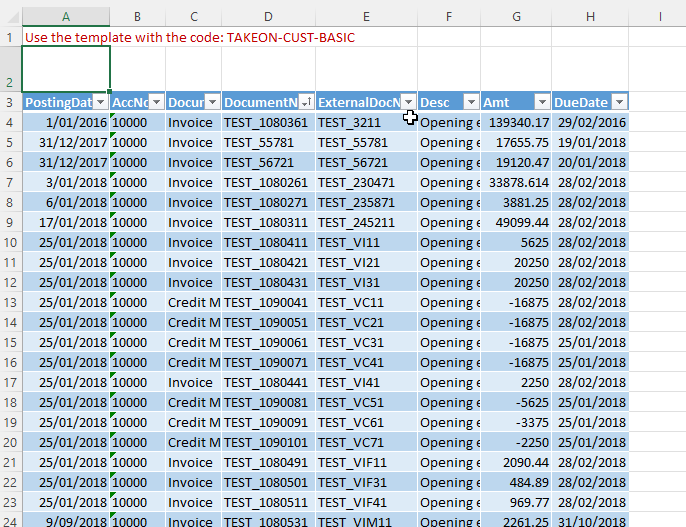
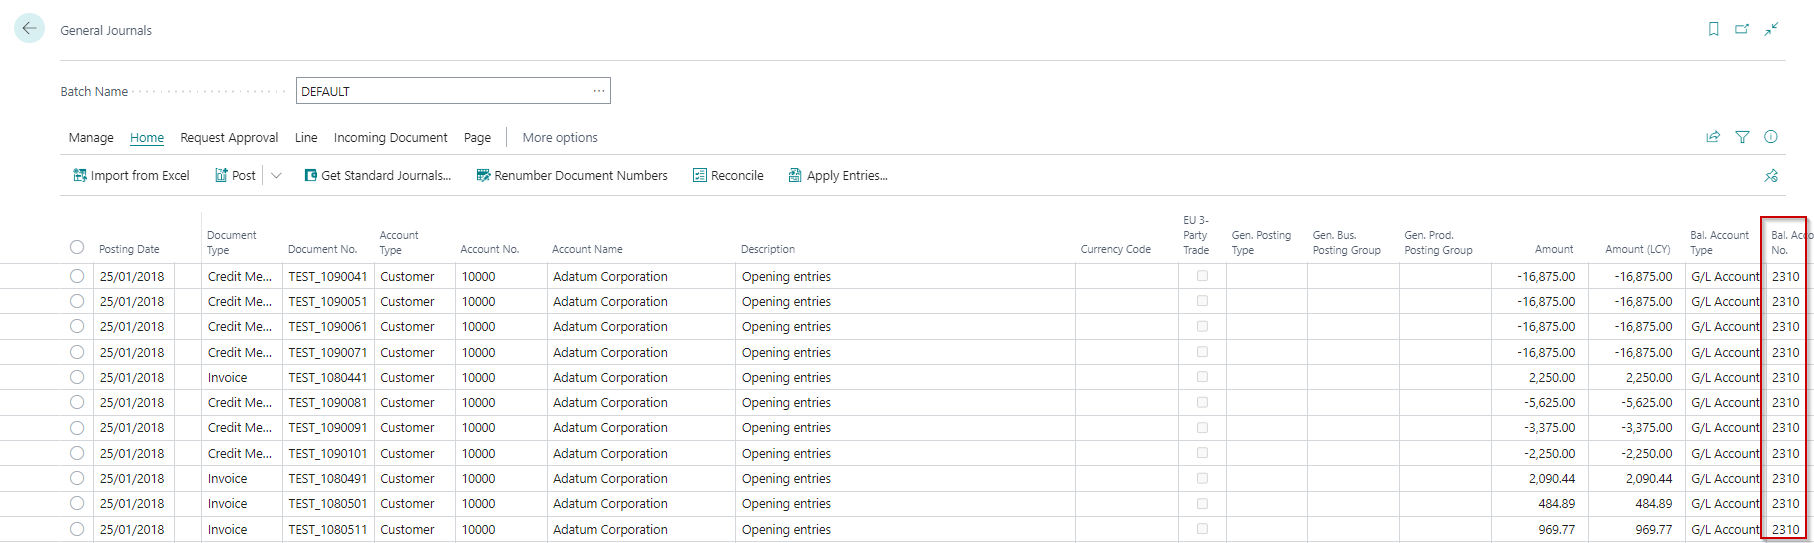
Example 1: Import for opening customer entries
In this scenario, we import opening entries for a new Business Central company. The company previously used a different accounting system. The entries got exported from the previous accounting system.
Excel Mapping Template
Excel File
Imported Journal
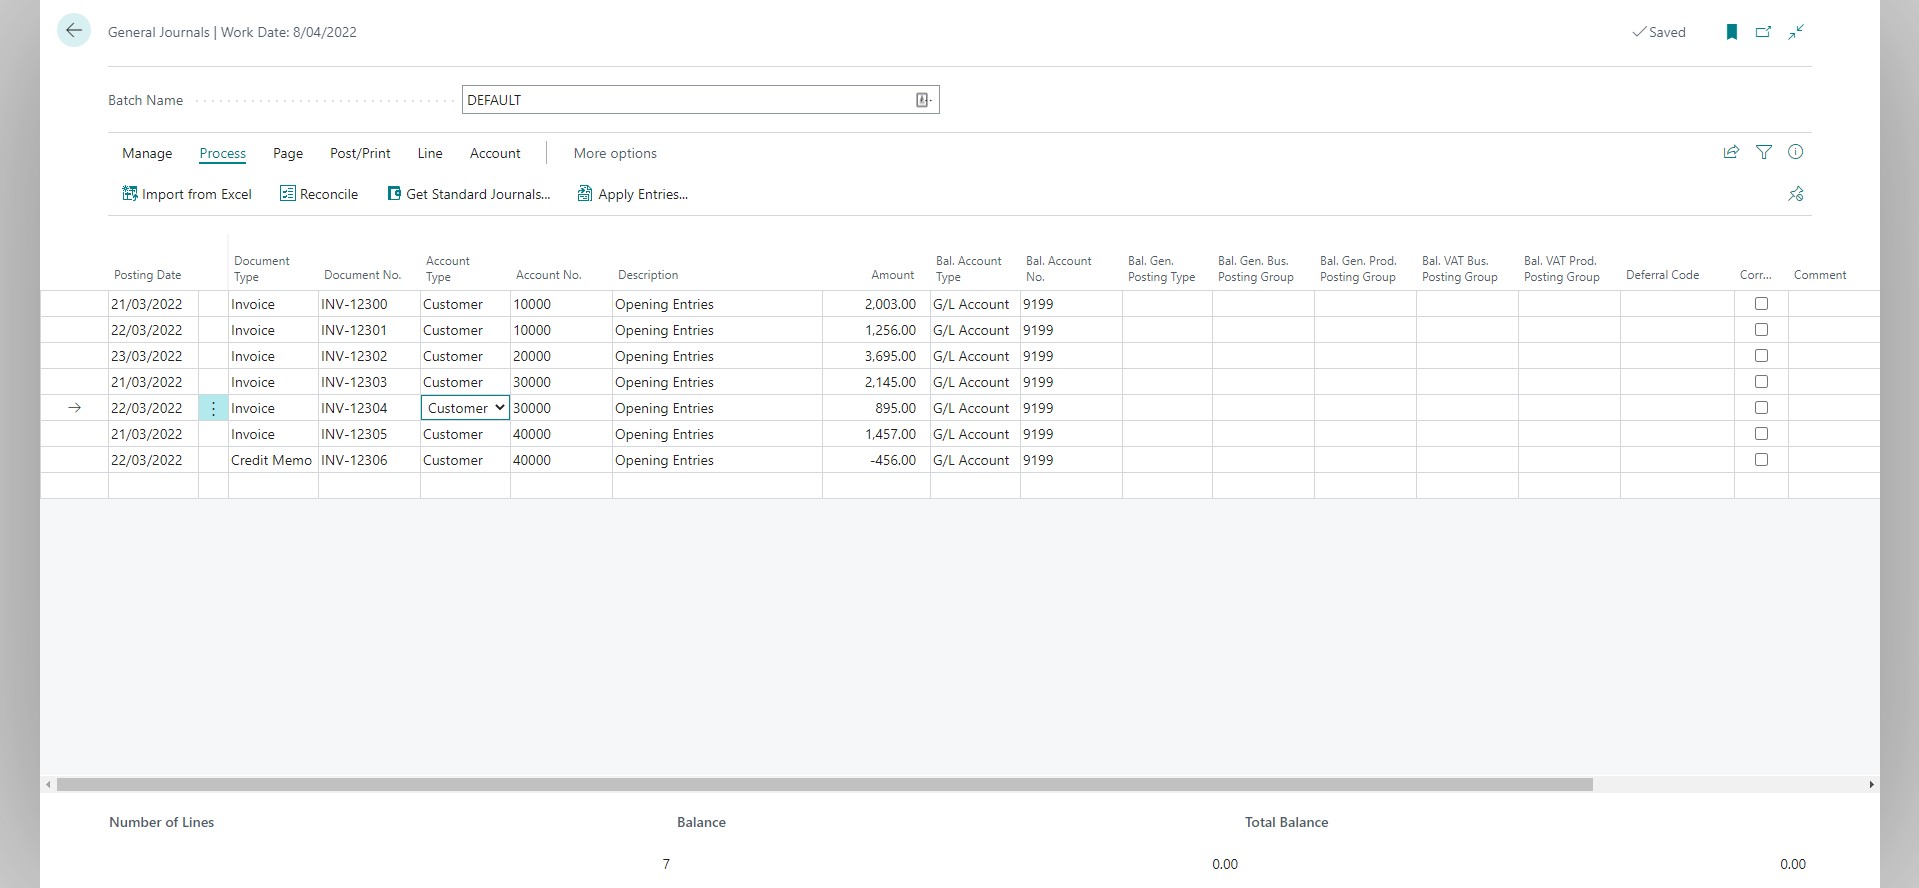
The Account/Dimension Mapping is beneficial if the accounts and dimensions in the previous accounting system have different codes from those in Business Central. Our employee expense example below utilises the Account/Dimension Mapping in a slightly different context, but it illustrates the possibilities.
Example 2: Import for Dimensioned Amount Columns
Excel Mapping Template
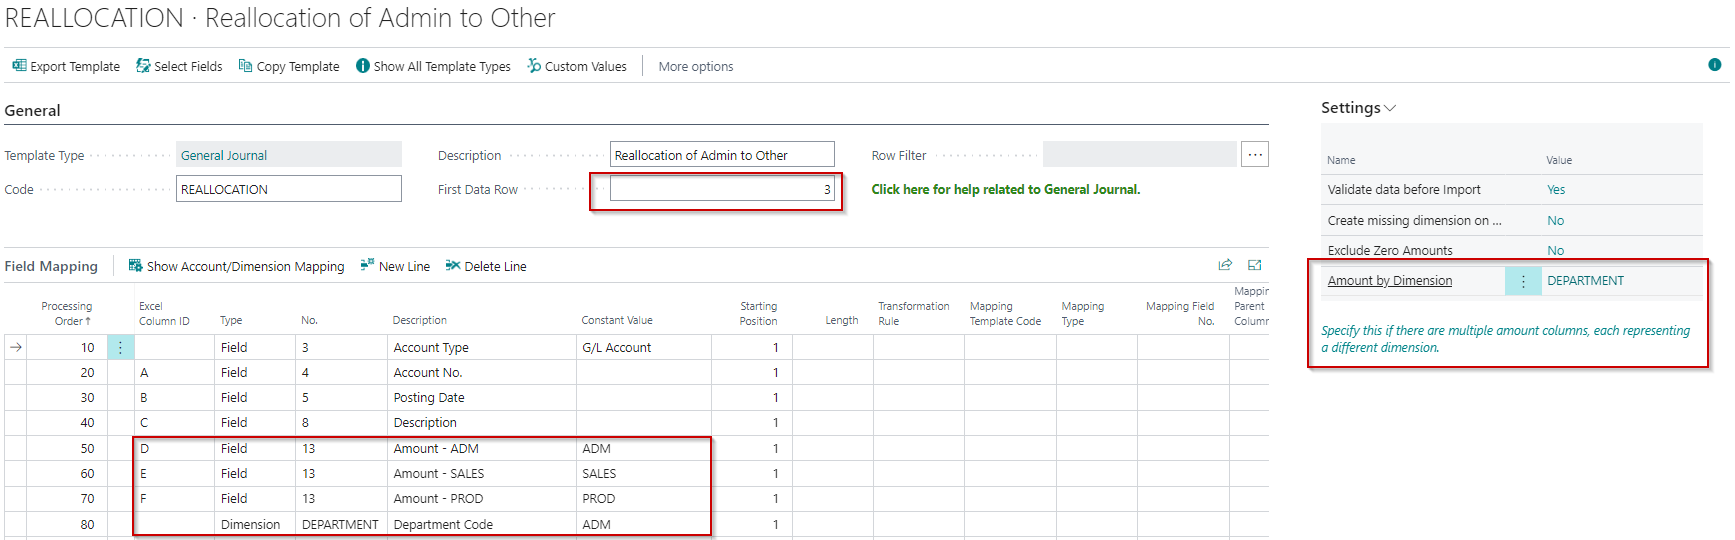
- The field First Data Row has been set to 3 because, in the Excel worksheet, that is the first line we want to import
- In the settings fact box, we have specified DEPARTMENT for "Dimension Code linked to Amount columns."
- The Amount field is mapped three times - an amount column representing each department
- We are required to add a mapping line for Dimension DEPARTMENT. You will receive an error when importing if you do not specify this. You will also notice that we specified a constant value on this line. You must specify a valid dimension value for the constant value, but it does not matter which one you enter here.
Excel File
Imported Journal
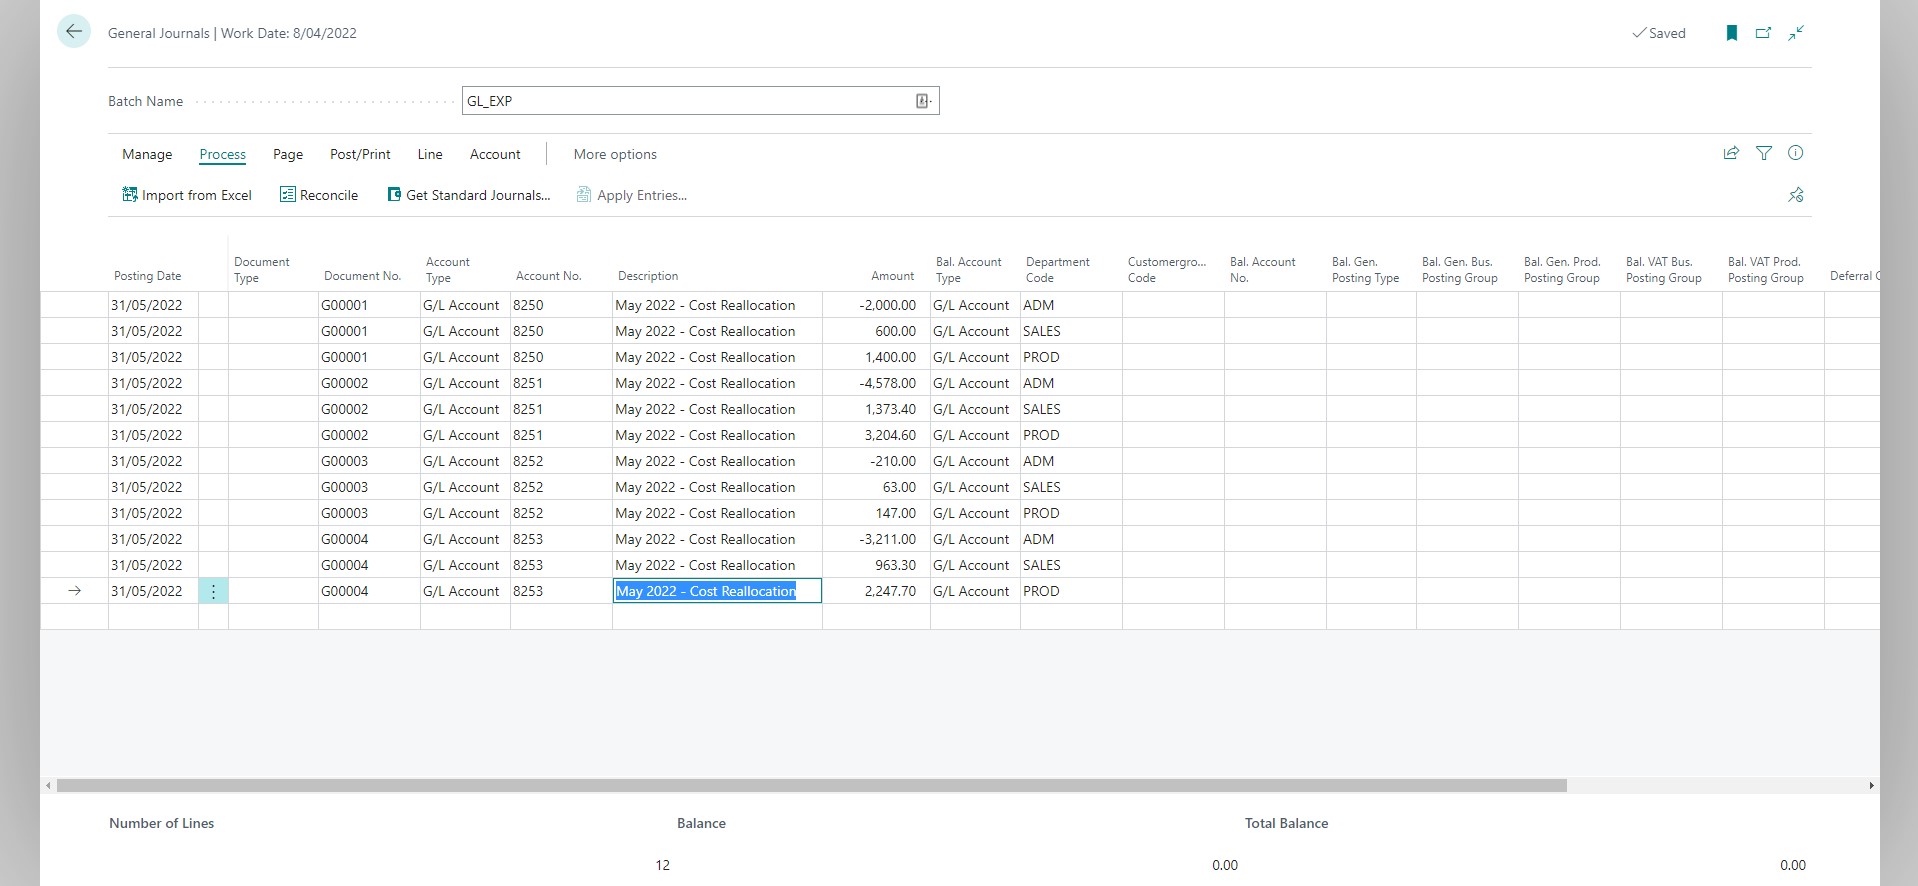
We created three journal lines for each line in the Excel worksheet - one for each dimension.
You might have noticed that the journal has document numbers, but we specified no document numbers in the Excel worksheet. Excellent Importer uses the number series selected for the batch to generate document numbers.
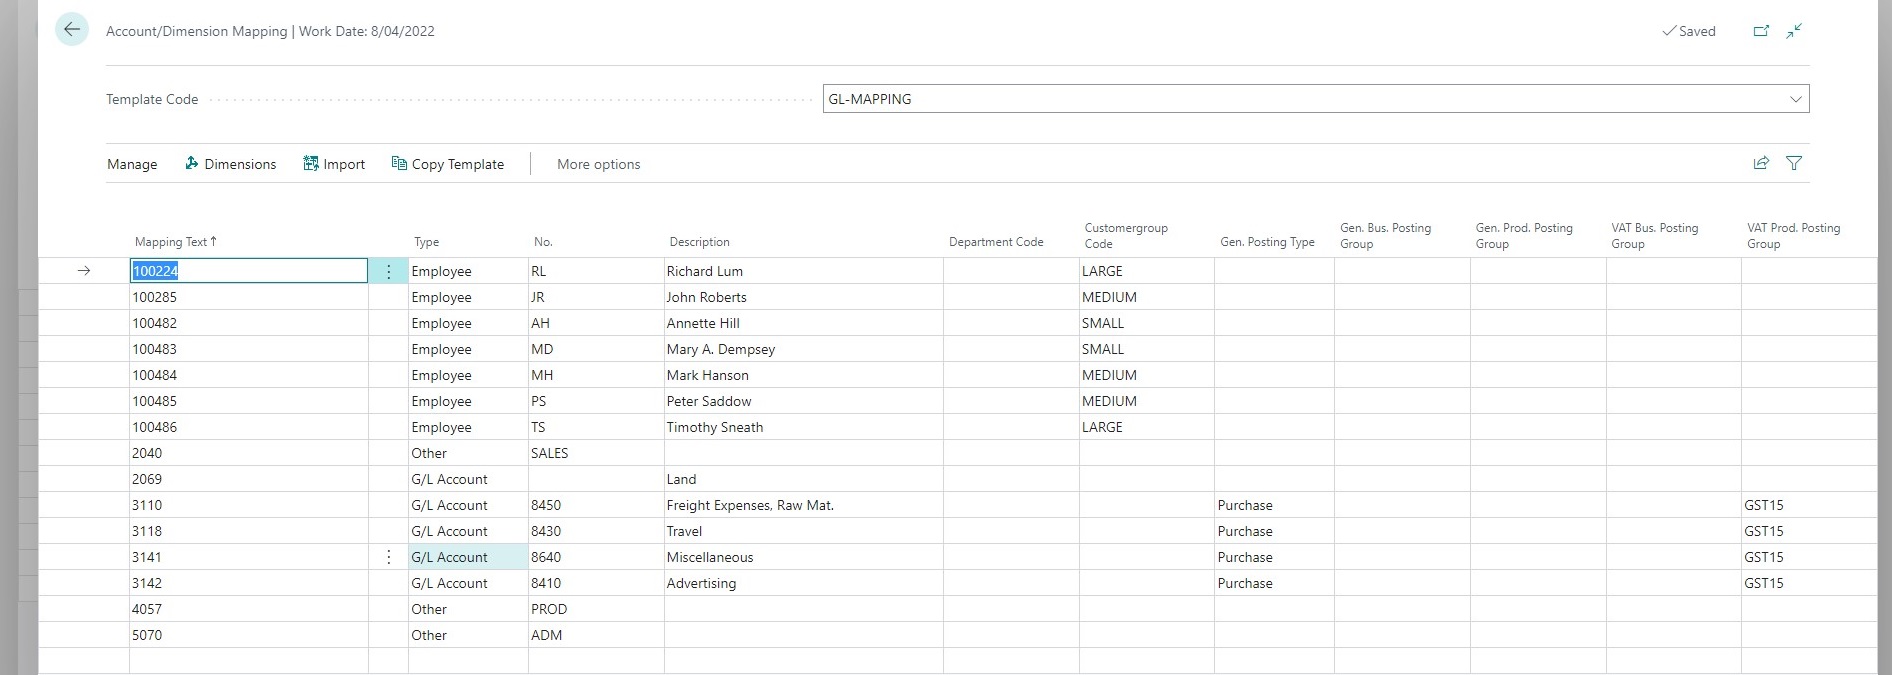
Example 3: Employee Expense Import using Account/Dimension Mapping
Here we import employee expense claims. The expense claims got exported from a different system, and the employee codes, dimensions, and expense accounts do not match what we set up in Business Central. You will see how we use the Account/Dimension Mapping in this relatively complex scenario to handle this.
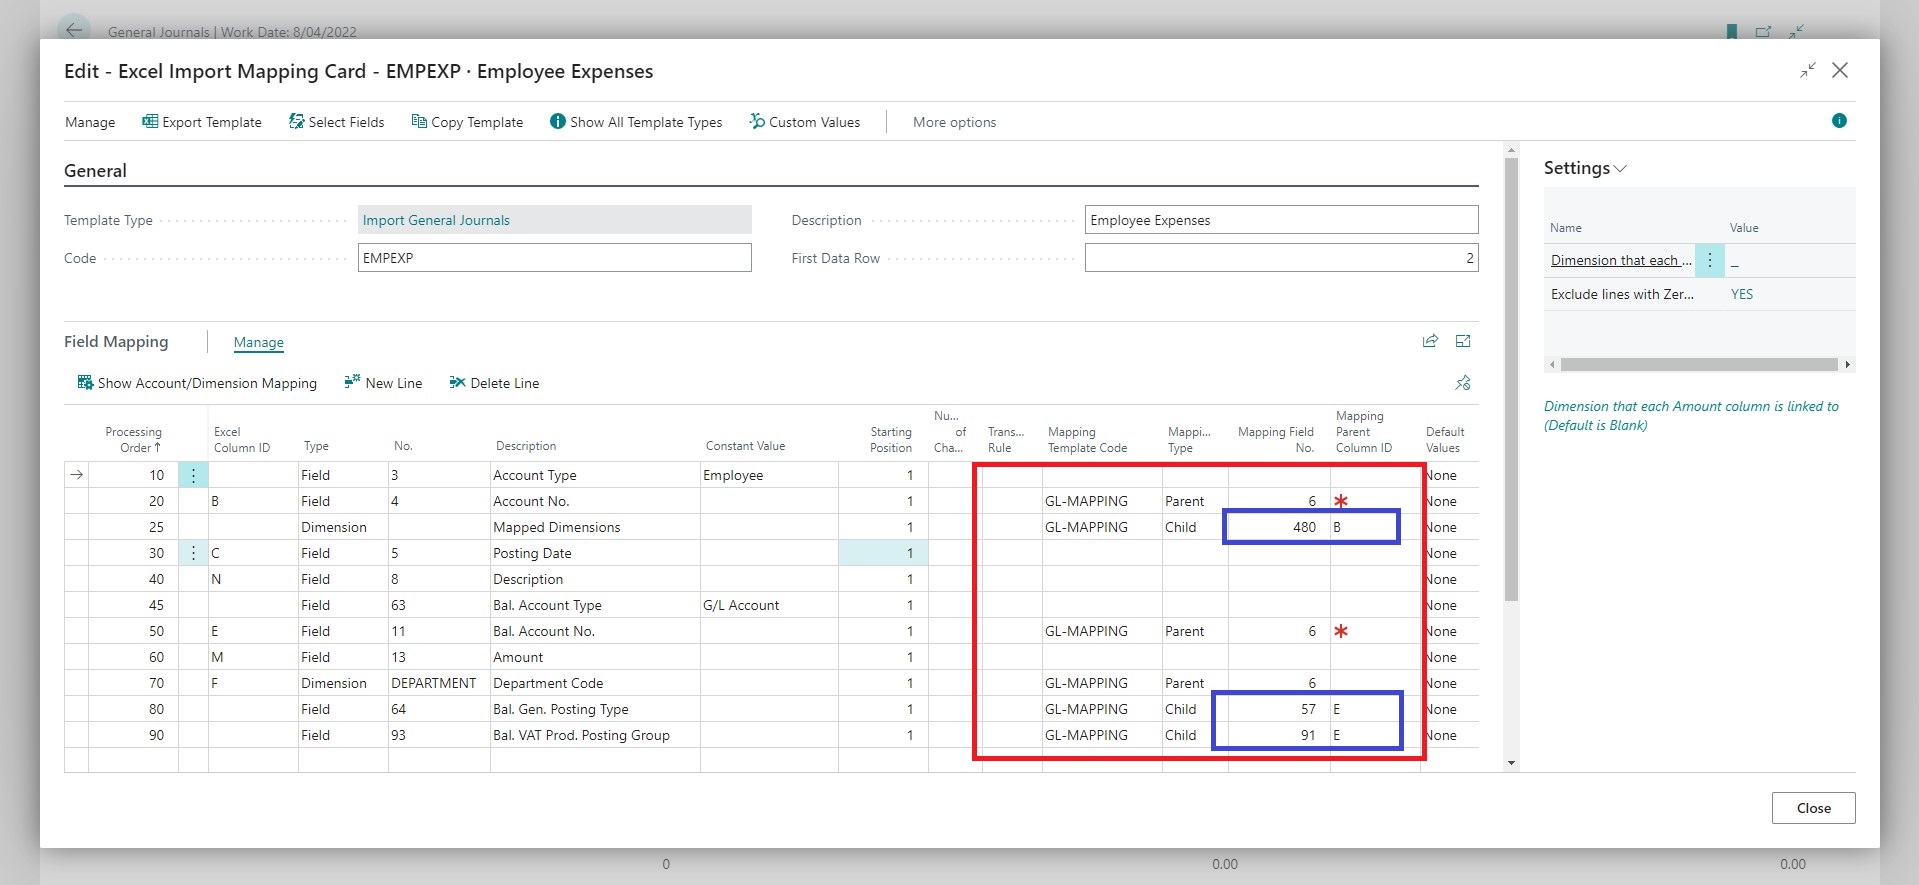
- The columns that reference Account/Dimension Mapping are highlighted with the red box.
- We are only getting values from the file for B, E and F - you will notice that the Mapping Type is Parent for all of these.
- The blue boxes highlight where the Mapping Type is Child. These are associated with a Parent, which is the Account/Dimension Mapping that is used to get the value for that field. This feature of the Account/Dimension Mapping allows you to copy values to multiple fields even with only one mapped column.
Account/Dimension Mapping
Excel File

Imported Journal
Example 4: Defaulting the control account for opening entries
This example is a variation of the previous customer entries example. The difference is that we have the app assign the control account. This feature is useful when importing opening entries for many customers, and you have set up several control accounts.
You can use a similar approach to import opening entries for vendors.
Mapping Template

Regarding the above image:
- Here, we selected the custom value CONTROLACCOUNT. You will notice that there is no mapping to the Excel file and no Constant Value.
- We added a default for the System-Created Entry field to allow the direct use of the control account, which you usually configure to prevent direct posting.
This template is included with the other sample template when you use the setup guide.
Excel File
Imported Journal
Example 5: Using Account/Dimension Mapping with Global and Shortcut Dimensions
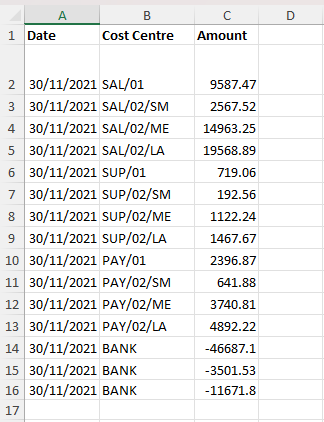
In this example, we want to import a payroll file containing account numbers and dimensions in a single string and use the account dimension mapping to transform them.
Excel File
The file below contains a cost centre column, and we need to use this column to map to Business Central G/L Accounts and Dimensions.
Account/Dimension Mapping
In the image below, the Department and Customer Group are global dimensions, and the Business Group is a shortcut dimension.
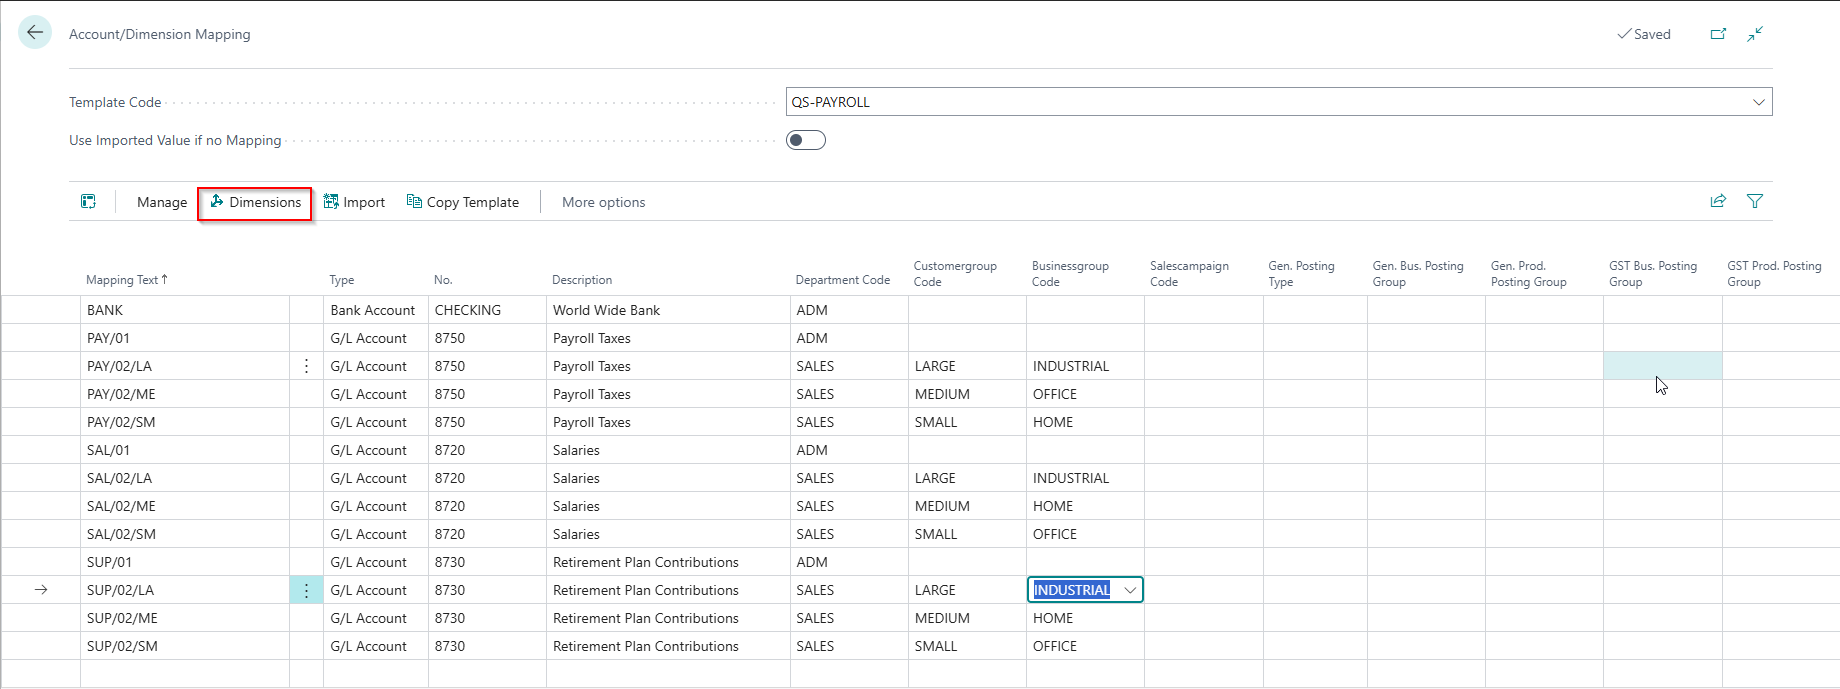
The Account/Dimension Mapping also supports all dimensions - even those not specified as either a Global or Shortcut dimension.
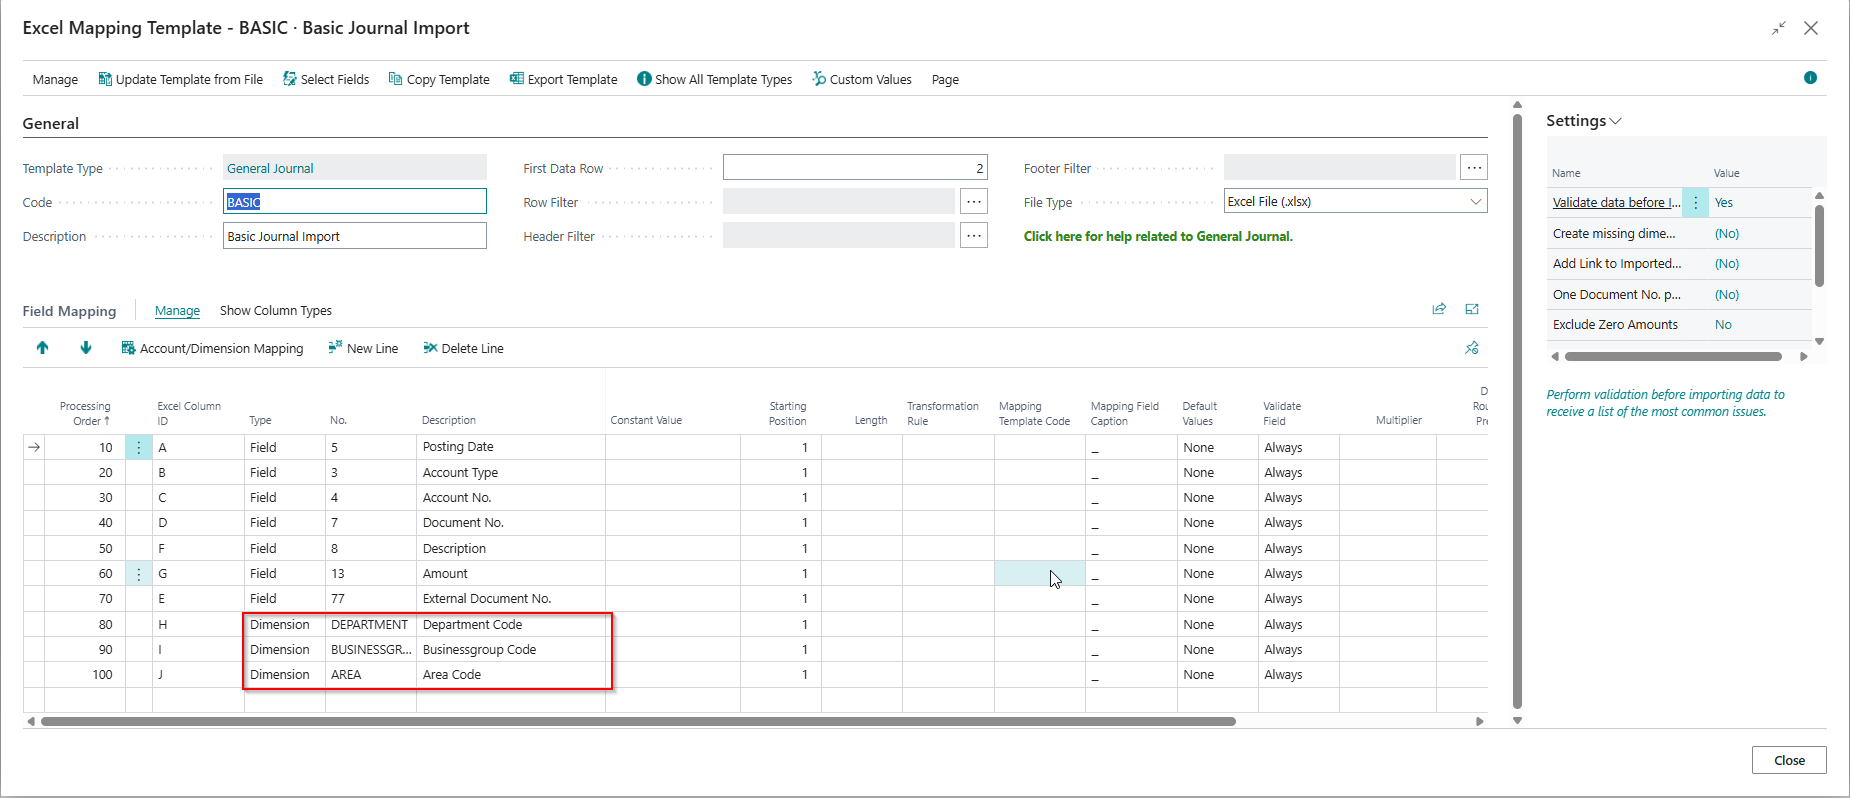
Excel Mapping Template
In the image below, you will notice one:
- The same Mapping Template Code is used to map the Account Type and No. fields as well as the Dimensions.
- The Excel Column ID is B for all these fields, as it is that column that contains the value I want to map.
- The Mapping Field Caption is used to specify which value to use for the Account/Dimension Mapping.
- There is only one template line for Dimensions, and we have selected the Map to Dimension Set field. This indicates that we want to use all the dimensions specified on the Account/Dimension Mapping.
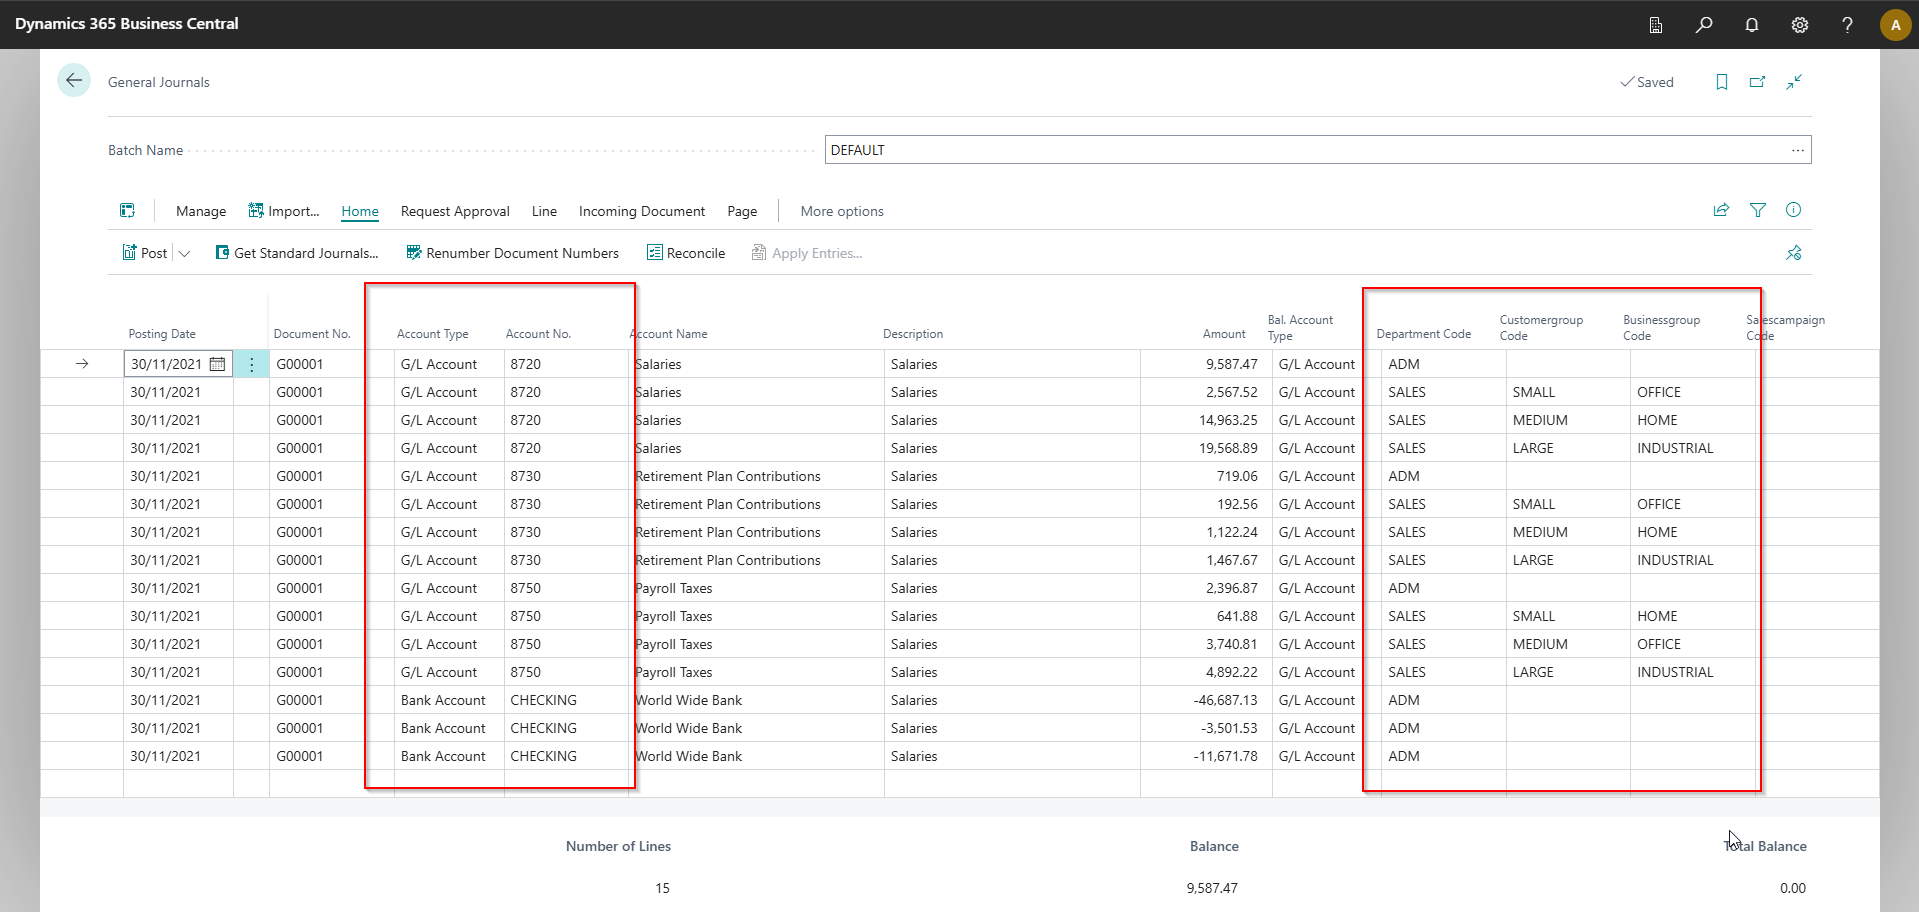
Imported Journal
You will notice that the app has mapped the accounts and dimensions using account dimension mapping.
Example 6: Basic Example using Dimensions
This example shows you a template we have configured to import dimensions.
Mapping Template
In Business Central, only the Global Dimensions 1 and 2 can be found as fields on the table. However, the app still allows you to map to any dimension. As you can see in the image below, we have mapped three different dimensions specified with the type Dimension instead of Field. The app will correctly map the dimension values to the associated table field for dimensions configured as global dimensions 1 or 2.
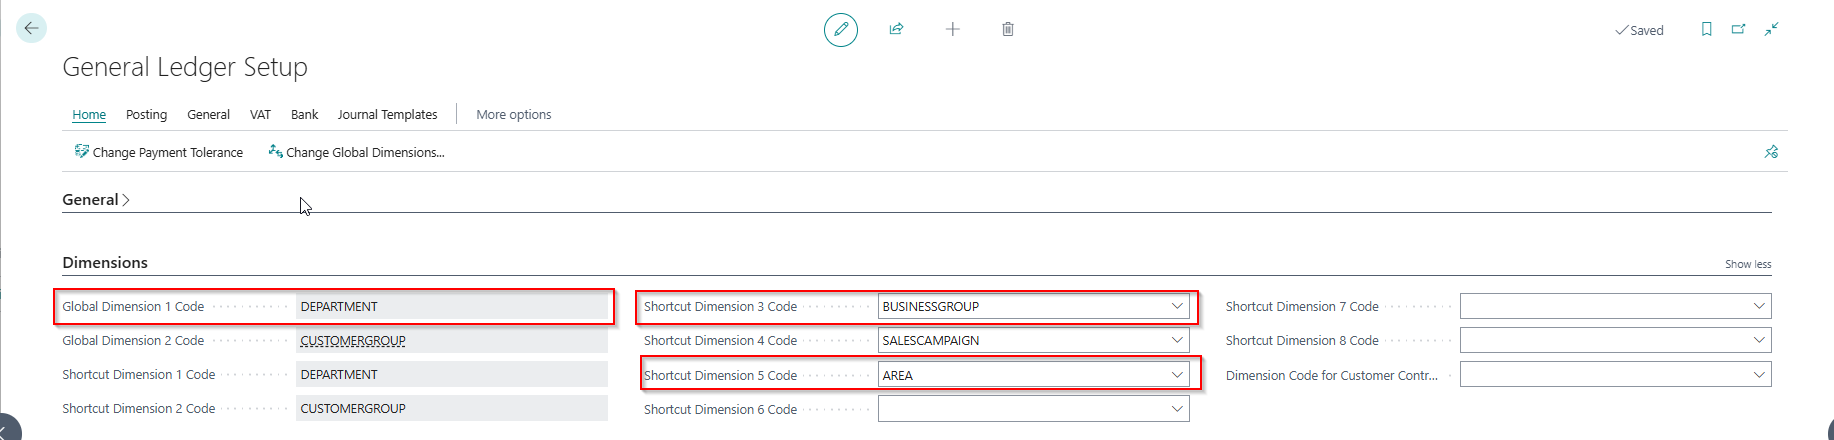
General Ledger Setup
The image below shows our General Ledger Setup, and you can see that the template has allowed us to map Global Dimension 1 Code and Shortcut Dimensions 3 and 5.
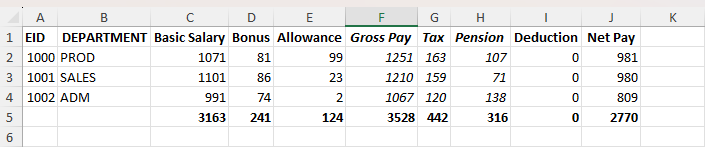
Example 7: Import a payroll file with multiple columns representing different accounts
In this example, we import a payroll export with one row per employee and several amount columns, each mapping to a different general ledger (G/L) account. We use the custom value action General Journal Add Additional Line to transpose the data from columns to rows, creating separate journal lines for each amount column. This means a single row in Excel with multiple amount columns becomes multiple journal lines in Business Central. The template also uses row filtering to skip total rows and the multiplier setting to post specific columns as credits.
This example is included in the sample templates that you can download with the Excellent Importer Setup Wizard.
Excel File
Mapping Template

With reference to the image above:
- Row filter: skip rows that have no value in column A. This works even when column A isn't otherwise used in the template.
- Custom values: each amount column is mapped as a custom value; every non-zero column creates a separate general journal line.
- Multiplier: The multiplier is set to -1, so positive values in the file are posted as credits.
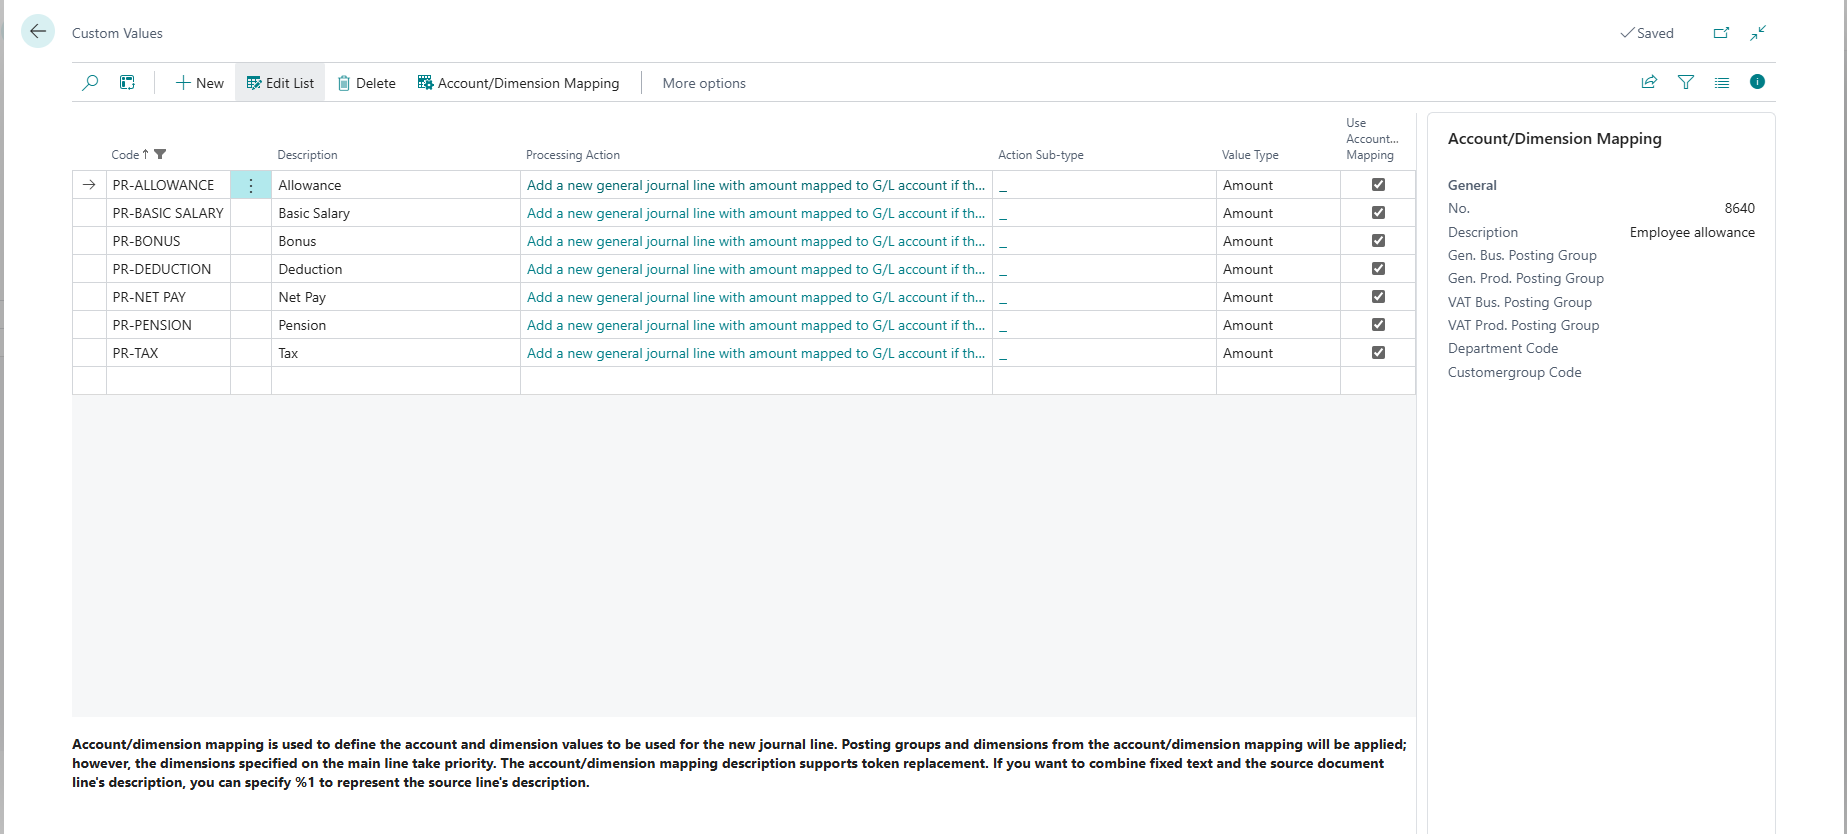
Custom Values and Account/Dimension Mapping
Each custom value has an associated account/dimension mapping that defines the general ledger (G/L) account and any dimensions to use. The mapping template can also map to dimensions, which take precedence over any dimensions specified on the account/dimension mapping.
The app even supports mapping all dimensions, including those not referenced in the General Ledger Setup.
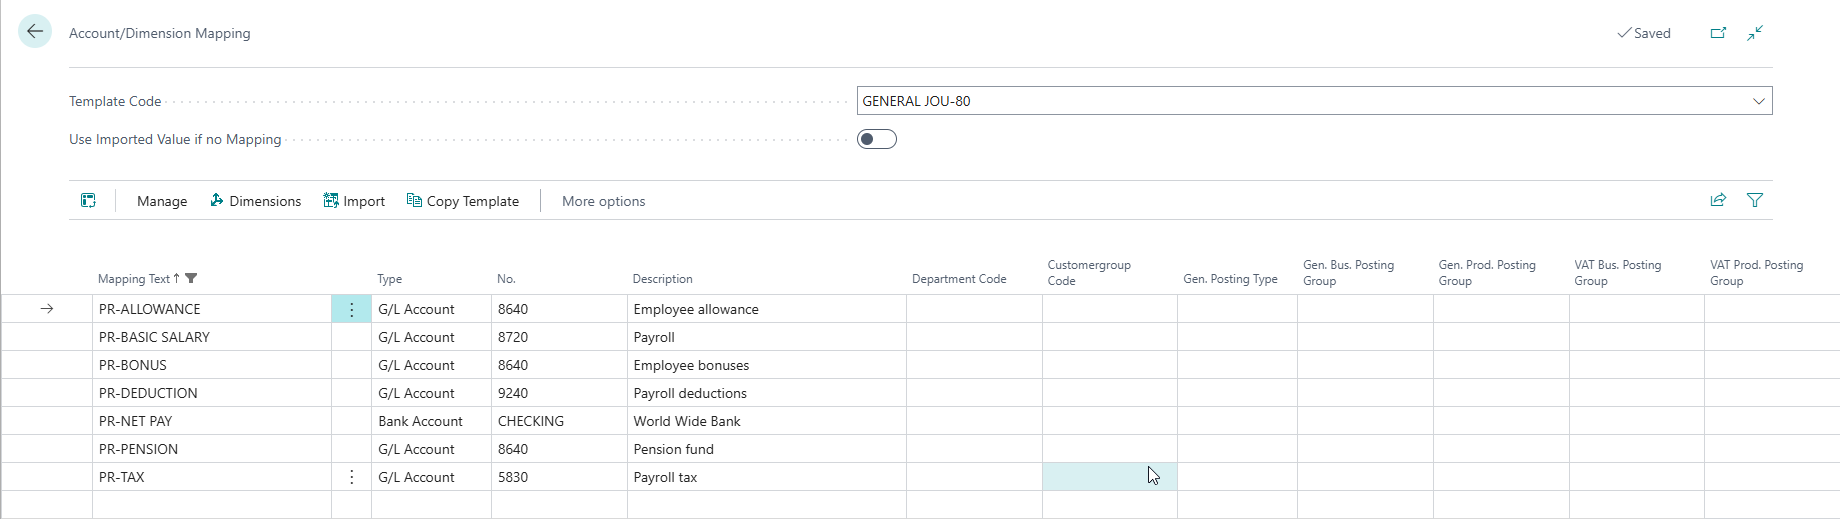
Result
After importing, you will notice that the app has created a line for every column that had a non-zero amount. The department code was specified in the file, but the actual accounts used were derived from custom values, including the bank account.
