Excel Mapping Template
The Excel Mapping Template specifies the column layout of the Excel files you will import and the settings that affect how the files get imported. You can create multiple mapping templates for each import type.
If you are new to Excellent Importer, we recommend downloading and applying the sample Excel Mapping Templates because they give you examples of templates we frequently use. The easiest way to download these samples is to use the Excellent Importer Setup Wizard.
Creating a new Excel Mapping Template from a File
You can create new or update existing Excel Mapping Templates while simultaneously view the file you want to import. This feature supports both Excel and Variable text files. You can access this feature from the Excel Mapping Template List or Excel Mapping Card pages.
You can read more about this feature here.
Creating a new Excel Mapping Template
You can create or edit Excel Mapping Templates from the Excel Import Mapping List. The steps for creating the Excel Mapping Template are:
- Open the Excel Import Mapping List
- Create a new record and specify the file type
- If the file type is a text file, specify the column mapping
- Specify the Field Mapping to the Excel columns in the file
- Add additional fields to the field mapping that need to get values but are not available in the file
- Specify values for the settings
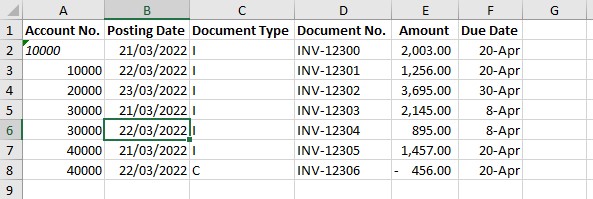
We will create a new Excel Mapping Template to import the following Excel file:
Open the Excel Import Mapping List
You can open the Excel Import Mapping List from any of the following places:
- The Import Excel/Text File dialogue, which gets opened when you select Import.
- The Excel Import Mapping List - use Tell Me to search for this page.
- The Assisted Setup also gives you access to the Excel Mapping Templates.
In this example, we will open the Excel Import Mapping List from the Import from Excel dialogue. We use this approach because it allows us to configure the template in the same place where we want to use it.
- Open the sales journal and select the Import from Excel action to open the Import from Excel dialogue.
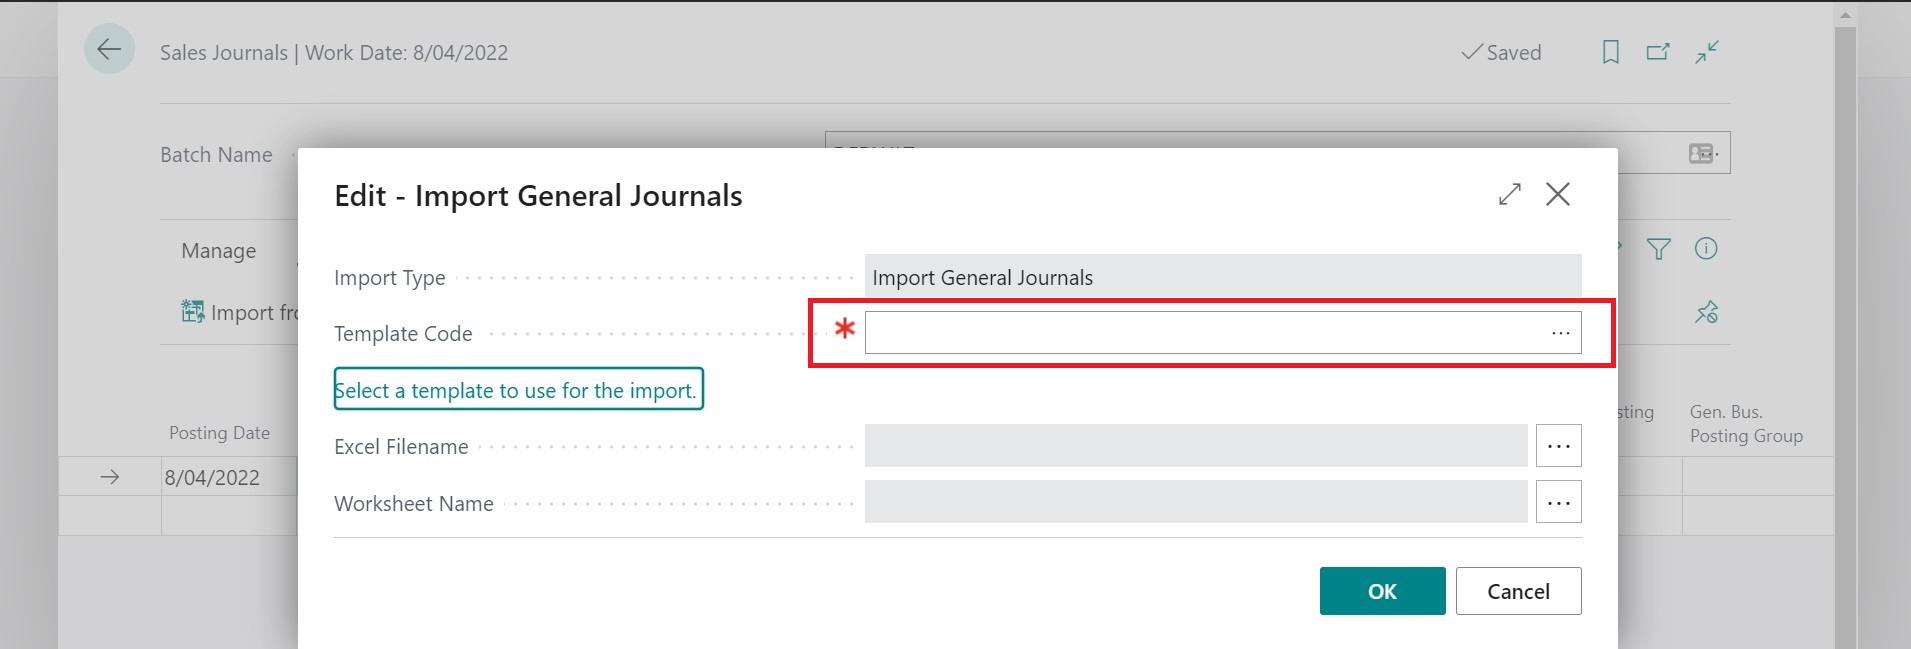
- Use the lookup of the Template Code to open the Excel Import Mapping List. Alternatively, click Select a template to use for the import to open the Excellent Importer Mapping List.
Create a new record
- In the Excel Import Mapping List, click New to create a new Excel Mapping Template.
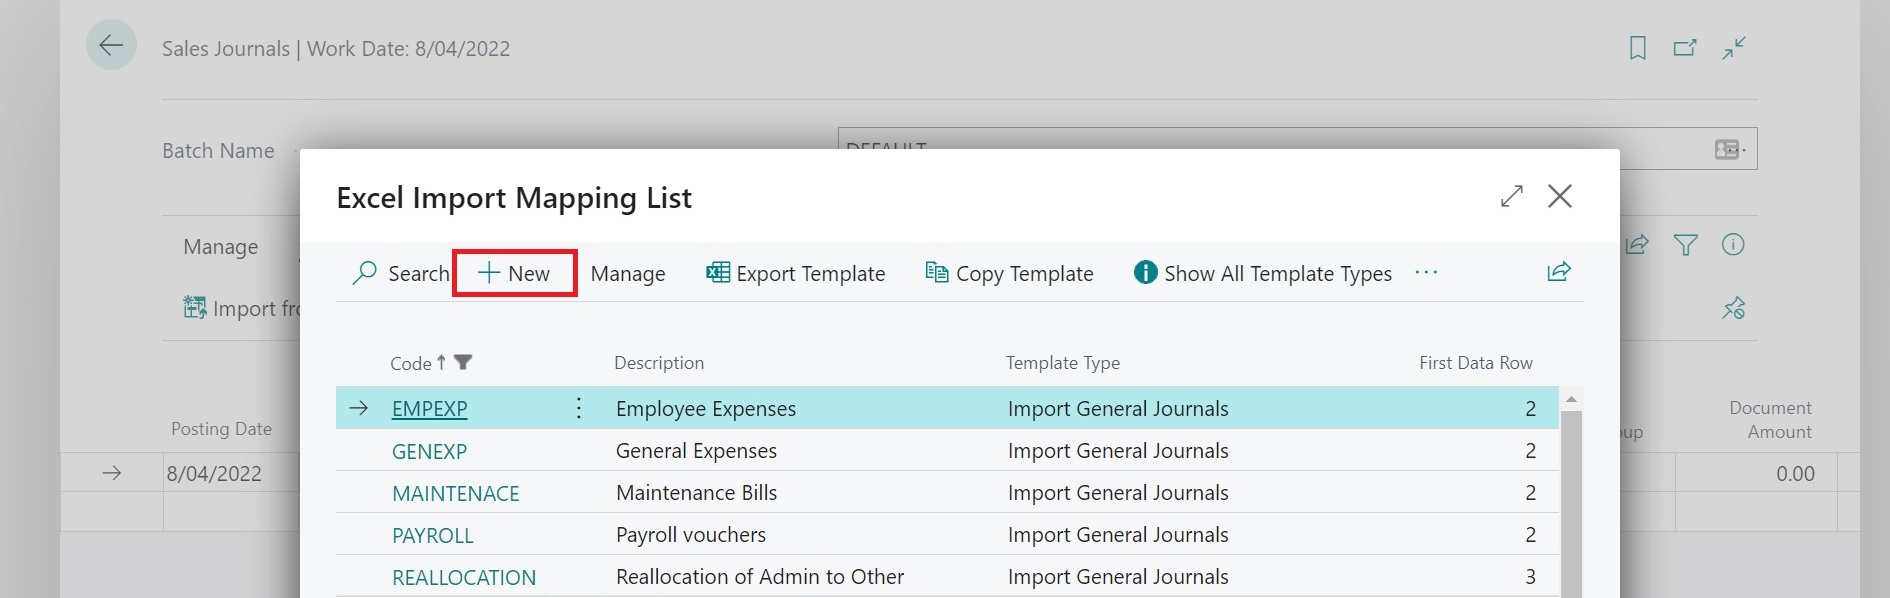
- The Excel Mapping Template Card is opened with a new record.
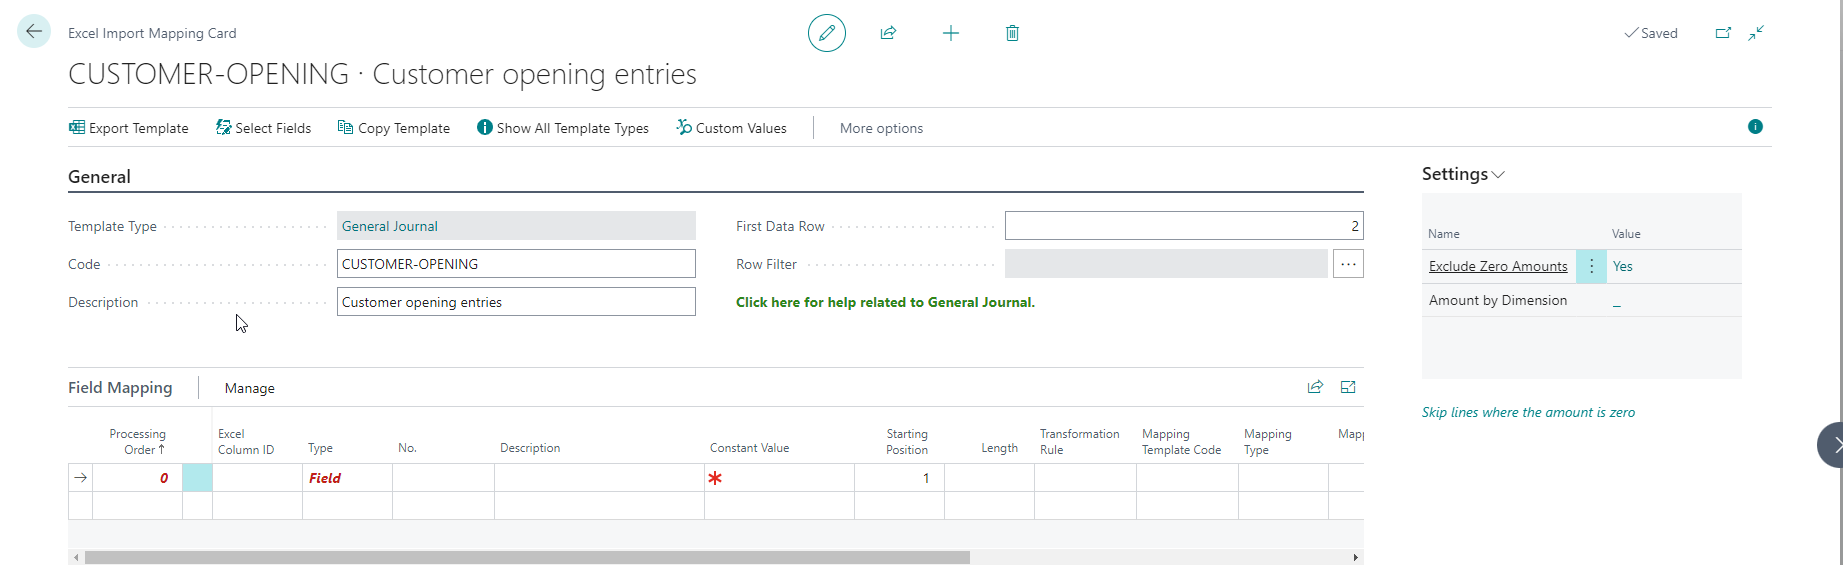
- Select the Template Type Import General Journals. Excellent Importer will fill in this value if you have come from the Import from Excel dialogue, as we do in this example.
- Enter CUSTOMER-OPENING for the Code.
- Enter Customer opening entries for the Description.
- For First Data Row, we use the default value (2) because that is the first row in the Excel file we would like to import. You only change this value if your data starts in a different place.
Specify the Field Mapping for the Excel columns
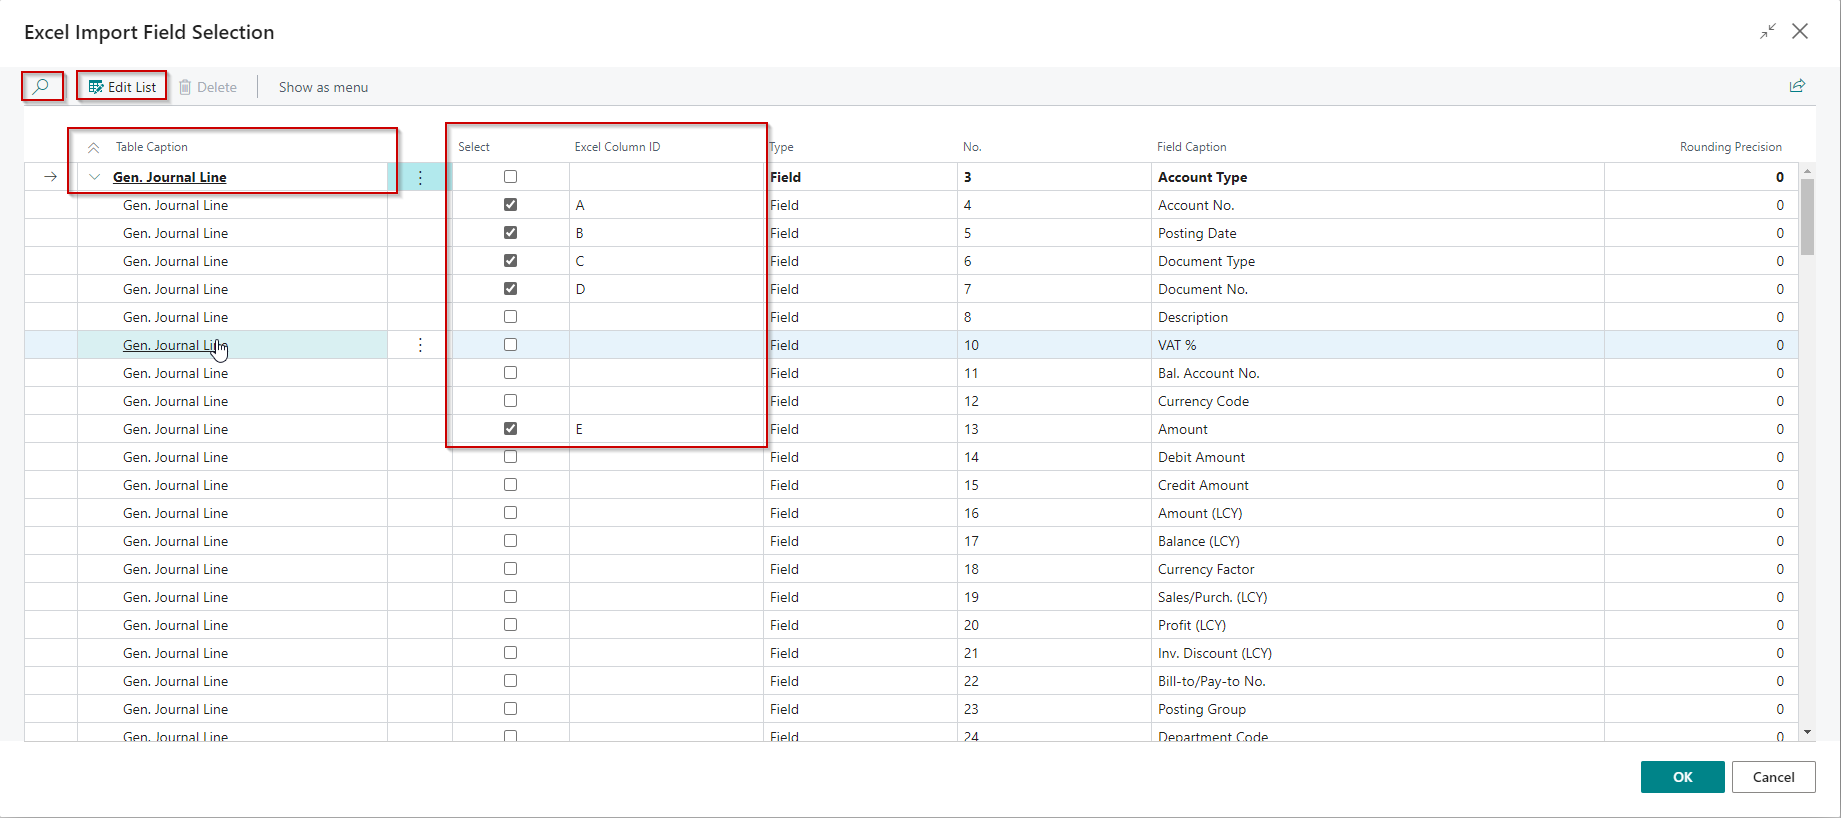
- Use the Select Fields action to open the fields list.
The fields list shows all available fields to select for the import type. Some fields are excluded from the list because they get updated by the system.
For some of the import types it includes fields from more than one table. For example, the sales document import type contains fields from the Sales Header, Sales Line and Tracking Specification.
- Select the fields that you want to map.
- Select the Edit List action to make the page editable.
- Select the fields by placing a checkmark in the Select field.
- Change the Excel Column ID if required.
- Use Search to find fields quickly.
- Click OK when you have selected the fields you want. Excellent Importer will take you back to the Excel Mapping Template Card, and the selected fields get added to the template.
- You can select the same Excel Column ID for more than one field if you need to. For example, you might want to update the Document No. and the External Document No. with the same value from the file.
- You can use the Select Fields action as often as you like, even if your template already has field mapping.
- You can expand and collapse the Table Caption. This is helpful to find fields on imports that have multiple tables (e.g. Sales and Purchase Documents or Projects). Click here to see how you can use this feature.
Add additional fields
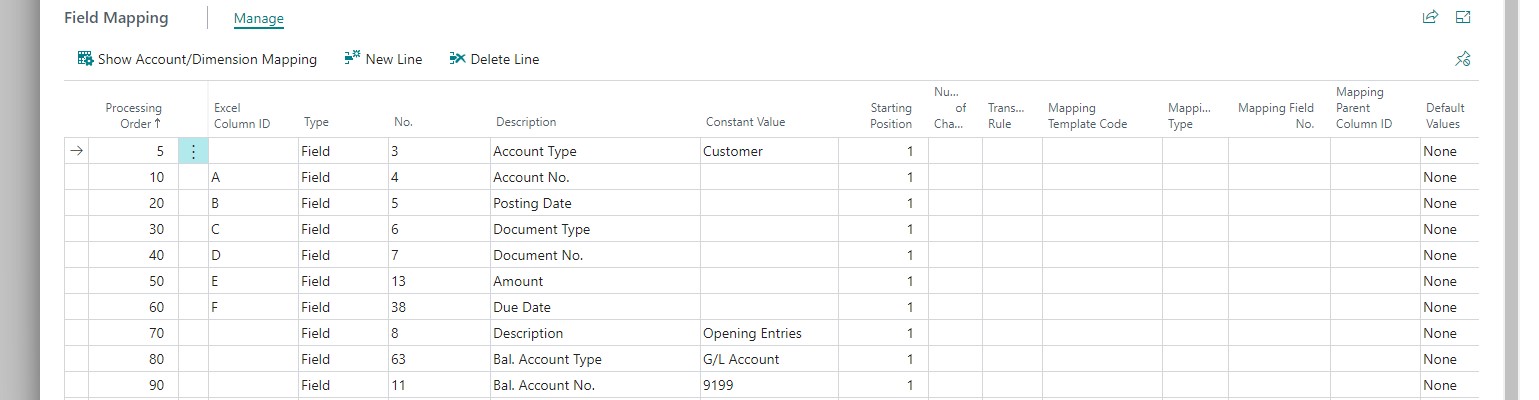
Your Excel file only sometimes contains all the fields that need to be specified. We also want to set values for Account Type, Description, Bal. Account Type and Bal. Account No. in this example.
- For each field you want to add:
- Add a new line at the bottom of the Field Mapping section.
- Enter the Processing Order.
- Enter Field for the Type field.
- Enter the field value in the Constant Value field.
The Processing Order specifies the sequence in which Excellent Importer should update the fields.
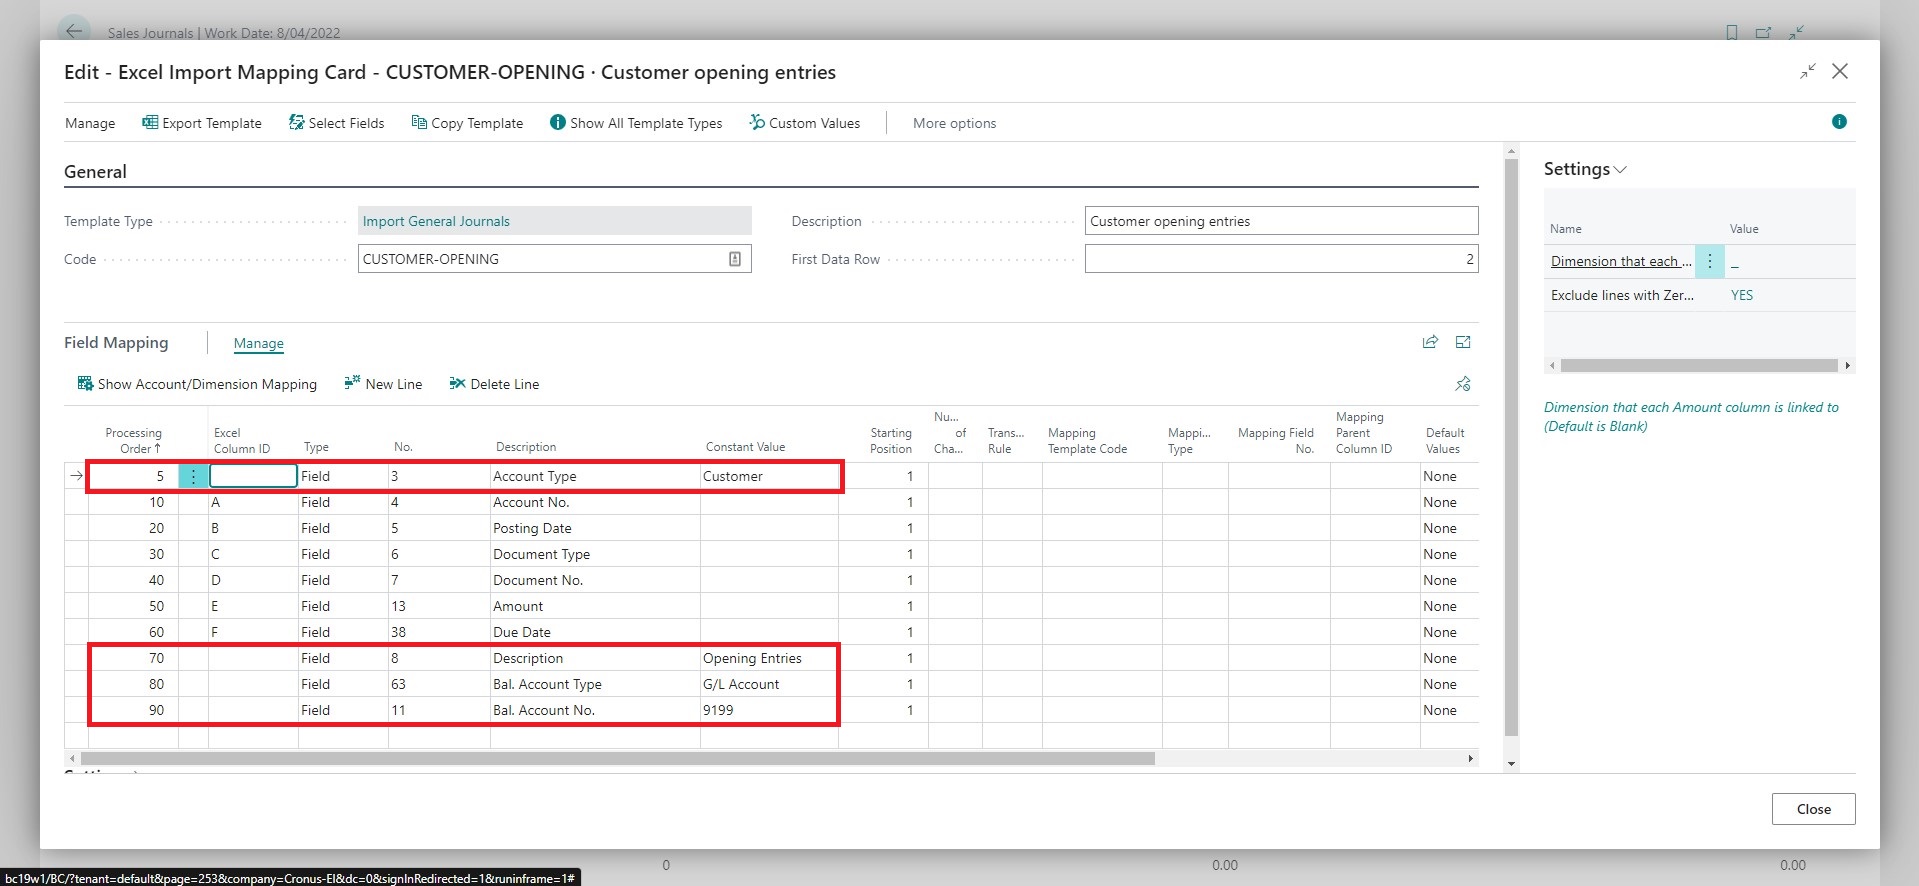
The Processing Order is important because Business Central applies business logic when you enter field values that may replace values that get imported. The general rule for the Processing Order is that it should be in the same sequence as you enter the values on the page.
Notice that we entered 5 for the Account Type. We want to specify this field before the customer number from the file gets copied to the Account No. field.
Specify values for settings
In this template, we do not want to import rows that have a zero amount. We clicked on the setting value and selected Yes.

Finish
You can close the Excel Mapping Template Card and return to where you started. In our example, we will return to the Import from Excel dialogue. We can now select the template and import the file. You can see how we import the file here.
Need to create a new template similar to another template? Use the copy template feature to assist you.
Excel Mapping Template Reference
This section details all the fields and features connected to the Excel Mapping Template. The Excel Mapping Template consists of the following components:
- Header,
- Field Mapping
- The Settings, where you specify rules to apply.
Header Fields
Here you specify a name and other details about the template.

| Field | Description |
|---|---|
| Template Type | This compulsory field specifies the import type. This field must contain a value before you can specify any other fields. |
| Code | This compulsory field specifies a unique id for the Excel Mapping Template. You can specify alphanumeric characters in this field to make the id meaningful. |
| Description | This is a description of the template. This field will appear in the Excel Import Mapping List and should be meaningful so users know when to select this template. |
| First Data Row | Here, you can specify the first Excel row from which to import data. The value defaults to 2 because most Excel files will have headings on the first line and data starting on the second line. You can change this value if your data begins on a different row. |
| Row Filter | Allows you to specify when the app should import a row or when the app should skip a row. You can read more about this feature here. |
| Header Filter | Allows you to specify the criteria for identifying header records. This field works similarly to the row filter, where you can select one or more columns. Usually, for a text file, the record type indicator would be the first column. |
| Footer Filter | Allows you to specify the criteria for identifying footer records. This field works similarly to the row filter, where you can select one or more columns. Usually, for a text file, the record type indicator would be the first column. |
| File Type | Specifies the type of file that the template is configured to import. The supported types are Excel, Variable Text (CSV), Fixed-Length Text, and Staged Data. See Staged Data File Type for details on this option. |
| Text Files | The visibility of the following fields is dependent on the value of the File Type. |
| File Encoding | Specifies the file encoding. The default value is Windows. |
| Record Separator | Specifies how records (rows) are separated in text files. Options include "New Line (CR/LF)" (default), "CR", "LF", or "None". This is useful when importing files from different operating systems or legacy systems that use non-standard line endings. |
| Column Separator | Specifies how columns in the file are separated if the file is of type Variable Text. The default value is Comma (CSV). |
| Custom Column Separator | Specifies how columns in the file are separated if the file is of type Variable Text and Column Separator is of type Custom. |
| Field Delimiter | Specifies the character used as a field delimiter (the characters that define the start and end of a field). By default, you would leave this field blank. You only specify this when your file has been defined with a non-default field delimiter. |
| Record Type Filter | Allows you to filter the column and field mapping by record type. This value only changes the display and does not impact how the file gets imported. |
Column Definitions
This section is visible when the File Type is Variable Text, Fixed-Length Text, or Staged Data.
For Variable Text and Fixed-Length Text files, the column definitions tell the app how to parse each row of the file.
For Staged Data templates, the column definitions describe the fields in the Staging Data table. The Column No. here maps directly to the field number in StagingData_EI_TSL — for example, Column 1 corresponds to Field 1 (50 Char), Column 31 corresponds to Field 31 (100 Char), and so on. Use the Create from Data Exchange action to generate these definitions automatically from an existing Data Exchange Definition.
| Field | Purpose |
|---|---|
| Description | Specifies a meaningful description of the column. |
| Start Position | Specifies the start position of the field in a fixed-length text file. |
| Length | Specifies the start position of the field in a fixed-length text file. |
| Column No. | Specifies the column number. Each record type will have columns starting from 1. For Staged Data templates, this number corresponds to the field number in the Staging Data table. |
| Column Text ID | Specifies a letter corresponding to the column number. We added this field to have a common way of mapping the fields for Excel files (which do not require column definitions) and text files. |
Staged Data File Type
The Staged Data file type is used when data has been pre-loaded into the StagingData_EI_TSL table by an external process — typically Integration Hub or a custom XMLport — rather than being read from a physical file. When this file type is selected, Excellent Importer reads the staged rows from the Staging Data table and processes them through the normal mapping and posting pipeline.
When to use it:
- You are receiving payloads from Integration Hub in JSON or XML format and want to leverage Excellent Importer's mapping, transformation, and posting features.
- You want to process data from any external source that cannot produce a standard Excel or text file, by writing your own code to populate the staging table (see Extending Staged Data Processing).
- Your source data has multiple record types (e.g. header and detail rows) that need to be mapped separately.
How it works:
- An external process (Integration Hub, XMLport, or custom code) writes rows into
StagingData_EI_TSL, tagging each row with a unique Import Reference. - Excellent Importer retrieves that reference, reads the matching staged rows, and processes them exactly as it would for a regular file import.
- Once processing is complete, the staged rows are deleted (unless Retain Staged Data is enabled on the Data Exchange Definition).
The Staging Data table has 60 text fields across three capacity tiers. Your Column Definitions map column numbers to those fields — Column 1 → Field 1 (50 Char), Column 31 → Field 31 (100 Char), Column 51 → Field 51 (250 Char). Use the Create from Data Exchange action on the Column Definitions subpage to generate these mappings automatically.
- Generic Data Exchange Processing — full setup guide including Data Exchange Definition configuration and the Staging Data table structure.
- Extending Staged Data Processing — how to populate the staging table yourself without Integration Hub.
- OnBeforeReadStagingData event — developer event for driving staged imports programmatically, e.g. via an XMLport.
Field Mapping
This is where you specify the columns from the Excel or text file and map them to fields on the table in Business Central. The Import Type determines which fields are available for selection. You do not have to use all columns from the file - only those that contain relevant data. In some cases, you may specify constant values for fields that are not present in the file but require a value in Business Central.
Common Fields
These are the fields that are used most frequently.
When the text colour of the mapping lines is red, it indicates that you have not completed the setup correctly.
| Field | Description |
|---|---|
| Processing Order | The Processing Order specifies the sequence in which Excellent Importer should update the fields. The general rule is the Processing Order should be in the same sequence you specify the fields when you capture the data directly in Business Central. Excellent Importer increments the Processing Order by 10 to allow you to add new fields between existing fields easily. |
| Record Type | Specifies the type of record that this field mapping relates to. On a file containing different record types, the same column number can get mapped to a different field. |
| Excel Column ID/Column Text ID | You specify the column from the file here. If the field is assigned a constant value, then you leave this field empty. If you are mapping columns from a text file, you can select the column from a list. You can also specify absolute references in the format Column:Row (e.g. F:4 to use the value from F4 on every line.) |
| Type | Choose either of the following: Field, Related Field, Dimension or Custom Value. Field or Related Field is used to map the Excel column to a field in a table. Dimension maps the Excel column to a dimension in Business Central. Custom Value is used when you cannot map the Excel column to a Business Central field but need the value for some special processing. |
| No. | Depending on the Type, this contains either a reference to the field, dimension or custom value. |
| Description | Provides a description which is based on the Type and No. |
| Constant Value | This field specifies values you want to assign to fields that you cannot map to an Excel Column but need to have a value. This field sometimes gets used with other fields on the mapping line. |
| Default Values | Specifies how to default values in this field. Choose None (default) when you want to use the value in the Excel cell, Use BC Default if Empty if you're going to use the value Business Central defaults when there is no value in the Excel cell and Use Constant if Empty to use a constant value when there is no value in the file. If you specify Use BC Default if Empty, you must also enter a value for Constant Value. |
| Validate Field | Use this field to control how Business Central updates the field value. Select Always to execute the business logic that Business Central would typically run. Select Only if Values when you want to run the business logic when a value is in the imported file. Select Only if not default value when you would only like to run the business logic when the value imported differs from the field's default value (e.g. the default value for decimal is zero). Select Never if you only want to fill a specific value without executing the business logic. Note: Dimension Values are always validated irrespective of the specified value. |
Selecting Never for Validate Field does not execute the underlying business Logic associated with the field. It would be best to choose this option as a last resort. You usually only specify this value for fields such as document numbers, which would otherwise cause an error when importing. We have found that the default value of Always works in most scenarios, provided that you specify the processing order correctly.
Transformation
These fields get used when you need to change the value in the Excel cell before it is applied to the field in Business Central.
| Field | Description |
|---|---|
| Starting Position | This field defaults to 1. Change this value if you do not want to copy the first part of the text in the column. |
| Length | Specify a value here if you do not want to copy the full value of the column. For example, if the column contains more than 100 characters and you want to use the value for a description, you would specify 100. This field works in conjunction with the Starting Position. |
| Decimal Rounding Precision | This field only applies to Decimal values and defaults to 0.01. You can change the rounding that Excellent Importer should use on the value in the column. You might want to specify 0.00001 for quantities or unit amounts. |
| Multiplier | Allows you to multiply a decimal or integer by a specific value. You can use this to change the sign of an amount (-1) or to convert cents to currency (e.g. 0.01). If this value is not specified (zero), the amount will not be multiplied. |
| Remove Special Characters | This field removes special characters from the column. You only need to do this if the formatting of the imported value will cause an issue when you import the file. In most cases, you do not need to change this. |
| Transformation Rule | Apply a rule to convert the text value. This uses the standard Business Central Transformation Rules, which you can read about here. We have also added a practical example here. |
Account/Dimension Mapping
The Account/Dimension Mapping allows you to handle scenarios where the data in Excel has a different coding structure to Business Central. You can read more about the setup here. You only specify values in the fields below if you need to handle mapping.
| Field | Description |
|---|---|
| Mapping Template Code | The Account/Dimension Mapping Template that contains the mapped text. |
| Mapping Type | This field gets used to specify if the mapping line is coming from the Excel file (Parent) or if the mapping line is an additional field that you want to include from the Account/Dimension Mapping (Child). |
| Mapping Field | This is the field you want to retrieve from the Account/Dimension Mapping. For example, you might want to retrieve the mapped account number or one of the dimensions from the Account/Dimension Mapping. |
| Mapping Parent Column ID | You specify a value here when the Mapping Type is child. This creates a link between the Parent line and the current line. |
| Mapping Stage | Specifies when the mapping should occur if you are concatenating columns. If you are not concatenating columns, then this field has no impact. If you do not select an option, the app will try to map before and after concatenation. You can read more about this here. |
Concatenating Values from Several Columns
The app allows you to map several columns from the file to one destination field. Additionally, you can specify if you want the app to add a separator between each value automatically.
| Field | Description |
|---|---|
| Concatenated Value Separator | Specifies a separator to concatenate multiple values into one field. This value is only used when you assign more than one column in the file to the same field. |
| Concatenated Value Separator (Custom) | Specify the custom separator text you want when concatenating multiple values into one field. You can only specify a value here when the Concatenated Value Separator is "Custom". |
- You can apply transformation and mapping to each column:
- By default, the app tries to apply Account/Dimension Mapping before and after concatenation. Suppose you intend to map the concatenated value. In that case, you might need to specify Use value if no mapping on the Account/Dimension Mapping Template to prevent errors.
- Alternatively you can specify the Mapping Stage to be either before or after concatenation. - Transformation is applied before the columns are concatenated.
- Avoid using row filters on the columns you concatenate where because it increases the complexity of the template. You can read more about this here.
- The app does not concatenate Custom Values - only Fields/Related Fields.
Click here to view an example where we have used concatenation with a sales document.
Mapping Excel Columns to Blob Fields
Some fields in Business Central hold text values but are defined as a Blob. An example is the Work Description on sales documents. Excellent Importer allows mapping one or more columns to the same Blob field. The example below shows how to map multiple columns from an Excel file to the same blob field.

If you map one or more columns to the same blob field then you can specify the Concatenated Value Separator.
Absolute References
Absolute references allow you to specify that the app will source the value for a specific field from the same Column and Row on every imported record. You specify absolute references in the format Column:Row (e.g. F:5). This feature is available for all supported file types.
Click here to view an example where we have used absolute references with a sales document.
Settings
There are common settings and settings specific to each import type. The settings fact box is on the Excel Mapping Template Card. In the settings fact box, you can see:
- The setting name (red box)
- A detailed explanation of the setting (yellow box).
- The setting value (blue box)
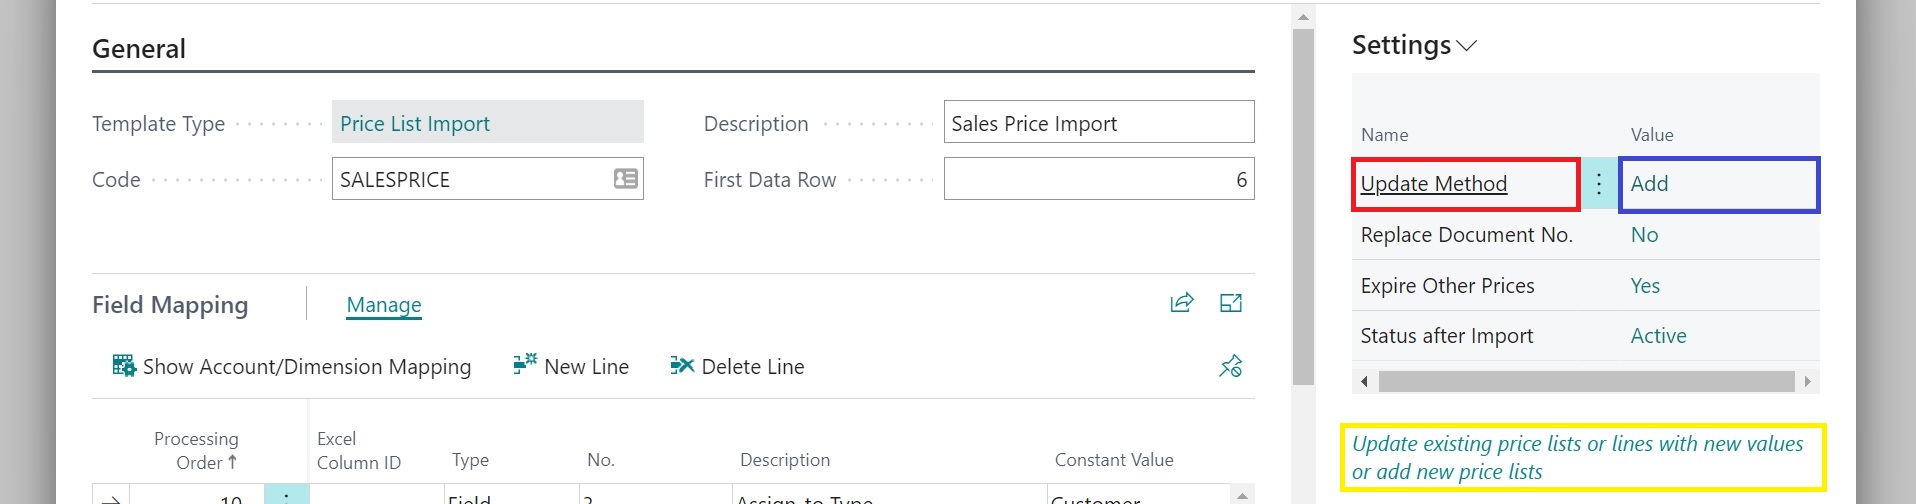
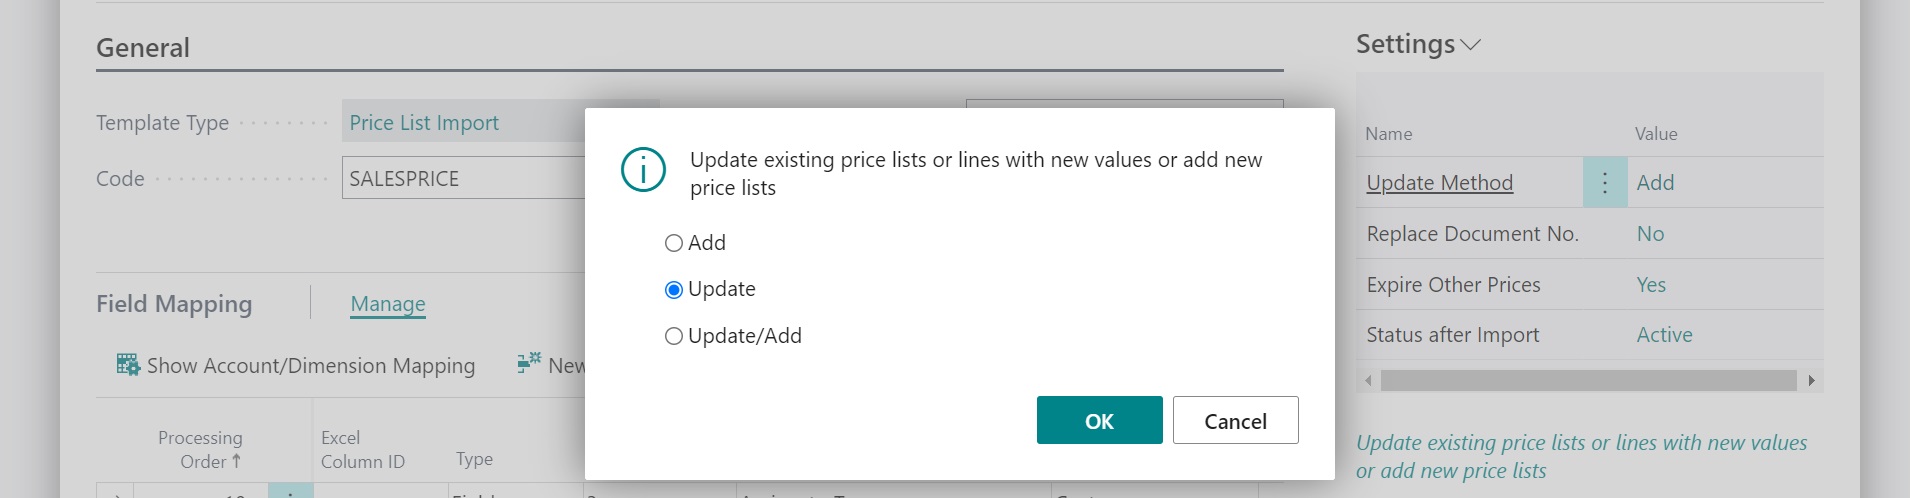
To change a setting, you click on the setting value:
You will find help for settings specific to each import type in the import type's help article.
Common Settings
Common settings are settings that are found in the template setup for multiple import types.
Validate data before Import
Specifies that you want to perform validation before importing data to receive a list of the most common issues. The default value is Yes. Note that if you choose No, the data will be validated while importing, and the import will stop on the first error. In other words, this setting cannot turn off the validation - it only allows you to enable error collection.
Create missing dimension on Import
Specifies that you want to create new dimension values if your file contains values that do not exist in Business Central.
Create missing dimension on Import should only be set to Yes on templates where you trust the data quality of the source file to prevent invalid dimensions from getting created.
Update Method
Specifies whether this template can update existing records or create new records only. The default value is Add. Some templates support additional values like Update or Update/Skip. Templates that support updating existing records will show these additional options.
Add Link to Imported File
This setting lets you specify if you want to link imported records to the imported file. When specified, the app file saves the file in the Imported Files table and creates a record link against each imported record. This allows users to browse from the record to the file used to create or update the record. This setting is available on the following templates:
The animation below shows you an example where this setting is enabled for a sales document import:
- This setting is only available if you have a Premium subscription plan.
- You must use personalisation to show the Links fact box if it is not shown by default.
Adding rules to include or exclude Excel Rows
Business Value
Some of the Excel files you import may originate from reports produced by external systems. Sometimes, these files will include unwanted rows, such as sub-totals. Alternatively, you may receive Excel files containing rows with invalid data you do not want to import. Removing these lines takes time and can lead to errors.
Feature Details
Excellent Importer allows you to specify a Row Filter. When you specify a Row Filter, you also specify whether the app will use this filter to include or skip lines. The Row Filter is available on all Import Types.
To use this feature to its fullest potential, it helps to be familiar with entering filters in Business Central. You can read the help from Microsoft here.
Row Filters and Account/Dimension Mapping
The app evaluates the row filter before applying mapping and transformation and after mapping and transformation.
- If, before processing the mapping/transformation, the row does not meet the criteria required to include the row in the import, then the app will skip the row.
- Else, the app will apply the mapping/transformation and then re-evaluate the conditions using the values after mapping to determine whether to include or exclude the line.
Row Filters and Concatenation
The app does not prevent you from applying filters to columns you concatenate. However, it is essential to note that concatenation occurs before the app evaluates the row filters. When columns are concatenated, the app only combines all concatenated values into the last reference for a field. Therefore, if you concatenate D, E and F from a file, the app file only finds a value in F when it evaluates the row filter.
We recommend that you avoid using columns that you want to concatenate as part of your row filters to minimise the complexity of your template.
Example: Skip Specific Rows from a file
In this example, we will import employee expenses from a file that contains a total per department. We will use the Row Filter to skip these lines.
Excel File
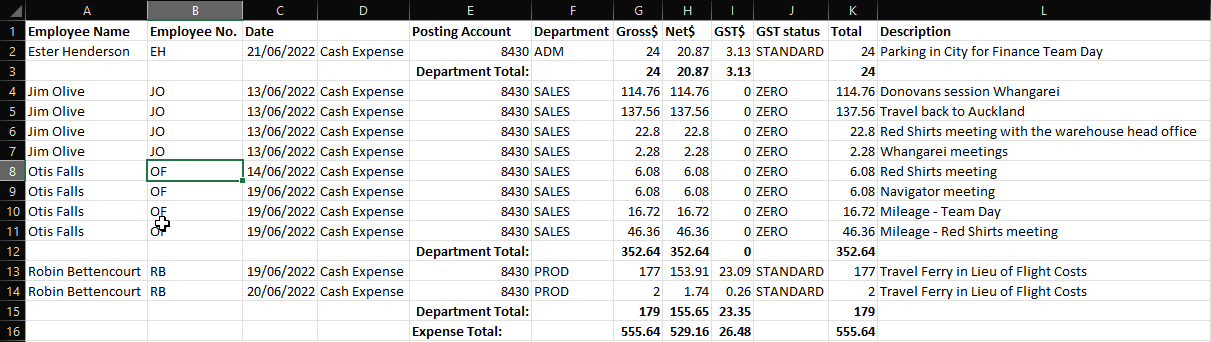
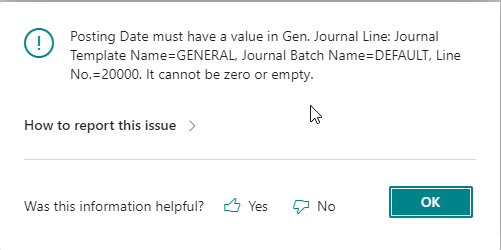
As you can see above, the lines with the total must not get imported because they do not contain any valid transactional data. If we import the file without applying the Row Filter, we get the following error:
Specify the Row Filter
Open the Excel Mapping Template Card and select the assist edit action next to the Row Filter.

The following page gets opened:
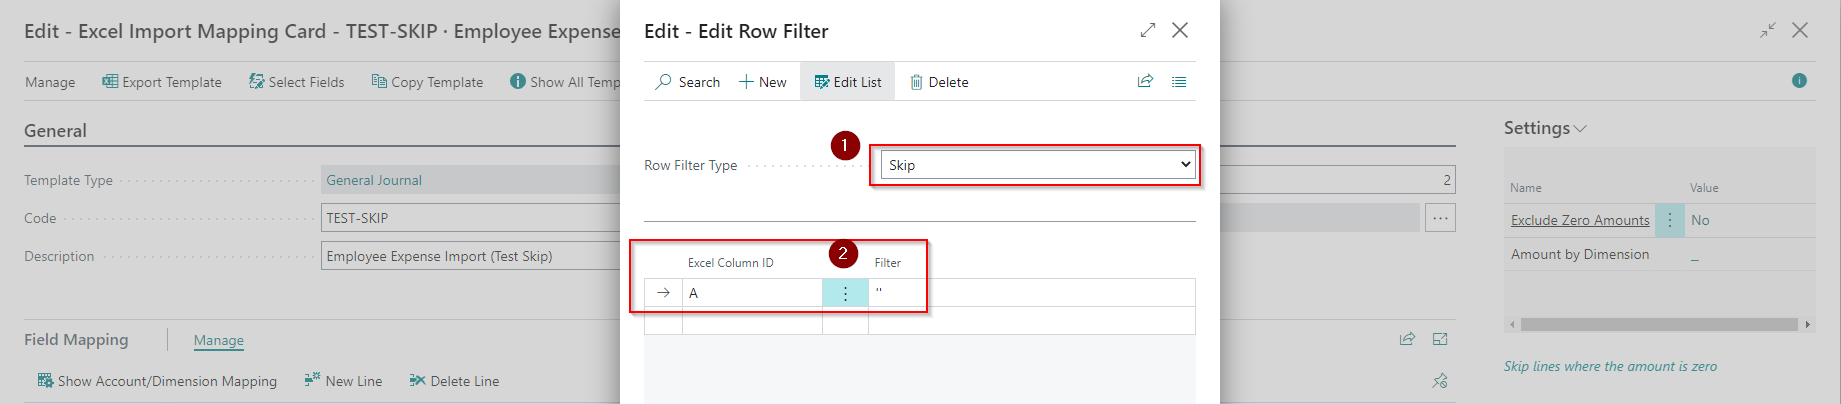
- Select Skip for the Row Filter Type.
- Specify the conditions. For our example, we only need to specify one condition because every line we want to import has an Employee Name.
- You can specify any column from the Excel File in your conditions - even if you have not mapped the column in your template.
- The filter is for the text value imported from the file before it gets copied to the field.
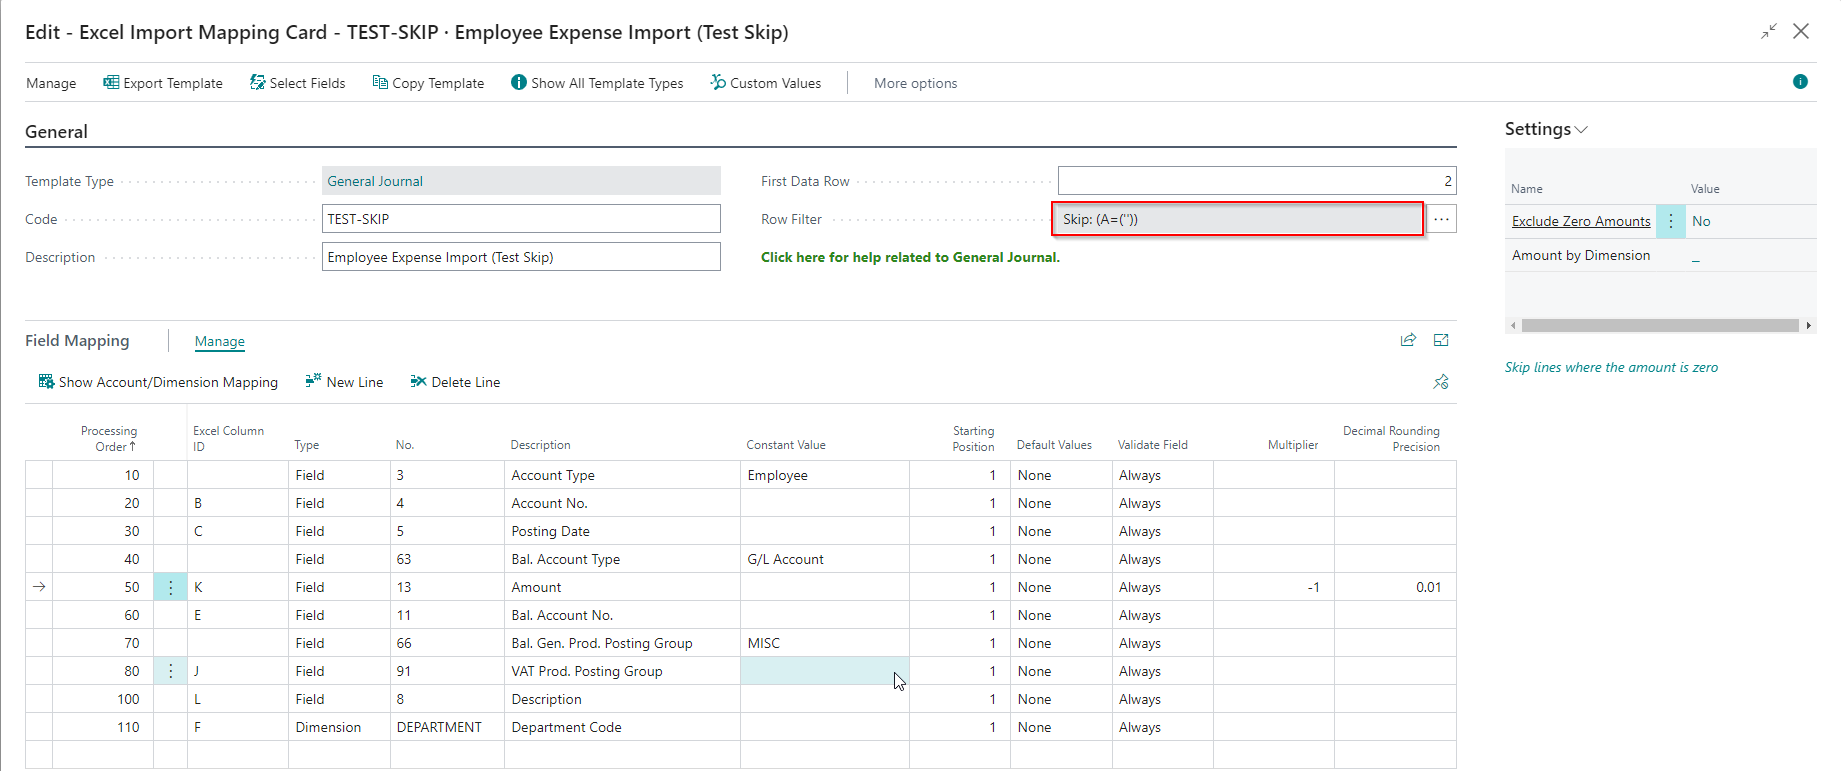
After you close the page, the Row Filter is updated as below:
Import the file
When you import the file, you will notice that all rows get imported except those that did not have a value in column A.
Example: Include Specific Rows from a file
We will use the template from the previous example to show you how to achieve the same outcome by specifying which lines to include rather than which to skip.
Update the Row Filter
Open the Excel Mapping Template and select the assist edit next to the Row Filter.

- Change the Row Filter Type to Include.
- Change the filter on column A's value to
<>''.
Close the page. Notice that the Row Filter is updated.
Import the file
The file will import the same lines even though we specified the rule differently.
Copy Template
The Copy Template aims to copy existing templates as a starting point for a new template and copy templates between companies. The feature supports copying to a new template and copying from an existing template. If you change a template in one company, you can use the copy template feature to push these changes to other companies.
This Step-by-Step guide will show you how to copy a template to a different company.
Custom Values
The custom values feature allows you to map data columns from files that cannot map to a field in Business Central, and then you can do processing with this data.
Step-by-Step Guides
Create an Excel Mapping Template for Purchase Documents
Copy Excel Mapping Template
Examples
Transformation Rule Example
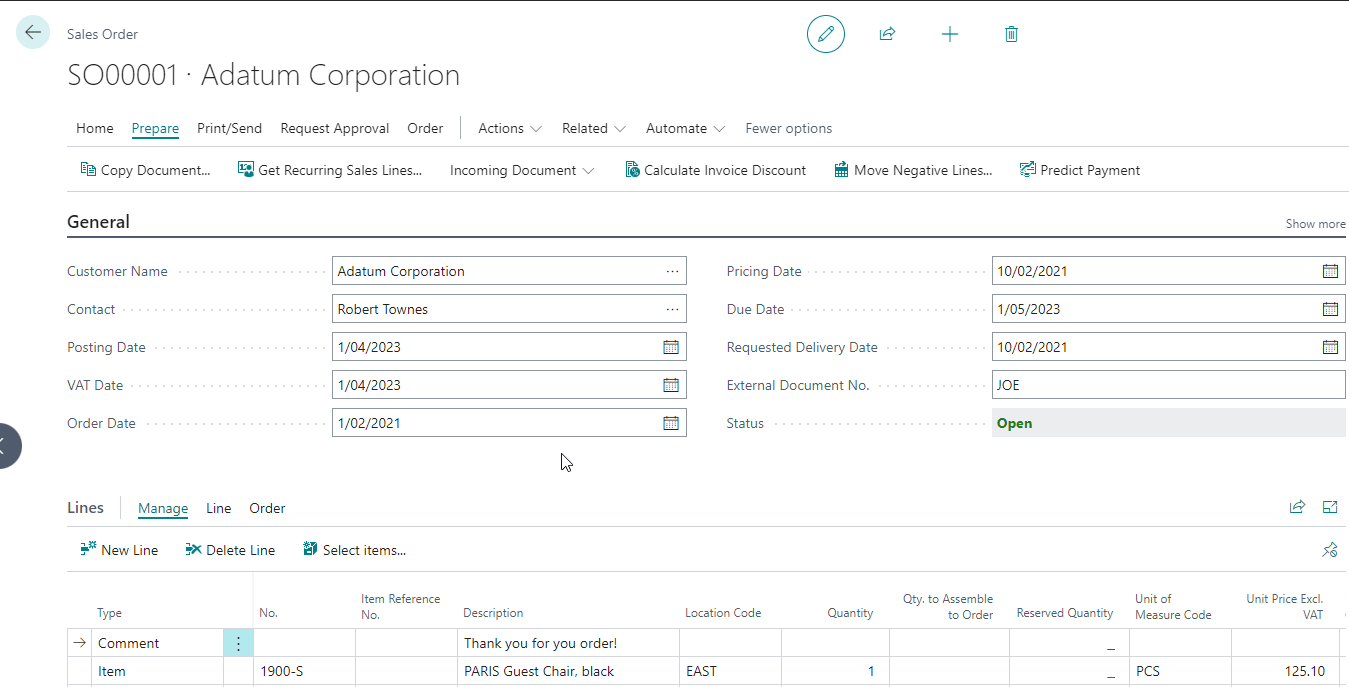
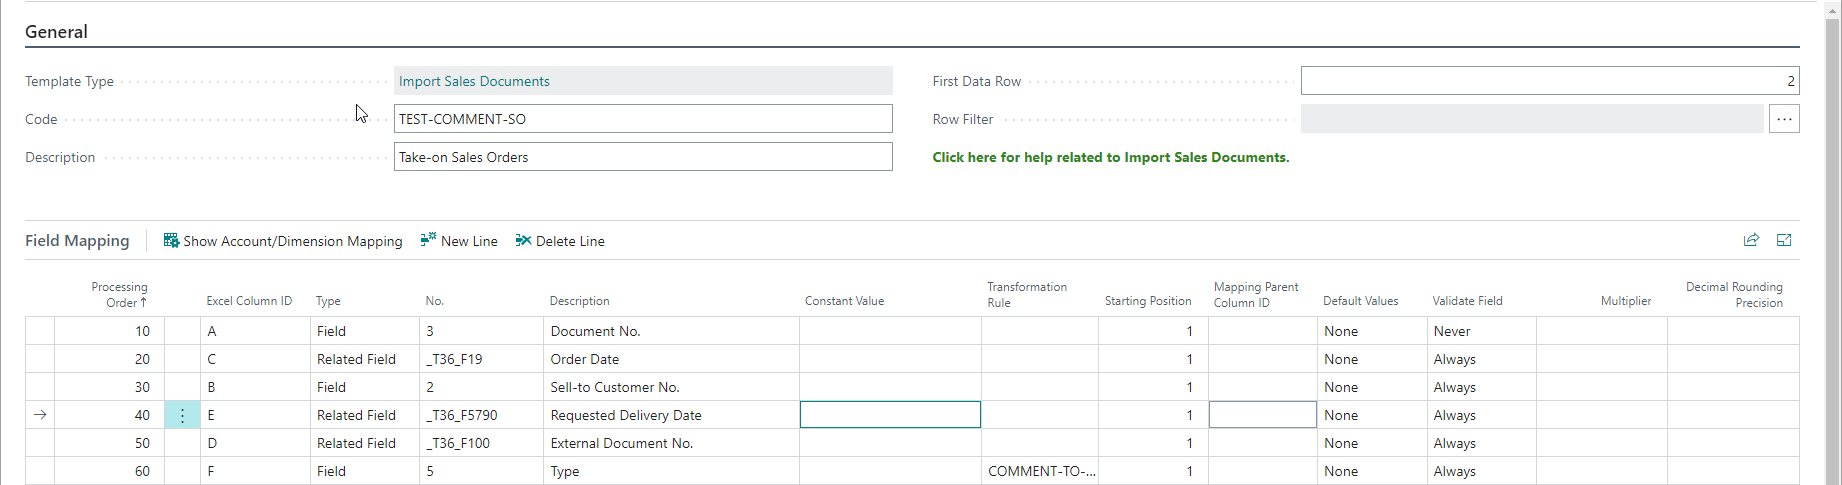
On sales and purchase documents, you can add comment lines. While the Type gets formatted as the text Comment on the pages, this value cannot be entered into the field directly because the actual value is blank. This transformation rule converts the text Comment to blank.
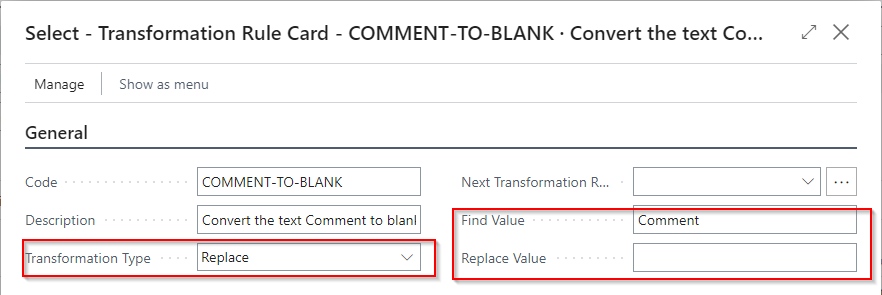
Here is an example mapping template where we use the transformation rule:
Here is an example file that you can import with this configuration:

Here is the imported document: