Bulk Updates
This section covers features we created to handle common bulk updates requested by our customers.
- Before using one of these features in your production environment, you must ensure you have a complete understanding of the tool's purpose and possible consequences.
- We recommend that you run the update in a sandbox before attempting to run the update in a production environment so you can ensure that you are happy with the outcome. You cannot reverse the changes made by some of these updates.
- Some updates can run for a long time and should be run outside office hours to avoid locking
Historical Dimension Update
Some companies want to change the dimensions of their historical entries when they change the dimensions in the master records, like customers, items, jobs, etc. The set of tools described in this section allows you to update the dimensions selectively.
Feature Details
The Historical Dimension Update tool set consists of two main parts:
- Processing-only reports, that trigger the update of dimensions and allow you to specify update options and filters.
- Customer Sales History Dimension Update
- Item Sales History Dimension Update
- Job History Dimension Update
- Dimension Update Log. This log provides additional details about who ran the update, when they ran it, what dimensions were updated, etc.
The above pages are available from the Theta Run Object page and Tell Me.
The update reports do not check whether specified dimensions selected for an update are blocked, or certain dimension value combinations are prohibited. It is up to the user to decide which dimensions need to be reflected against the historical transactions.
As the historical transactions can consist of thousands of entries, scheduling these batch jobs using the job queue is recommended.
Customer Sales History Dimension Update
Some companies want to change the dimensions of their historical entries when they change the dimensions of their customers. The Customer Sales History Dimension Update allows you to update the dimensions selectively.
Business Value
You can use this update to do the following:
- Correct sales transactions related to customers that got set up incorrectly.
- Introduce a new dimension linked to your customers and update all history.
- Reclassify your customers and allow this classification to get reflected in the history and future transactions.
If you use Analysis Views, you must rebuild them because this tool does not update analysis views.
How to start
Run Customer Sales History Dimension Update report to start updating dimensions in historical transactions based on customer's dimensions. The request page of the update report is shown below:

The request page has the following options:
| Field | Purpose |
|---|---|
| Dimensions to Update | Specifies dimensions codes that should be updated. To select dimension codes from the list, press the assist edit button. You must select at least one dimension. |
| Update Type | Available option values: Update Dimensions Available for Customer (default choice) and Update All Selected Dimensions. The default option value is to update dimensions specified against the customer to prevent a scenario where we would remove a dimension value that was specified but is not a default dimension. |
| From Posting Date | Specifies the earliest Posting Date for sales transactions for which the app will update dimensions. |
| To Posting Date | Specifies the latest Posting Date for sales transactions for which the app will update dimensions. |
| Comment | Specifies optional comments from the user. By default, the comment reflects dimension codes to be updated. |
| Commit after each customer | Specifies that app should commit changes after processing each customer's history. This setting is to prevent one error from rolling back the entire batch. |
| Use Sell-to Customer For Dimension Update | This option supports customers with the Advanced Sales extension installed. It is updated automatically and cannot be overridden. It is enabled when the Advanced Sales extension is installed in the customer environment and set up to use default dimensions from the Sell-to Customer instead of the Bill-to Customer. |
| Filter: Customer | The Filter section shows the default filter fields you use to limit which customers to update. To add a filter, choose the + Filter action, type the name of the field that you want to filter by, or pick a field from the drop-down list. |
Dimension Update Scenarios
Depending on the current customer and existing historical dimension sets, different update scenarios are possible. For example:
| Scenario | Description |
|---|---|
| 1. New dimension code DEPARTMENT with value 'ADM' got assigned to the customer. | Historical dimension sets for this customer will now show DEPARTMENT 'ADM'. |
| 2. Dimension Code DEPARTMENT is changed from 'ADM' to 'SALES'. | Historical dimension sets for this customer will now show DEPARTMENT 'SALES'. |
| 3. Dimension Code DEPARTMENT gets removed from the customer | Depending on the Update Type option selected on the report request page, Dimension Code DEPARTMENT might remain unchanged or get removed from the historical dimension sets. |
The update report processes only dimension codes specified in the request page's Dimensions to Update field.
Special case of Bill-to Customer No. different from Sell-to Customer No.
Standard BC functionality allows Bill-To Customer No. to be different from the Sell-To Customer No. in sales documents. In such cases and unless Advanced Sales extension is installed in the customer environment and set up to use default dimensions from the Sell-to Customer instead of the Bill-to Customer, the dimension set of specific entries gets updated from the Bill-To Customer No. dimensions and the dimension set of other entries gets updated from Sell-To Customer No. dimensions.
Namely, the dimension set of the below entries gets updated from Bill-to Customer No.:
- "G/L Entry"
- "Value Entry"
- "Cust. Ledger Entry"
- "Detailed Cust. Ledg. Entry"
- "Sales Cr.Memo Header"
- "Sales Cr.Memo Line"
- "Sales Invoice Header"
- "Sales Invoice Line"
The dimension set of the below entries gets updated from Sell-to Customer No.:
- "G/L Entry"
- "Value Entry"
- "Sales Shipment Header"
- "Sales Shipment Line"
- "Return Receipt Header"
- "Return Receipt Line"
Item Sales History Dimension Update
Similar to the previous case, some companies want to change the dimensions of their historical entries when they change the dimensions of their items. The Item Sales History Dimension Update allows you to update the dimensions selectively.
Business Value
You can use this update to do the following:
- Correct sales transactions related to items that got set up incorrectly.
- Introduce a new dimension linked to your items and update all history.
- Reclassify your items and allow this classification to get reflected in the history and future transactions.
If you use Analysis Views, you will need to rebuild them because this tool does not update analysis views.
How to start
Run Item Sales History Dimension Update report to start updating dimensions in historical transactions based on items's dimensions. The request page of the update report is shown below:
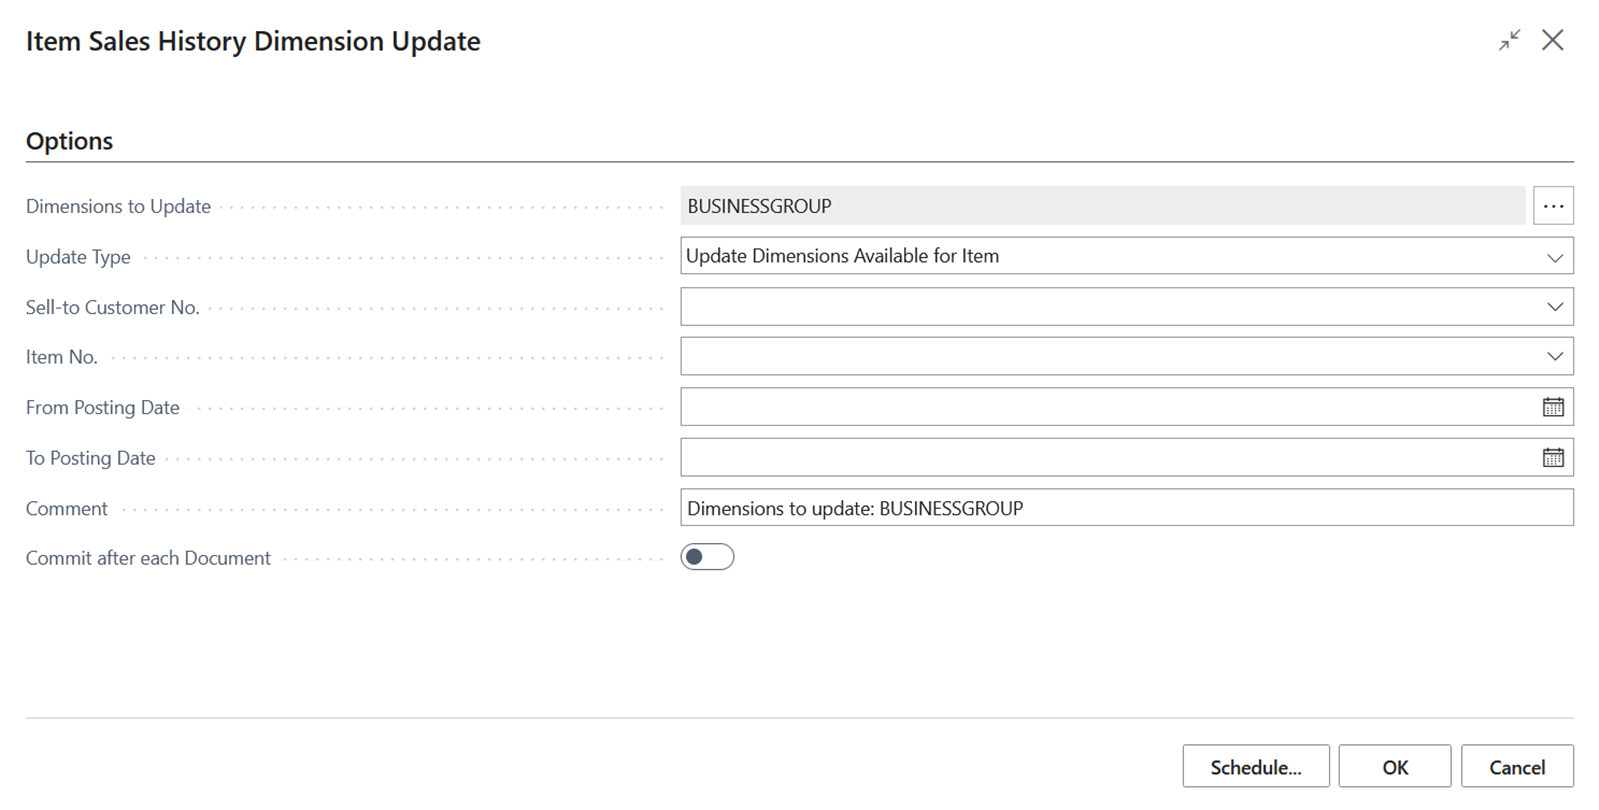
The request page has the following options:
| Field | Purpose |
|---|---|
| Dimensions to Update | Specifies dimensions codes that should be updated. To select dimension codes from the list, press the assist edit button. You must select at least one dimension. |
| Update Type | Available option values: Update Dimensions Available for Item (default choice) and Update All Selected Dimensions. The default option value is to update the dimensions specified against the item to prevent a scenario where we would remove a dimension value that had been specified but is not a default dimension. |
| Sell-to Customer No. | Specifies the sell-tp customer number for which dimensions update should be executed. If left blank, dimensions will be updated for all customers. |
| Item No. | Specifies the item number for which dimensions update should be executed. If left blank, dimensions will be updated for all items. |
| From Posting Date | Specifies the earliest Posting Date for sales transactions for which the app will update dimensions. |
| To Posting Date | Specifies the latest Posting Date for sales transactions for which the app will update dimensions. |
| Comment | Specifies optional comments from the user. By default, the comment reflects dimension codes to be updated. |
| Commit after each document | Specifies that app should commit changes after processing each customer's document. This setting is to prevent one error from rolling back the entire batch. |
Dimension Update Scenarios
Depending on the current customer and existing historical dimension sets, different update scenarios are possible. For example:
| Scenario | Description |
|---|---|
| 1. New dimension code BUSINESSGROUP with value 'OFFICE' got assigned to the item. | Historical dimension sets for this item will now show BUSINESSGROUP 'OFFICE'. |
| 2. Dimension Code BUSINESSGROUP is changed from 'OFFICE' to 'HOME' for the item. | Historical dimension sets for this item will now show BUSINESSGROUP 'HOME'. |
| 3. Dimension Code BUSINESSGROUP gets removed from the item | Depending on the Update Type option selected on the report request page, Dimension Code BUSINESSGROUP might remain unchanged or get removed from the historical dimension sets. |
The update report processes only dimension codes specified in the request page's Dimensions to Update field.
Affected tables
The dimension set of the below entries gets updated when report is executed:
- "Item Ledger Entry";
- "Value Entry";
- "G/L Entry";
- "Sales Shipment Line";
- "Return Receipt Line";
- "Sales Invoice Line";
- "Sales Cr.Memo Line";
Foreign currency special case
When processing sales invoices and sales credit memos posted in a foreign currency, the report skips updating dimension set in the "G/L Entry".
Job History Dimension Update
Similar to the previous cases, some companies want to change the dimensions of their historical entries when they change the dimensions of their job tasks. The Job History Dimension Update allows you to update the dimensions selectively.
Business Value
You can use this update to do the following:
- Correct posted transactions related to job tasks that got set up incorrectly.
- Introduce a new dimension linked to your job tasks and update all history.
- Reclassify your job tasks and allow this classification to get reflected in the history and future transactions.
How to start
Run Job History Dimension Update report to start updating dimensions in historical transactions based on job tasks's dimensions. The report can be accessed either using Theta Run Object page or Tell Me functionality. The request page of the update report is shown below:
The request page has the following options:
| Field | Purpose |
|---|---|
| Dimensions to Update | Specifies dimensions codes that should be updated. To select dimension codes from the list, press the assist edit button. You must select at least one dimension. |
| Update Type | Available option values: Update Dimensions Available for the Job Task (default choice) and Update All Selected Dimensions. Default option value is to update dimensions specified against the job task. This is to prevent a scenario where we would remove a dimension value that had been specified but is not a default dimension. |
| From Posting Date | Specifies the earliest Posting Date for job related transactions for which the app will update dimensions. |
| To Posting Date | Specifies the latest Posting Date for job related transactions for which the app will update dimensions. |
| Comment | Specifies optional comments from the user. By default, the comment reflects dimension codes to be updated. |
| Commit after each Job Task | Specifies that app should commit changes after processing each job. This setting is to prevent one error from rolling back the entire batch. |
Dimension Update Scenarios
Different update scenarios are possible depending on the current customer and existing historical dimension sets. For example:
| Scenario | Description |
|---|---|
| 1. New dimension code AREA with value 'Europe North (EU)' got assigned to the job task. | Historical dimension sets for this item will now show BUSINESSGROUP 'Europe North (EU)'. |
| 2. Dimension Code AREA is changed from 'Europe North (EU)' to 'Europe North (Non EU)' for the job task. | Historical dimension sets for this job task will now show AREA 'Europe North (Non EU)'. |
| 3. Dimension Code AREA gets removed from the job task | Depending on the Update Type option selected on the report request page, Dimension Code AREA might remain unchanged or get removed from the historical dimension sets. |
The update report processes only dimension codes specified in the request page's Dimensions to Update field.
Affected tables
The dimension set of the below entries gets updated when report is executed:
- "Resource Ledger Entry"
- "G/L Entry"
- "Cust Ledger Entry"
- "Detailed Cust. Ledg. Entry"
- "Posted Sales Invoice Lines"
- "Item Ledger Entry"
- "Value Entry"
Job Task Type special case
Only Job Task lines with "Job Task Type" = 'Posting' are processed by the report.
Dimension Update Log
Each time you run the update reports, a new entry gets created in the Dimension Update Log. As can be seen in the screenshot below, the update was run three time in a test company:
_
Press Open Card action to get additional details about the update.
_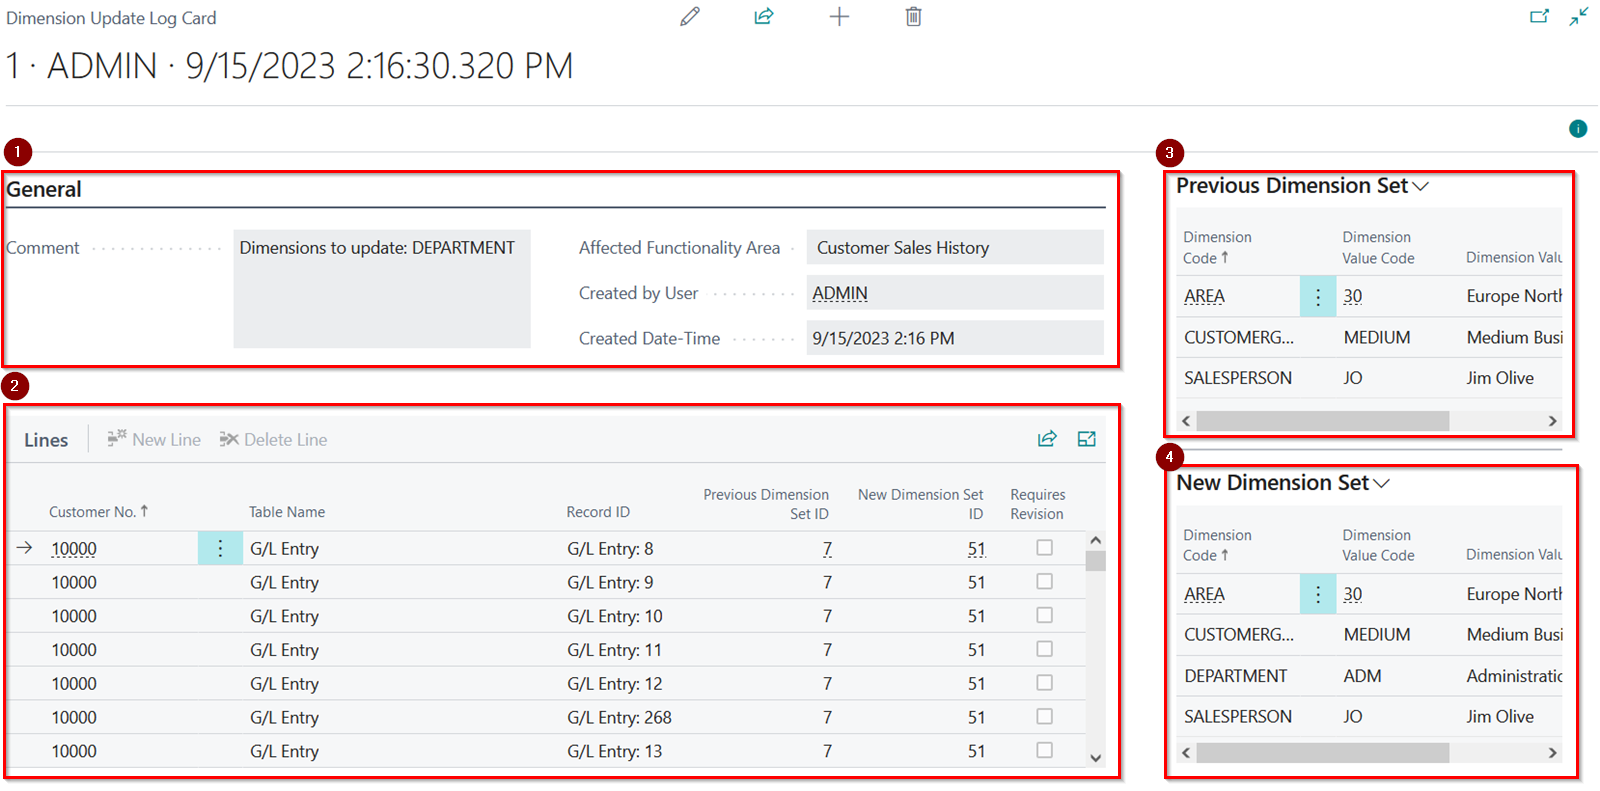
| Section | Description |
|---|---|
| 1. General | Specifies general information about the update: user name, time-stamp and comment. |
| 2. Lines | Specifies the entries that got updated in this batch. |
| 3. Previous Dimension Set factbox | Specifies the current entry's dimension set before the update. |
| 4. New Dimension Set factbox | Specifies dimension set which current entry received after the update. |
As can be seen in the Comment field in the screenshot above, the user ran the update to update the DEPARTMENT dimension code. The New Dimension Set fact box shows that the app enriched the dimension set for the selected entry with the new dimension code value 'ADM'.
Bulk Delete
This feature allows you to delete many records at a time. Example scenarios include:
- If you need to delete many sales orders, you can use this tool to delete all the order headers instead of doing this one by one. The standard application code will cause the related lines to be deleted.
- Retention Policies have a hard limit of only deleting a maximum of 10000 records at a time. If you want to enable a retention policy, use this tool to perform the initial catch-up (if applicable). We have seen this used for the change log.
You can access this feature from the Run Object page under the Additional Tools section of the ribbon. If you want to schedule this job in the job queue, you must specify Report 70254661.
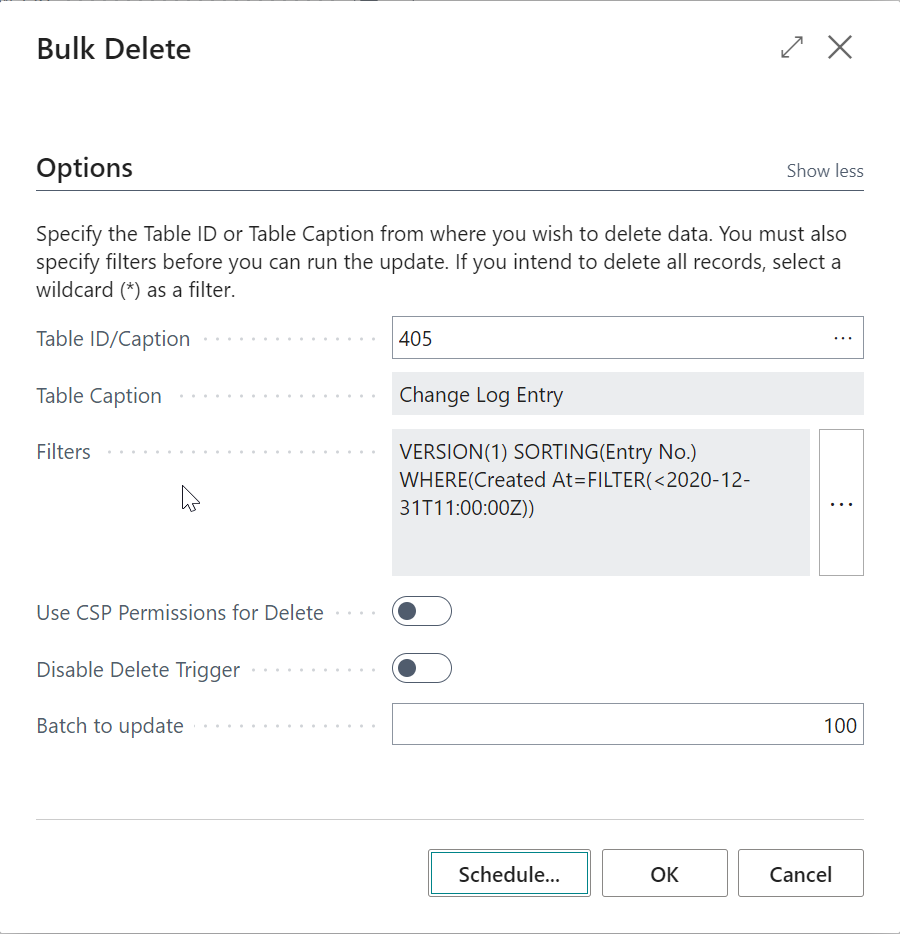
| Field | Purpose |
|---|---|
| Table ID/Caption | Specify a table from which you wish to delete data. You can enter a table number if you know it, or you can enter part of the table caption. |
| Table Caption | Specifies the table caption. |
| Filters | Specify the filters you want to apply to the table. You will get an error if you do not specify any filters. |
| Use CSP Permissions for Delete | Allows you to delete records in posted entries provided that you are a CSP partner (only validated in a Production environment). |
| Disable Delete Trigger | Specifies that the app should delete the records without running the Delete trigger. Warning: Do not turn off the trigger if unsure what built-in validation will be disabled. |
| Batch to Update | You can define the number of records to commit after deletion. If blank or you specify a value more than the total number of available records, it will commit once all are deleted. |
The incorrect use of this feature can cause inconsistencies in your data that cannot be reverted. We recommend:
- Always test the action in a sandbox to avoid potential issues in a Production environment.
- Avoid turning off the Delete trigger, as the application often has validation that prevents you from deleting data incorrectly. Always check with your implementation consultant before using this.
If you need to delete many emails, we recommend using the Bulk Delete Emails feature instead of this generic feature, as the Bulk Delete Emails has specific logic due to the time it takes to delete each email and related tenant media.
Bulk Delete Emails
Business Value
Over time your sent emails will accumulate and use a lot of space in your database. Many of these sent emails contain attachments such as PDF copies of your invoices. These documents can easily get resent, so there is no need to retain this email for an extended period.
Feature Details
You can access the Bulk Delete Email batch job from Tell Me or the Run Object page. You can also run this report from the job queue (Report 70254658).
Business Central can handle the archiving automatically using Retention Policies. Usually, the retention policy is all you need, and you only have to use this tool if you have to handle a lot of history. This is because the retention policy can only delete 10000 records at a time.

| Field | Purpose |
|---|---|
| Retention Period | Specify a date formula representing the retention period. For example, specify 1M to keep emails newer than one month. |
| Delete Sent Emails | Specifies whether to delete sent emails. |
| Delete Outbox Emails | Specifies whether to delete outbox emails. Usually, you only need to delete outbox emails if many errors accumulate over time. |
The Bulk Delete Emails action requires an Essentials subscription plan.
The deletion of emails can be time-consuming. To prevent the tables from being locked for extended periods, the batch update commits changes after every 50 emails get deleted.
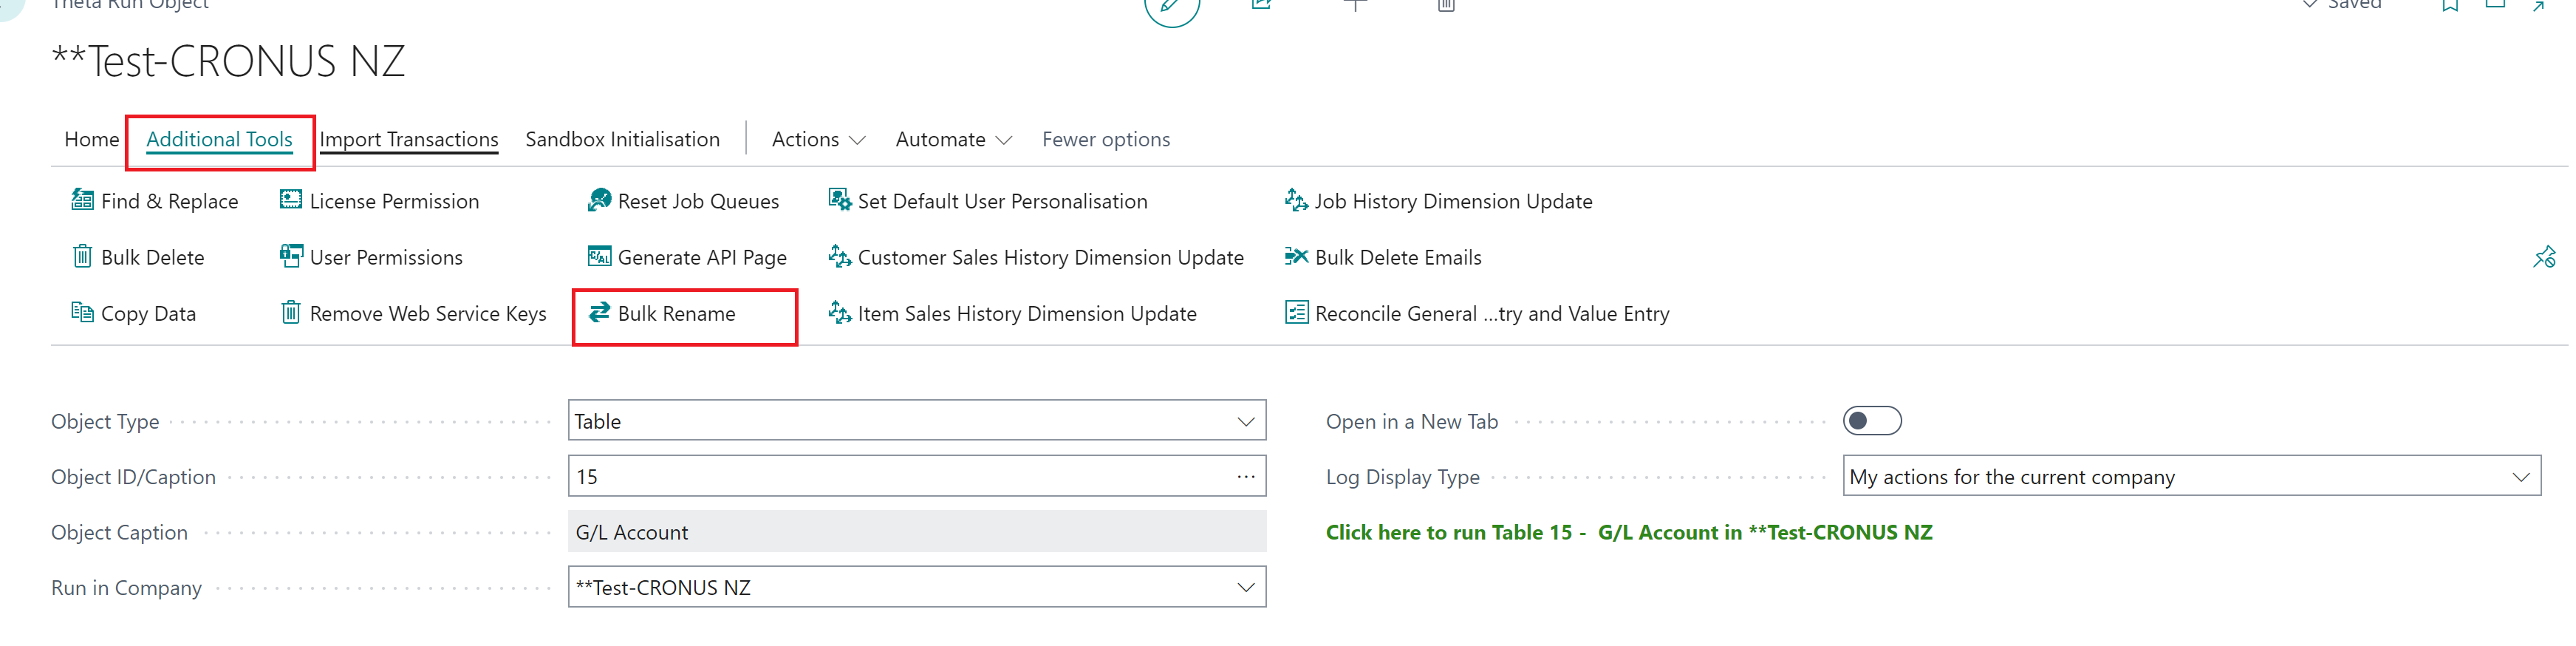
Bulk Rename
Renaming (renumbering) records can take a long time in Business Central because Business Central must update the related transactions, too. Therefore, if you have several records that you need to do at once, it is beneficial to automate the task. An excellent example of where you can use this feature is when you want to rename your chart of accounts to make space for new accounts or when you want to make some fundamental changes to align different companies. The bulk rename feature allows you to rename multiple master data records using a text file as an input.
You can access the Bulk Rename batch job from the Run Object page.
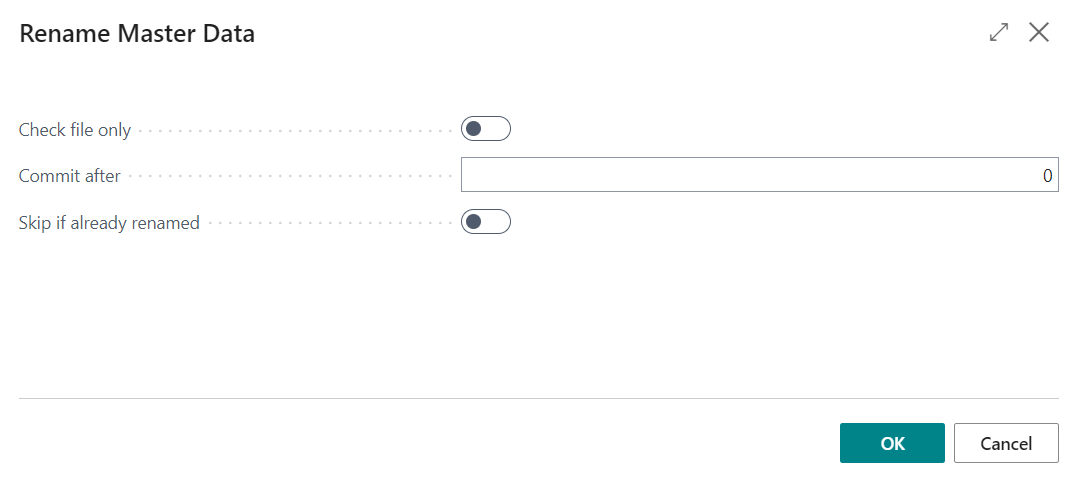
| Field | Purpose |
|---|---|
| Check file only | Specify to only check that the file is acceptable - no records will be renamed. |
| Commit after | Specify the number of records that should be renamed before the transaction is committed. The purpose of this is to prevent the process from locking tables for an extended period. If you specify zero here, the transaction will only be committed once all records are renamed. |
| Skip if already renamed | You can specify this to ignore where a record has been renamed. The program will assume that if the existing record does not exist but the new record does exist, it has already been renamed. You may need to use this setting if you commit records and the batch fails. |
We recommend using the Commit after option - especially for batches where the records being renumbered have many related records.
File Format
The default file format is a csv (comma-separated values) file with a header row. The file should contain:
Headings
[Table ID],[Primary Key Field 1],[Primary Key Field 2],...,[New Value 1],[New Value 2],...
The heading row is ignored by the import, so the column names are irrelevant. Since most CSV files will be created in Excel, we recommend that you give the columns meaningful names.
Here is an example file you would need to create if you wanted to rename records in the G/L Account table:
Table Id,Old Account No.,New Account No.
15,1110,111000
15,1120,112000
Here is an example layout you would used for the customer bank account table, which has two primary key fields:
Table Id,Customer No.,Old Code,Customer No.,New Code
287,10000,01,10000,DEFAULT
287,20000,01,20000,DEFAULT
Change the File Format
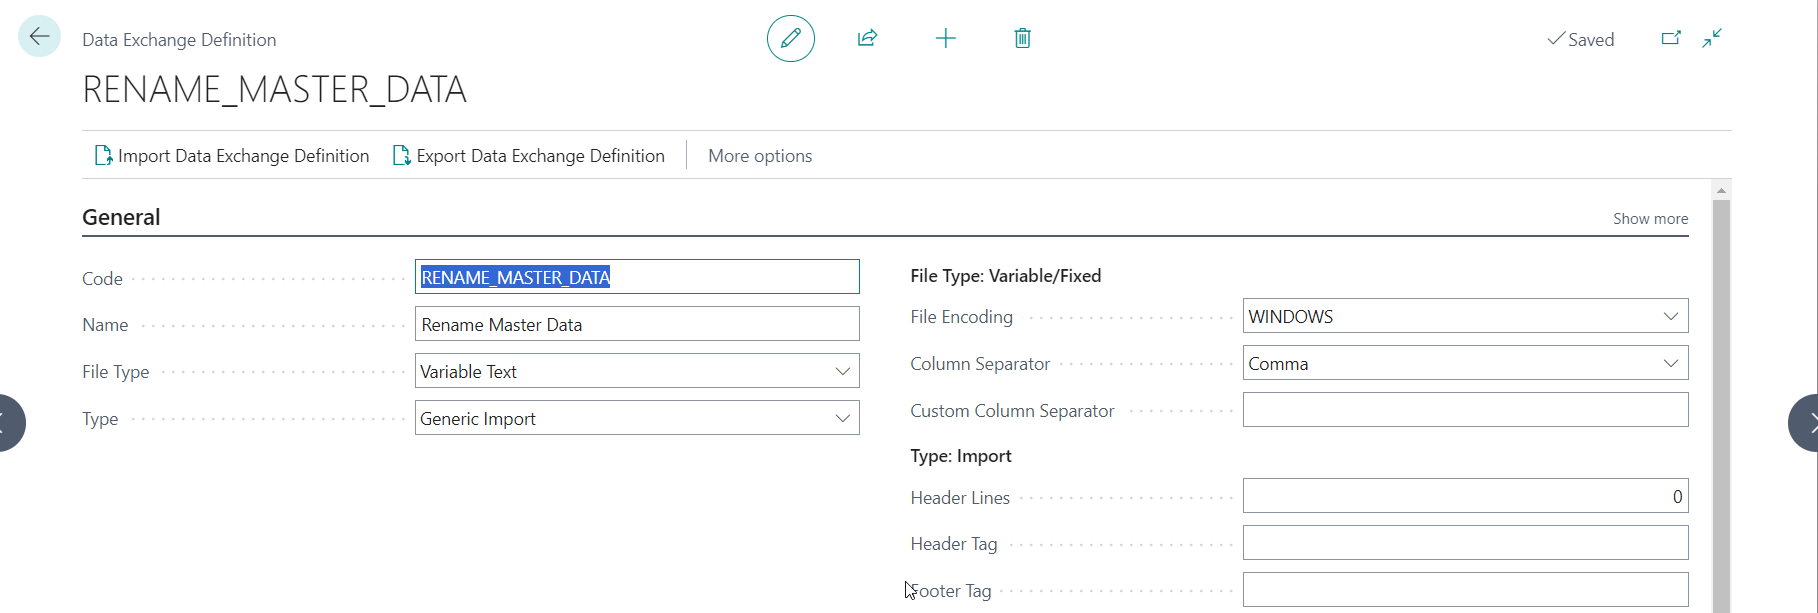
In most cases, you do not need to change the file format. However, you can update it if you need to. This is done by updating the data exchange definition the app automatically creates. You can update the data exchange definition to use a different file format (e.g., tab-delimited) or a file without a header row.
Bulk Cancel Reservations
Use this update to cancel item reservations in bulk. The update can also identify orphaned reservations. You can access this report from the run object page.
- The app only supports variable text, so you can only change the separator.
- You do need to specify line definitions, column definitions or mapping details.