EFT Transfers
Business Value
When paying multiple vendors, employees or customers, you need an efficient and robust process for suggesting the payments and creating an upload file for the bank.
Feature Details
We designed the EFT Transfer functionality to provide an efficient process supporting delegated authority levels. It can ensure that you can only make EFT Transfers to approved bank accounts.
Overview
The EFT Transfer provides the following features:
- Direct Credit
- Local and cross-border payments to Vendors
- Local and cross-border payments to Customers if you need to process refunds
- Local payments to Employees
- Direct Debit to handle customers that pay with direct debit.
- The ability to configure the bank file formats so you can handle virtually any bank.
- The following built-in file formats are pre-configured, and we support the hash-total calculations specified by these banks (where applicable):
- ANZ
- ASB
- BNZ
- HSBC
- Westpac
- Westpac (BACHO)
Security Features
- Vendor, Customer and Employee bank account approvals prevent bank accounts from being changed without approval.
- EFT Transfer Approvals, with the ability to specify approval limits and the minimum number of unique approvers. If you configure EFT Approvals, you cannot export the EFT File until the batch is approved.
- Monitoring of sensitive fields in the following areas
- EFT Setup
- EFT Bank File Configuration (to identify changes to file format/manipulation of file content)
- EFT User Approval Limits
Host-to-host integration
We support host-to-host integration. Enabling host-to-host integration needs to be set up with your bank. You will need Theta's assistance to connect Business Central to your bank securely. There is currently no other way to integrate Business Central directly with your New Zealand or Australia bank.
With host-to-host integration enabled, the following is possible:
- EFT Transfers get sent directly to the bank after the EFT Transfer is approved. Depending on your setup with the bank, the bank validates the file. It will process the payment (as it is deemed approved in Business Central).
- A daily bank statement feed automatically creates a bank reconciliation. All you need to do is log in and process the bank reconciliation.
Processing Direct Credit EFT Transfers
You can process Direct Credit EFT Transfers to pay your vendors and employees or to process customer refunds. You create Direct Credit Transfers from the Payment Journal. The EFT Transfer for Direct Credit can support payments in the same currency as the bank account or cross-border payments (payments in a different currency to the bank account).
This article assumes you are already familiar with the Payment Journals in Business Central. If you have not worked with Payment Journals before, then it is recommended that you read the Business Central help.
The process to create an EFT Transfer for Direct Credit from start to finish is:
- Open the payment journal and select an empty batch.
- Prepare the journal.
- Review the journal.
- Generate the EFT.
- If applicable, wait for the journal to be approved.
- Export the EFT File and upload the file, or Send the file to the bank (if host-to-host integration is configured).
- Post the journal (if configured, this action can also send remittance advices).
- Send Remittance Advices.
Prepare the Payment Journal
Payments to Vendors
You use the Suggest Vendor Payments function to create a payment journal when you want to pay vendors. This function will suggest a payment line for all vendors with a balance due.
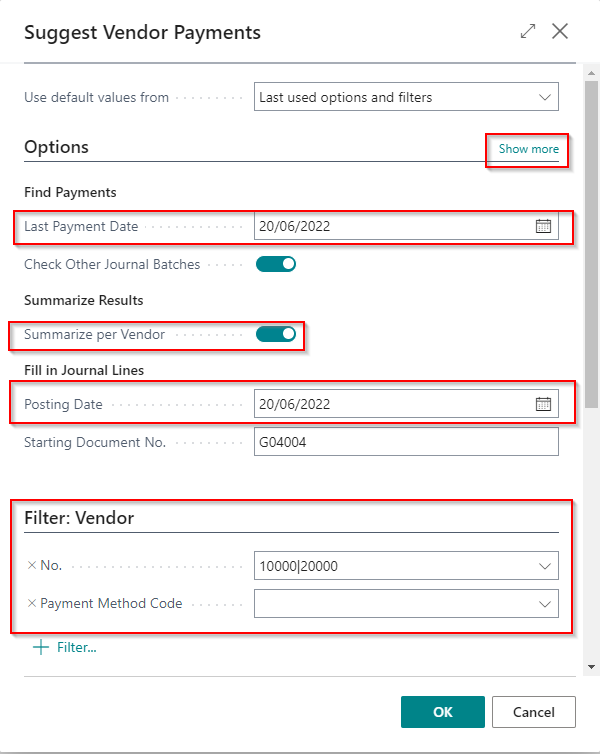
- The Last Payment Date is usually the same as the payment date. Business Central will only include invoices due on or before this date.
- Specify Summarize Per Vendor to create one line per vendor.
- The Posting Date is usually the same as the Last Payment Date.
- The Starting Document No. will default from the number series specified for your payment journal batch.
- Enable Skip Pending Approval/Missing Bank Accounts to skip the vendors that do not have a bank account or bank account that is part of an approval process.
- You can specify Vendor filters to limit which vendors get included.
If you use multi-currency functionality, then you need to ensure that all the lines created in the payment journal fit into one of these categories:
- All lines in the payment journal have the same currency as the bank account (local payment).
- All lines in the payment journal have a different currency to the bank account (cross border).
The categories above are defined in respect of the bank account currency, not the company's local currency. For example, if your company's local currency is NZD, but the bank account is a USD bank account, then a local payment for this bank account would be USD.
If you are running the Suggest Vendor Payments batch job for the first time, then please check the following options by clicking Show More...

- Bal. Account Type must be Bank Account.
- Bal. Account No. must not be specified.
Payments to Employees
You use the Suggest Employee Payments batch job when you want to make payments to your employees. This usually relates to expense claims.
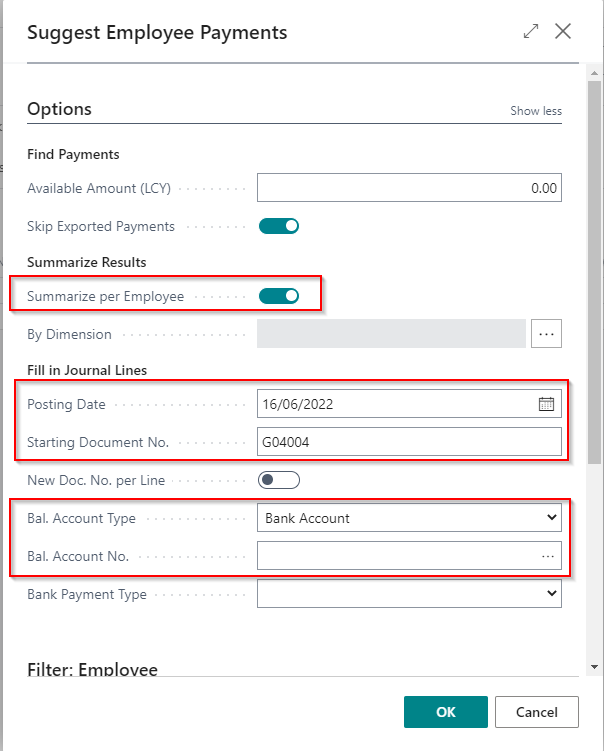
- The Posting Date is usually the same as the payment date.
- Specify Summarize Per Employee to create one line per employee.
- The Starting Document No. will default from the number series specified for your payment journal batch.
- Bal. Account Type must be Bank Account.
- Bal. Account No. must not be specified.
- You can specify Employee filters to limit which employees get included.
Payments to Customers
You use the Suggest Customer Payments batch job when you want to make payments to your customers. This usually relates to refunds when a customer has overpaid you or when you pass a credit after the customer paid for the original invoice.
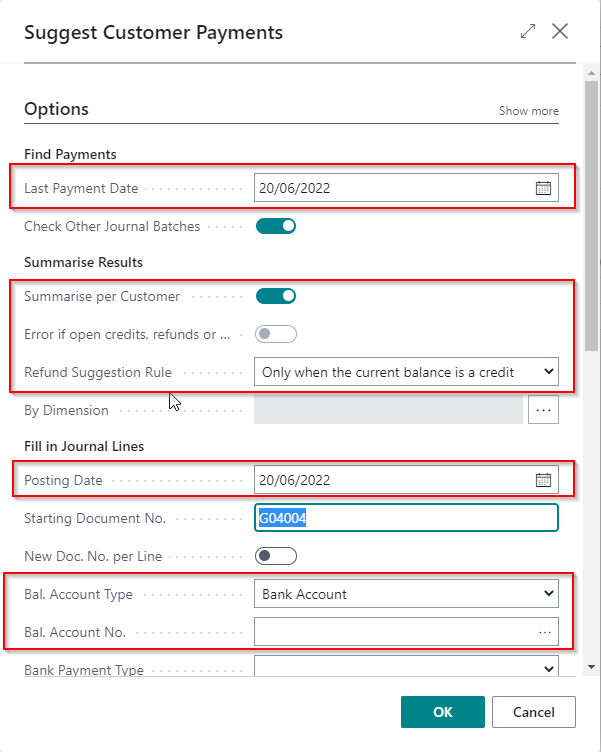
- The Last Payment Date is usually the same as the payment date. Business Central will only include credits due on or before this date.
- Specify Summarise Per Customer to create one line per customer.
- Error if open credits, refunds or payments - you can only specify this option if you do not summarise per customer. Specifies that the program will check that credits, refunds and payments are applied. We recommended that you specify this to avoid overpaying the customer.
- Refund Suggestion Rule - you can choose from the following options:
- Only when the current balance is a credit specifies that you will only include customers whose total balance is a credit. This is the default option.
- When the balance due is a credit specifies that you will refund customers if the balance due now is a credit. It applies even though they have a debit balance that is due later.
- The Posting Date is usually the same as the payment date.
- The Starting Document No. will default from the number series specified for your payment journal batch.
- Bal. Account Type must be Bank Account.
- Bal. Account No. must not be specified.
- Enable Skip Pending Approval/Missing Bank Accounts to skip the customers that do not have a bank account or bank account that is part of an approval process.
- You can specify Customer filters to limit which employees get included.
Create a journal manually
You can also create journal lines manually. This is not recommended because it is time-consuming and may not be as accurate. You will also have to apply the journal lines manually.
Each batch must only contain one account type. You cannot have a batch containing vendors and customers - these need to be processed as separate batches.
Review the payment journal
After suggesting the journal, you can remove lines and make changes to the journal if required.
Note the following:
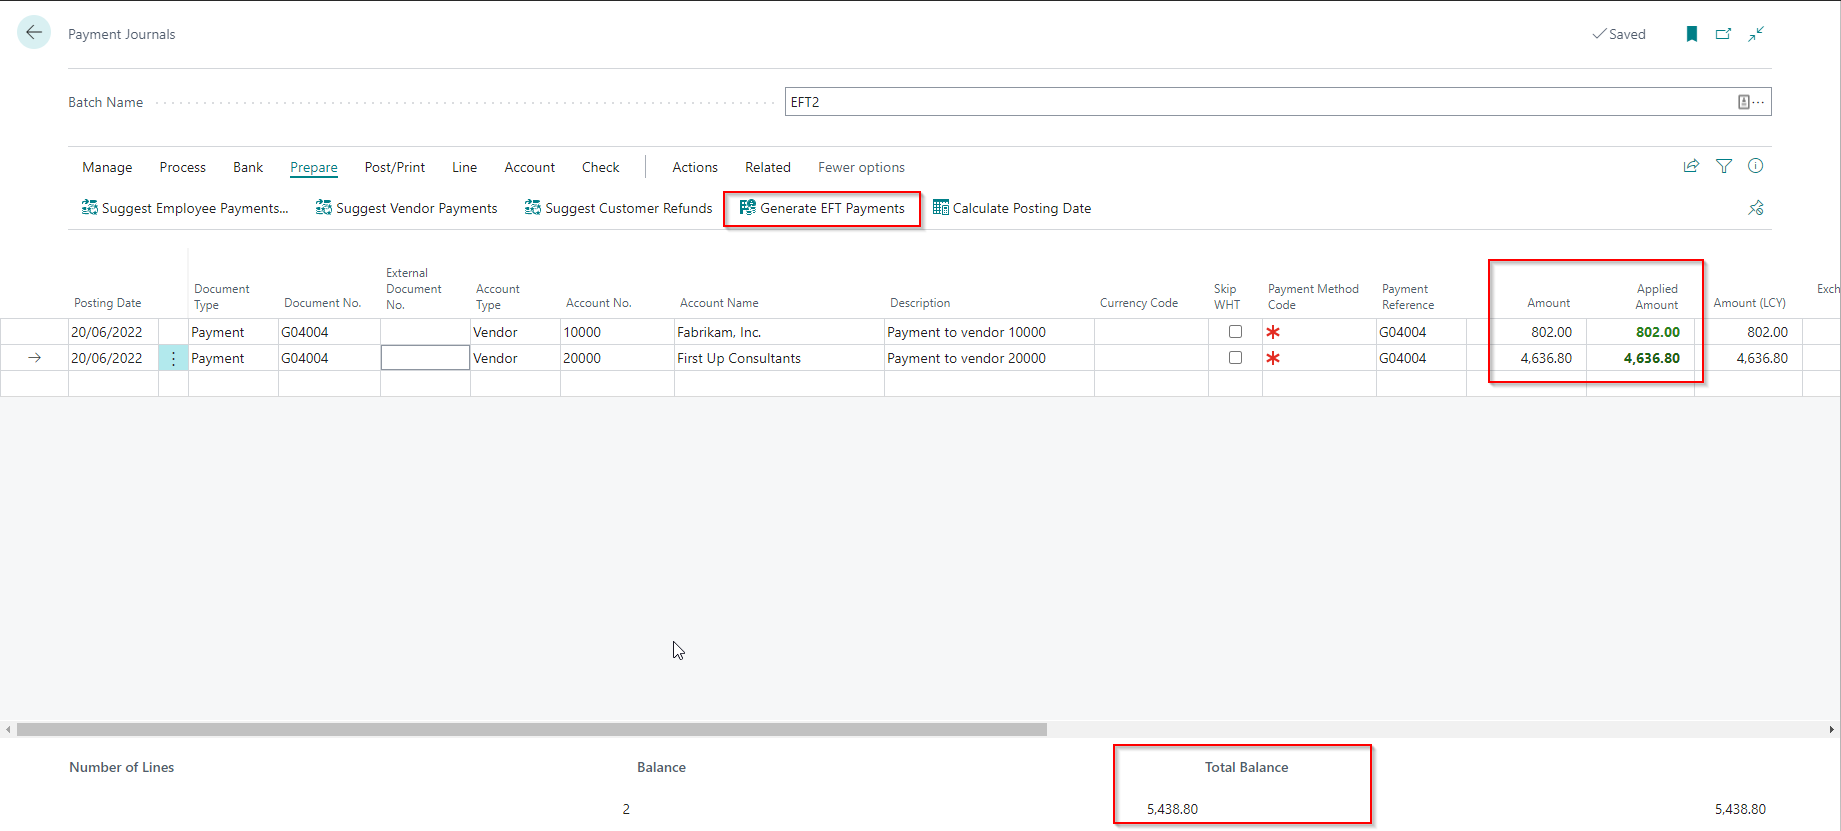
- The Amount represents the payment you will make to each Vendor/Customer/Employee.
- The Applied Amount shows the amount applied to vendor, customer or employee ledger entries. When you suggest payments, these will be equal.
- The journal should not be balanced at this stage. Therefore, the Total Balance will represent the total amount you will pay to all Vendors/Customers/Employees in this batch.
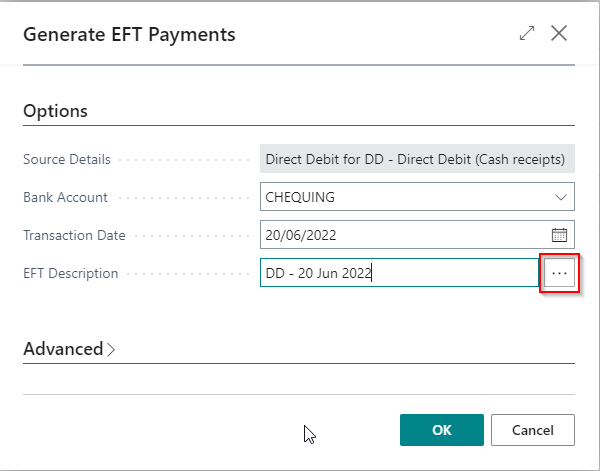
Generate EFT Payments
You can Generate EFT Payments when you have finished reviewing the journal.
The following details need to be specified:
- Bank Account - the bank account from which you will be making the transfer
- Transaction Date - this is the date you wish to make the payment. This date must be the current date or a future date.
- EFT Description - this is a description of the batch. You can enter a meaningful description or use the assist edit to specify a default value based on the batch name and payment date.
When you click OK, the following will occur:
- The journal lines will be validated to ensure that each account has an associated bank account.
- An EFT Transfer gets created with a line corresponding to every line in the journal.
- The balancing line gets added to the journal.
- If EFT Approvals are enabled, the EFT gets sent for approval.
Suppose the EFT Setup specifies that an approver must approve EFT Transfers. In that case, an error will occur if there is no active workflow. If you have not set up a workflow for EFT Approval, you can read about how to do this here.
Processing Direct Debit EFT Transfers
You can process Direct Debit EFT Transfers when you collect customer payments using direct debits. You create Direct Credit Transfers from the Cash Receipt Journal. The EFT Transfer for Direct Debit can only support direct debits in the same currency as the bank account.
This article assumes you are already familiar with the Cash Receipt Journals in Business Central. If you have not worked with Cash Receipt Journals before, then it is recommended that you read the Business Central help.
Prepare the Cash Receipt Journal
Suggest Customer Payments
You use the Suggest Customer Payments batch job to suggest customer payments.
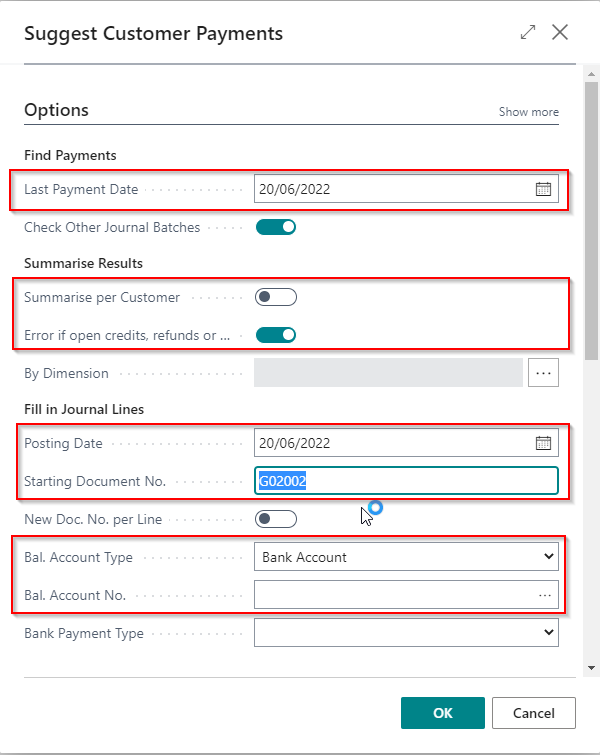
- The Last Payment Date is usually the same as the payment date. Business Central will only include debits due on or before this date.
- Specify Summarise Per Customer to create one line per customer.
- Error if open credits, refunds or payments - You can only specify this option if you do not summarise per customer. This option specifies that the program will check that credits, refunds and payments are applied. We recommended that you specify this to avoid excessively debiting the customers' bank accounts.
- The Posting Date is usually the same as the payment date.
- The Starting Document No. will default from the number series specified for your cash receipt journal batch.
- Bal. Account Type must be Bank Account.
- Bal. Account No. must not be specified.
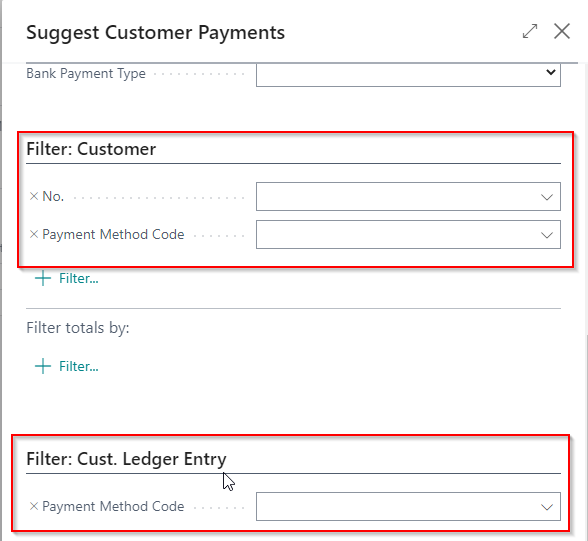
- You can specify Customer filters to limit which employees get included. For example, you can filter the payment method only to include customers configured for direct debit.
Suppose different types of transactions for customers have other payment methods. In that case, you can specify a filter on the Customer Ledger Entry's payment method instead of setting this as a customer filter.
Create a journal manually
You can also create journal lines manually. This is not recommended because it is time-consuming and may not be as accurate. You will also have to apply the journal lines manually.
Review the cash receipt journal
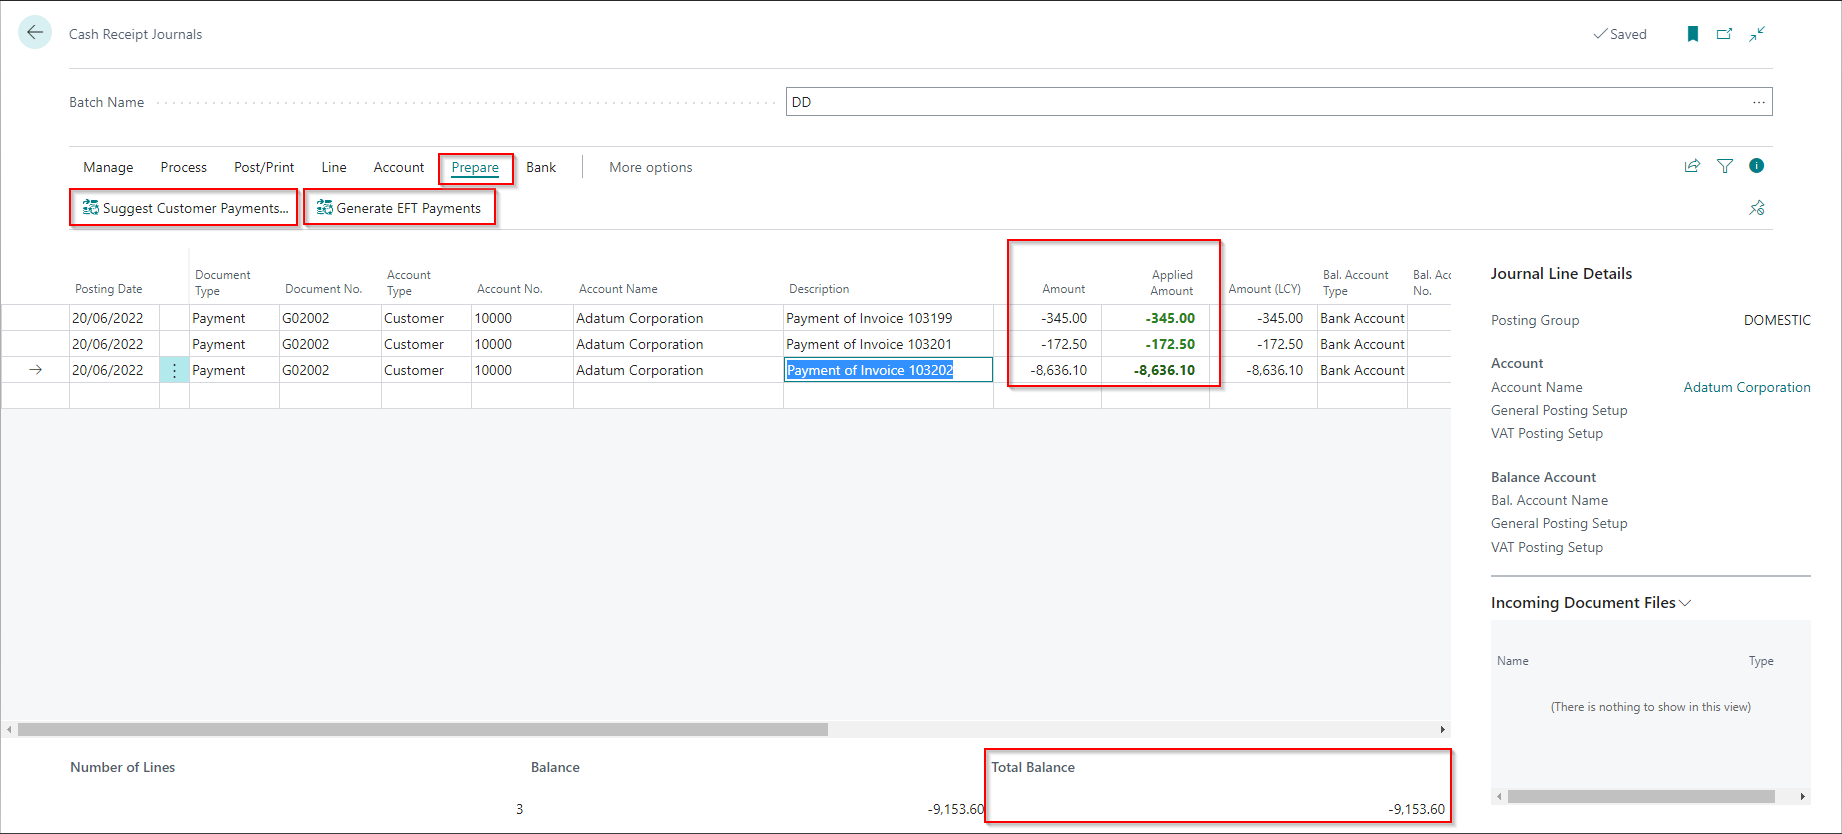
After suggesting the journal, you can remove lines and make changes to the journal if required.
Note the following:
- The Amount represents the payment amount you will debit to the customers' bank accounts.
- The Applied Amount shows the amount that will be applied to customer ledger entries. When you suggest payments these will be equal.
- The journal should not be balanced at this stage. Therefore, the Total Balance will represent the total amount that will be debited to all customers in this batch.
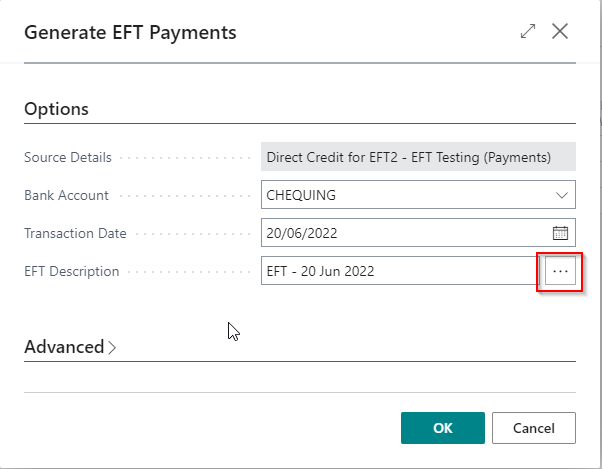
Generate EFT Payments
You can Generate EFT Payments when you have finished reviewing the journal.
The following details need to be specified:
- Bank Account - the bank account to which the funds will be credited.
- Transaction Date - this is the date on which the funds will be debited. This date must be the current date or a future date.
- EFT Description - this is a description of the batch. You can enter a meaningful description or use the assist edit to specify a default value based on the batch name and payment date.
When you click OK, the following will occur:
- The journal lines will be validated to ensure that each account has an associated bank account.
- An EFT Transfer gets created with a line corresponding to every line in the journal.
- The balancing line gets added to the journal.
- If EFT Approvals are enabled, the batch gets sent for approval.
Suppose the EFT Setup specifies that an approver must approve EFT Transfers. In that case, an error will occur if there is no active workflow. If you have not set up a workflow for EFT Approval, you can read about this here.
Reviewing and approving the EFT Transfer
You can access EFT Transfers from within the Payment and Cash Receipt Journals before the journal gets posted. You can also view them from the EFT Transfers list before and after the journal gets posted.
Reviewing the EFT Transfer from the Payment Journal
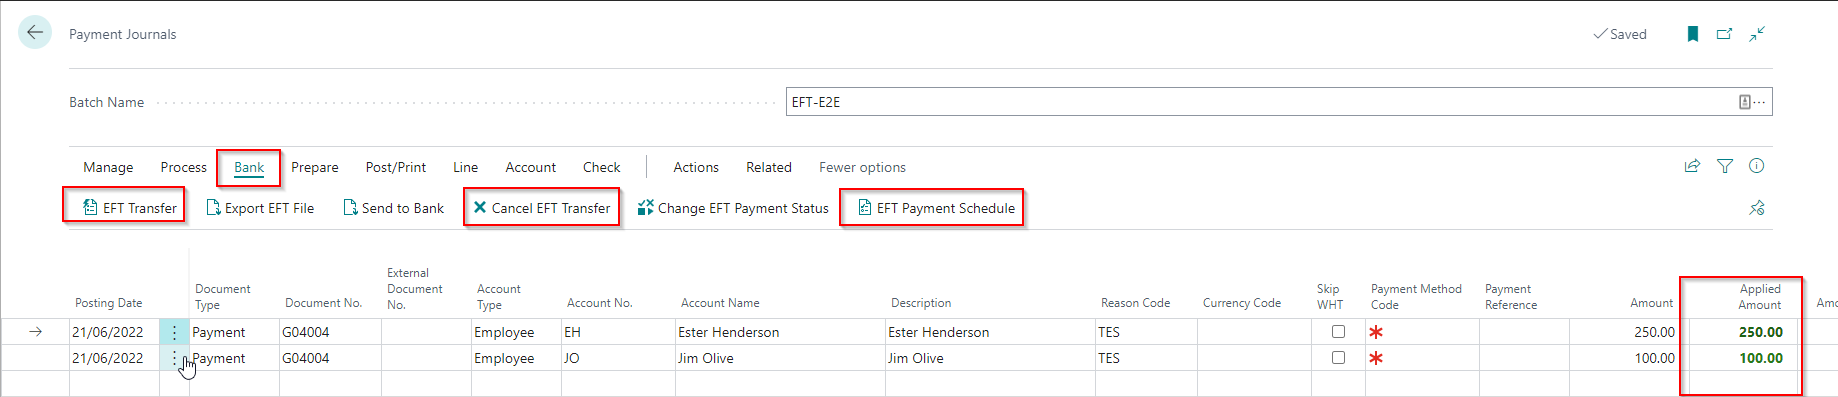
Note the purpose of the following actions/fields:
- EFT Transfer opens the EFT Transfer page where you can view the EFT Transfer and the account information.
- Cancel EFT Transfer cancels the EFT Transfer and any open approval requests.
- EFT Payment Schedule prints the EFT Transfer and the details of the accounts that will be credited/debited. This report also shows the hash total, which you can compare to the hash total shown in the bank after importing the file.
- Applied Amount shows you the total amount that will be applied. Usually, this should equal the amount on the line because you pay invoices that have been approved and posted.
The hash total is a vital control to check that someone did not change the EFT file before uploading it to the bank account. The hash-total printed on the EFT Payment Schedule should be identical to the hash-total displayed in your online banking.
You can review an EFT Transfer from a Cash Receipt Journal similarly.
EFT Transfer
The EFT Transfer page shows you the details of an EFT Transfer and the status. On this page, you can also do the following activities:
- Export the EFT File - exports the EFT file in the bank format provided the EFT Transfer has been approved.
- Send to Bank - if you have a host-to-host integration with your bank, this action will push the EFT file to the bank.
- Change EFT Payment Status - you can change the status of the EFT Transfer. For example, you can update the status when the file is uploaded to the bank and processed to prevent the EFT Transfer from being cancelled.
- Approval Entries - shows the EFT approvals done for this EFT Transfer if you have enabled Advanced EFT Approval.
- Send - sends the remittance advice to the vendors/customers/employees using the document sending profile for the selected lines.
- Print - prints the remittance advice to the vendors/customers/employees for the selected lines.
- Email - emails the remittance advice to the vendor/customer/employee on the current line. A confirmation opens first, and you can update the email before sending it.

EFT Approval
EFT Approval gets handled using the Business Central approval framework. Below is an example of an EFT Approval Request on the Requests to Approve page:

If you want to review the journal, select the Open Record action.
Upload EFT File or Send to Bank
You can either download
EFT Approval Entries
You can access the EFT Approval Entries from the EFT File Transfer list and page by clicking the Approval Entries action. You can also view limited details on the EFT Approval Entry fact box, which is also shown on the EFT File Transfer page. The entries in the EFT Approval table get created When EFT Transfers get approved. If there are multiple approvers, then each approval is recorded in this table.

The EFT Approval Entries table gets shared across all companies in the environment. The EFT Approval Entries page is filtered to show only entries for the current company.
EFT Approval Setup
The default setup for EFT Transfers specifies that approval is required to export the EFT Transfer to a file. You can also enable Advanced EFT Approval, which enforces approval limits and a minimum number of approvers.
EFT Setup (Approvals)
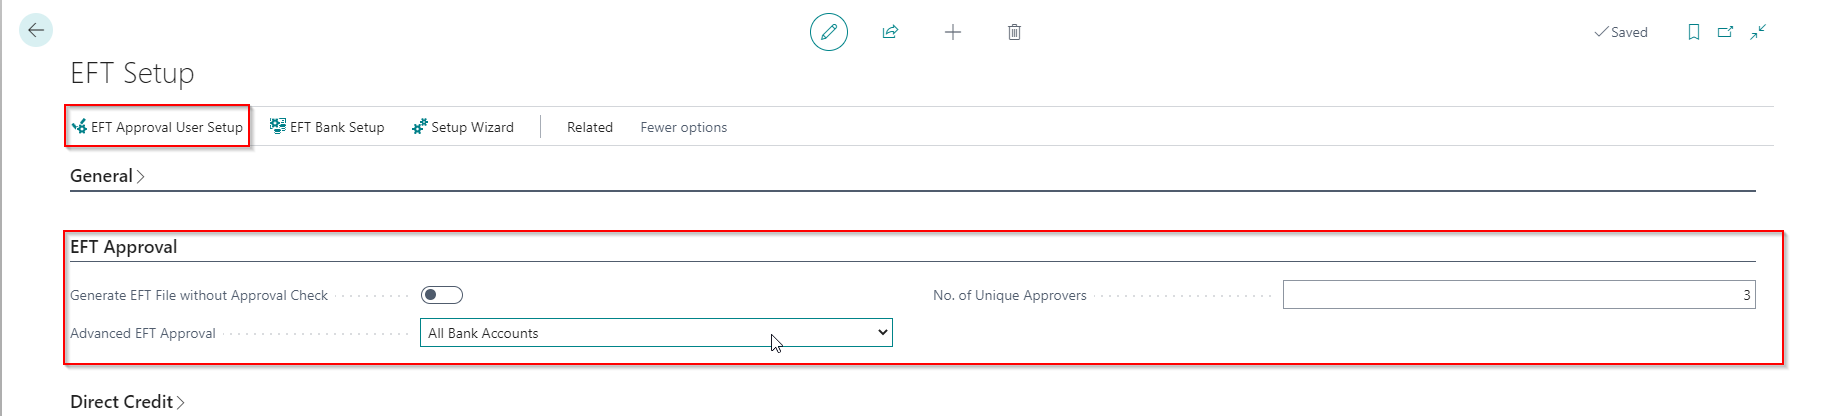
EFT Setup - Approval Fields
| Field | Details |
|---|---|
| Generate EFT File without Approval Check | Specifies if you want to disable EFT Approval in this company. |
| Advanced EFT Approval | Refer to the section below for more details on this field. |
| No. of Unique Approvers | Specifies the minimum number of unique approvers required to approve an EFT Transfer. You must enable advanced EFT Approvals to use this feature. |
You need to configure the EFT Approval Workflow if you do not disable EFT Approval. Details on how to do this can be found here.
Advanced EFT Approval
This field specifies if Advanced EFT Approval is enabled. The Advanced EFT Approval provides the following additional features:
- Specify the minimum number of unique approvers
- Specify EFT Approval limits per user. When validating the approval limit, the program also checks the amount already approved on other EFT Transfers so that you can enforce a daily limit.
- Specify alternative substitutes as well as additional substitutes
| Value | Purpose |
|---|---|
| Disabled | Specifies that the Advanced EFT Approval is disabled. |
| Per Financial Institution | Specifies that the approval limits get specified per financial institution and that the approval limits only apply to the current company. |
| Per Financial Institution (All Companies) | Specifies that the approval limits are specified per financial institution and validated across all companies. |
| All Bank Accounts | Specifies that the approval limits apply to all bank accounts and that the approval limits only apply to the current company. |
| All Bank Accounts (All Companies) | Specifies that the approval limits apply to all bank accounts and get validated across all companies. |
You can specify all bank accounts if you only process EFT Transfers from one financial institution.
EFT Approval User Setup
On this page, you configure the Approval Limits for EFT Approval. You only need to do this if you have enabled Advanced EFT Approval.

Fields
| Field | Description |
|---|---|
| Company Name | Specifies if the limit applies to the current company or if the limit applies to all companies. This field gets filled in based on the setting you have specified for Advanced EFT Approval on the EFT Setup, and you cannot change the value. |
| User ID | You need to specify setup for all users that can approve an EFT Transfer. You can only select users that have to exist in the Approval User Setup. |
| Financial Institute No. | Specifies the financial institute for which the limit applies. This field is compulsory if you have selected Per Financial Institution as a setting for Advanced EFT Approval. |
| Substitute | Specifies the substitute for the user. The substitute gets used when approvals get delegated. Substitute users also need to be configured on this page. |
| Additional Substitutes | Specifies the number of additional substitutes available for this user. You can configure additional substitutes for this user by selecting the Additional Substitutes action. |
| Currency Code | Specifies the currency in which the Approval Limit gets specified. The Currency Code is a compulsory field - even if the limits are in local currency. |
| Approval Limit (DC) | The approval limit for direct credit. This is the limit applicable for the period (usually one day). |
| Unlimited Approval (DC) | This user has no approval limit for direct credit. |
| Batch Approval Limit (DC) | Specifies the approval limit for a direct credit EFT Transfer Batch. |
| Approval Limit (DD) | The approval limit for direct debit. This is the limit applicable for the period (usually one day). |
| Appr. Limit Date Formula (DC) | Specifies the period for which direct credit the limit is applicable. If the limit is per day, then do not specify a value here. If the limit is for a period, you need to specify a value like -1W (Per Week). |
| Unlimited Approval (DD) | This user has no approval limit for direct debit. |
| Batch Approval Limit (DD) | Specifies the approval limit for a direct debit EFT Transfer Batch. |
| Appr. Limit Date Formula (DD) | Specifies the period for which direct debit the limit is applicable. If the limit is per day, then do not specify a value here. If the limit is for a period, you need to specify a value like -1W (Per Week). |
Additional Substitutes
Here you specify additional substitutes. You can optionally specify the Preferred Sequence to guide the users when delegating an approval.

Creating a workflow for EFT Approval
The EFT Approval uses the General Journal Batch Approval Workflow as a base with some added responses.
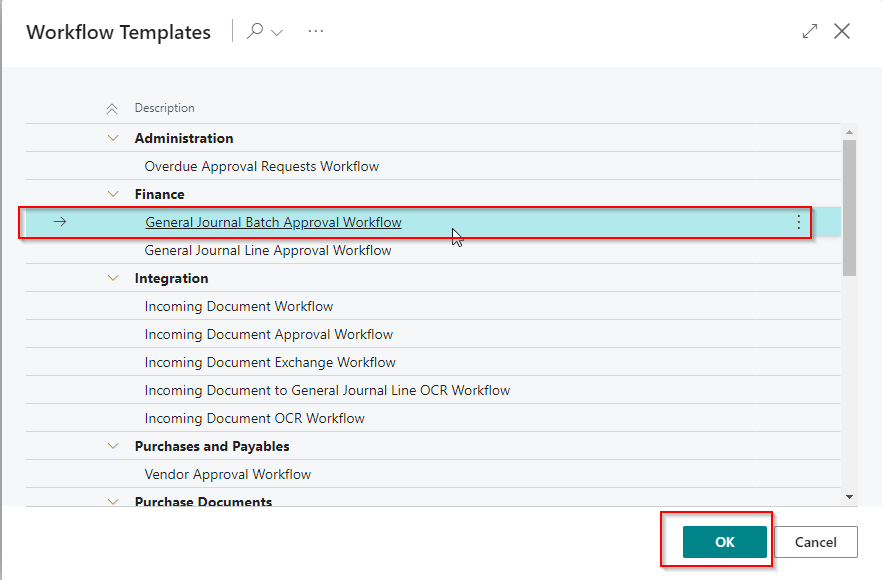
Create a new workflow
- Open the Workflows page and select New Workflow from Template.
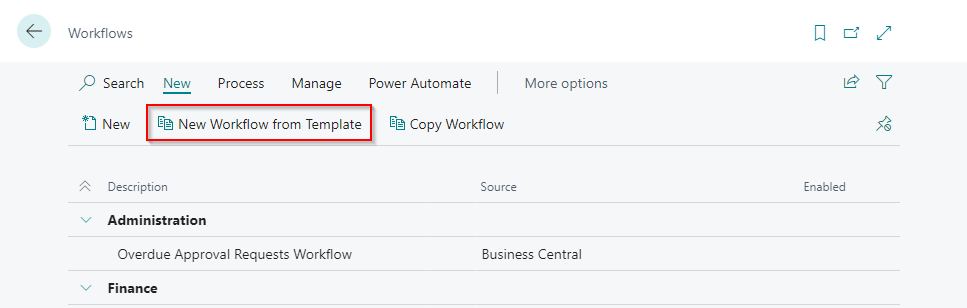
- Select General Journal Batch Approval Workflow and click OK.
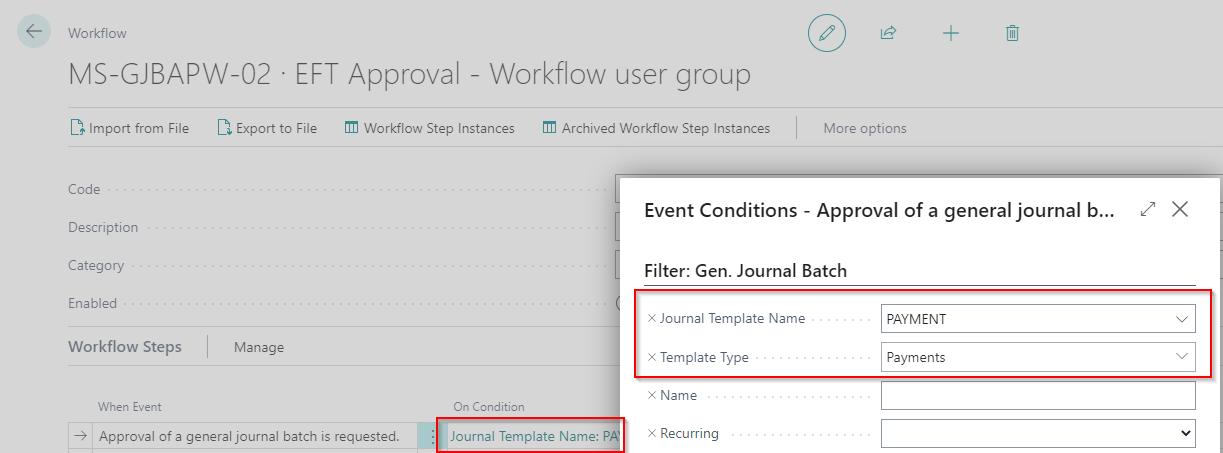
Workflow description and conditions
- Update the description of the workflow to a meaningful description

- Update the conditions so that the workflow only applies for EFT
Workflow responses
The EFT Approval Workflow requires additional responses to update the EFT File Transfer and apply the Advanced EFT Approval business logic.
- The following events require additional responses to be added:
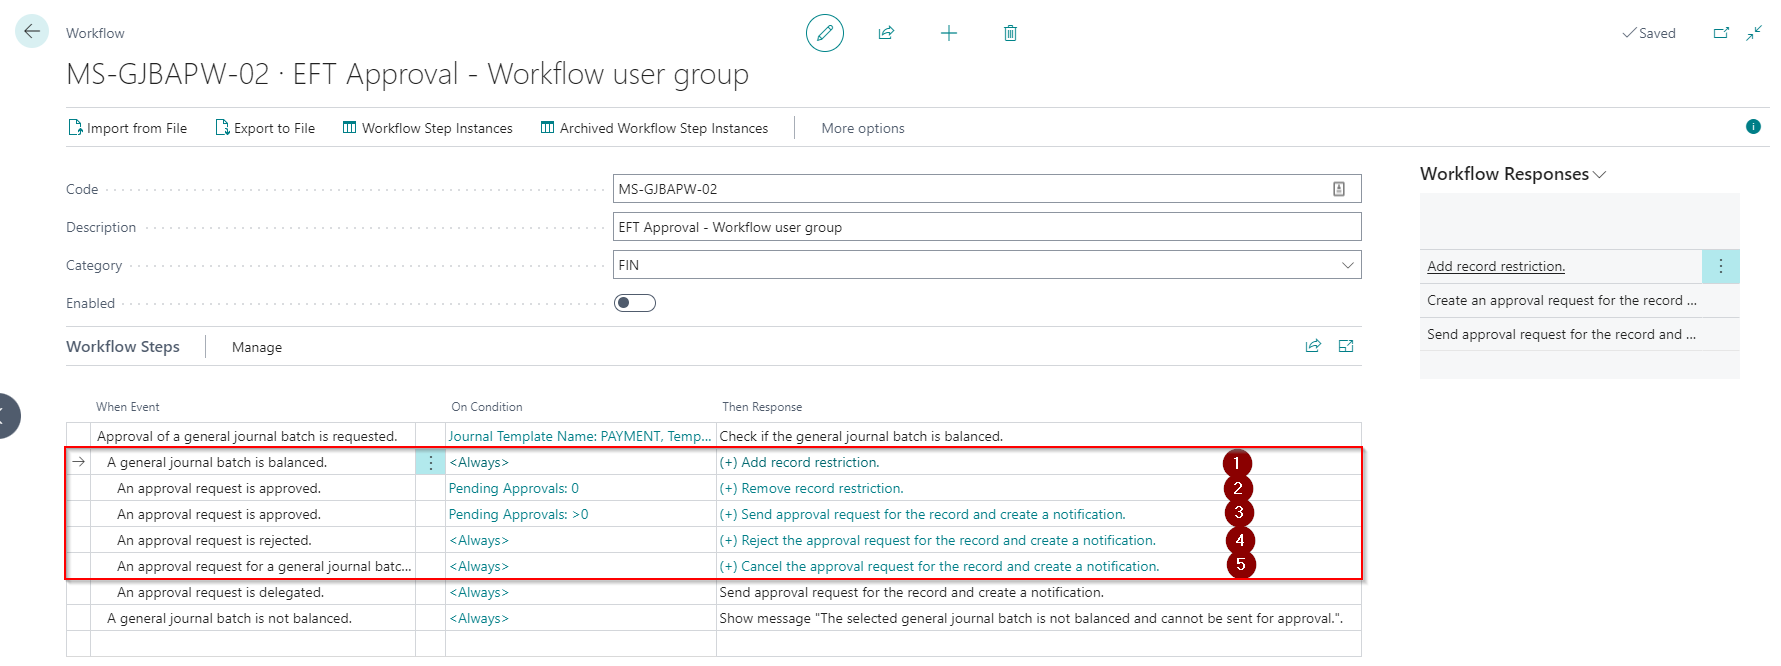
- A general journal batch is balanced (1)
When configuring the EFT Workflow, you can select the following options for Approver Type / Approver Limit Type:
- Approver / Direct Approver
- Approver / Specific Approver
- Approver / Approver Chain (only if Advanced EFT Approval is configured)
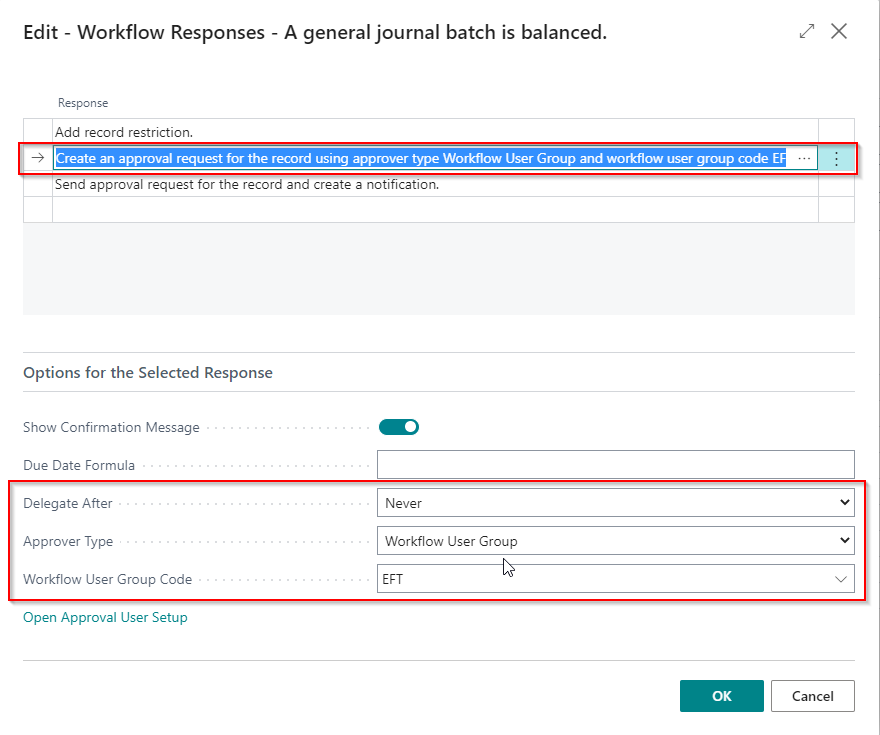
- Workflow User Group - this option usually gets selected when the EFT Approval needs to get directed to different users than when approving other documents.
When enabling Advanced EFT Approval with the minimum number of unique approvers, you must ensure that the workflow user group contains at least the minimum number of approvers.
- An approval request is approved (Pending Approvals: 0) (2)
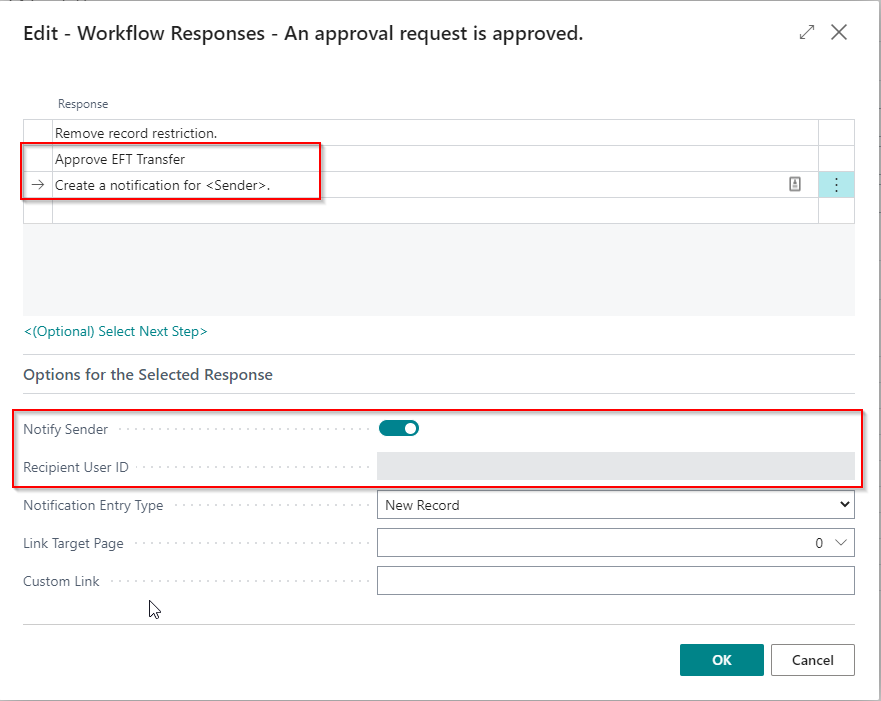
- An approval request is approved (Pending Approvals: >0) (3)
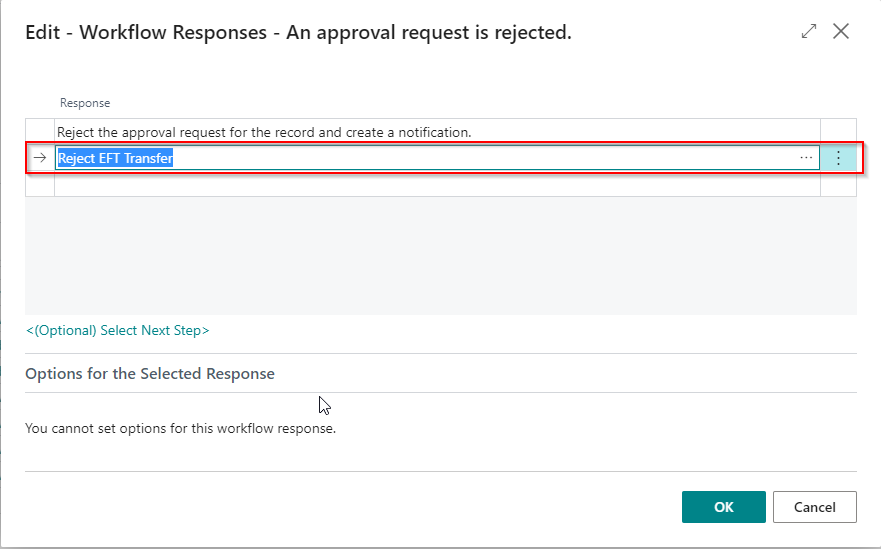
- An approval request is rejected (4)
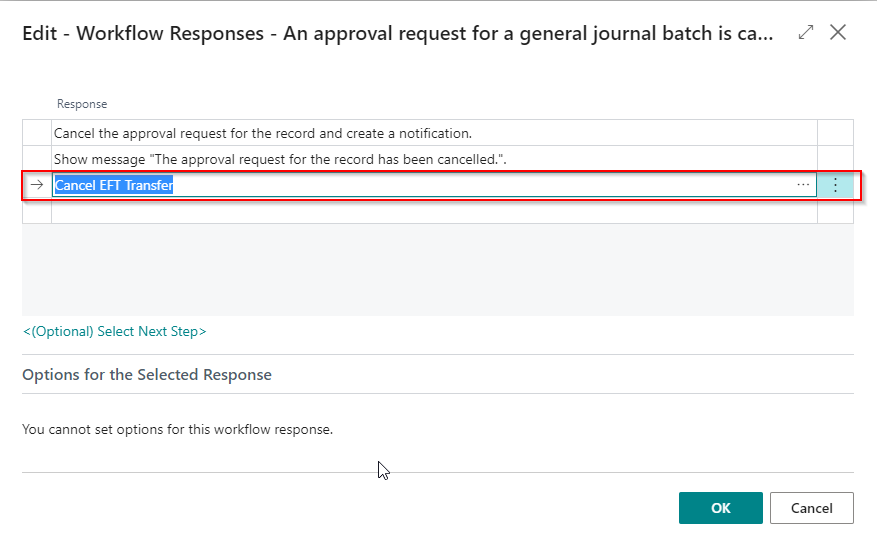
- An approval request is cancelled (5)
The example above shows how to set up a workflow for Direct Credit. If you use Direct Debit and enable EFT Approvals, you must create a separate workflow to handle Direct Debit.